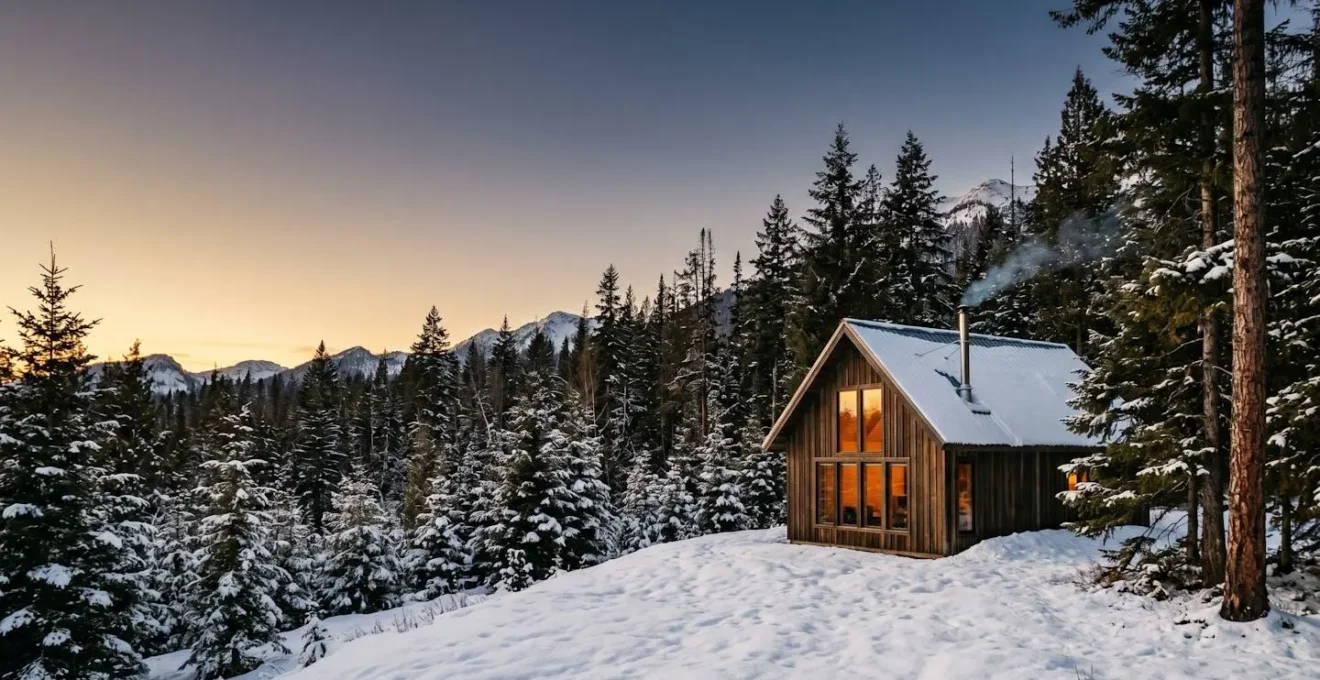
The cozy cabin you see online could be a thermal liability in disguise, leaving you cold and overpaying for comfort.
- Electric baseboards can cost more than double what a good wood stove does to produce the same amount of heat.
- Telltale signs of poor insulation, like condensation between window panes, are visible in rental photos if you know what to look for.
- The orientation of the cabin (south-facing vs. north-facing) is a critical factor in its ability to heat itself for free during the day.
Recommendation: Stop booking on hope. Adopt an inspector’s mindset to analyze a rental’s heating system, insulation, and even its firewood supply before you commit.
The allure of a winter cabin is powerful: a secluded retreat, snow falling outside a picture window, and the radiant warmth of a crackling fire. But for every idyllic postcard scene, there’s a vacationer’s nightmare—arriving at a beautiful but bone-chilling cabin with a heating system that can’t keep up. The typical advice is to « pack layers » or « ask the owner, » but this approach makes you a passenger to fortune. You’re gambling your comfort and money on the owner’s word or, worse, their lack of investment in proper insulation and heating.
This ends now. It’s time to shift your perspective from that of a hopeful renter to a sharp-eyed remote inspector. The key to guaranteeing a warm, comfortable stay isn’t found in the blankets you pack, but in the thermal forensics you conduct before you even click « book. » Many assume that evaluating a cabin’s thermal efficiency is impossible from afar. They believe you must be physically present to feel drafts or check insulation. This is a costly misconception.
The truth is, rental listings are filled with clues. The type of heating system listed, the reflections in the windows, the state of the firewood pile, and even the direction the cabin faces are all data points. The real key isn’t just knowing that a wood stove is good; it’s knowing how to spot the signs of a wet wood scam that renders that stove useless. It’s understanding that the presence of heavy drapes might be a red flag, not a decorative choice. This guide will arm you with an inspector’s checklist to deconstruct a rental listing, identify thermal weaknesses, and calculate the true cost of comfort. We will analyze heating systems, dissect window integrity through photos, evaluate fuel quality, and even plan for the worst-case scenario of a power outage, ensuring your winter escape is defined by warmth, not regret.
This article provides a detailed inspection framework to vet any potential winter cabin rental. By understanding these critical checkpoints, you can move from hoping for a warm stay to ensuring one. The following sections break down each element you need to scrutinize.
Summary: Your Guide to Vetting a Winter Cabin’s True Warmth
- Why electric baseboards cost a fortune compared to wood stoves?
- How to check window seals in photos before renting?
- The wet wood scam: How to recognize unseasoned logs?
- South vs North facing: Which saves heating during the day?
- When power fails: What to pack to stay warm in a cabin?
- Yurt or Geodesic Dome: Which structure offers better insulation in winter?
- Gas vs Alcohol: Which poses a lower carbon monoxide risk in vestibules?
- The 2-Week Timeline: How to Prep a Family Camping Trip without Panic?
Why electric baseboards cost a fortune compared to wood stoves?
The first item on your inspection list should be the heating system itself. A listing that proudly advertises « electric heat » might sound modern and convenient, but for a winter cabin, it should be a significant red flag requiring further investigation. Electric baseboard heating is notoriously inefficient from a cost perspective, functioning as a « heating liability » that can impact your comfort. While they convert electricity to heat at nearly 100% efficiency inside the room, the grid-level generation of that electricity is often only around 30% efficient, making it a costly energy source.
The numbers are stark. To produce one million BTUs of heat—a standard unit of energy—electric baseboards can be wildly more expensive than other options. A fuel cost analysis shows that electric baseboard heat can cost $36.05 per million BTU, whereas using firewood in an EPA-compliant wood stove costs only $16.23. That’s more than double the price for the same amount of heat. If heating costs are billed separately, this directly hits your wallet. If they are included, it incentivizes the owner to set the thermostat punishingly low to save money, leaving you to « wear more layers » to compensate for their high operating costs.
A wood stove, by contrast, provides powerful radiant heat that warms objects and people directly, creating a deep sense of comfort that electric convection heat struggles to match. The key, however, is that it must be a modern, well-maintained stove paired with quality fuel. An old, inefficient stove or wet wood negates these benefits entirely. When you see a wood stove in a listing, your inspection has just begun, not ended.
The following table, based on data from various heating cost analyses, illustrates the dramatic difference in annual expenses. It highlights why identifying the heating source is a crucial first step in your pre-booking audit.
| Heating System | Average Annual Cost (Massachusetts) | Heat Distribution | Efficiency |
|---|---|---|---|
| Electric Baseboard | $4,511 | 100% (convection, localized) | 100% conversion but grid generation ~30% |
| Natural Gas | $983 | Varies by system | Combustion 78-95% |
| Wood Stove (EPA-certified) | $900-$1,200 (estimated 6 cords) | Radiant heat from central source | 70-85% |
Therefore, when you’re scanning listings, view a wood stove as a potential asset and electric baseboards as a potential liability that demands closer scrutiny of the cabin’s other thermal features.
How to check window seals in photos before renting?
After identifying the heating system, your focus must shift to where that precious heat is most likely to escape: the windows. A powerful furnace is useless if it’s fighting a losing battle against a poorly sealed building envelope. Windows are the weakest link in a cabin’s insulation, and their condition is a direct indicator of the owner’s attention to maintenance and efficiency. In fact, a significant portion of a home’s energy loss can be attributed to them; the U.S. Department of Energy estimates that poorly sealed windows can account for 25% to 30% of heating energy loss.
This is where your remote inspection skills—your thermal forensics—come into play. You don’t need to feel a draft to spot a bad window; you just need to scrutinize the listing photos. The most damning piece of evidence is condensation or fog between the panes of a double-pane window. This is an undeniable sign of a failed seal. When the inert gas barrier is gone, the window has lost virtually all its insulating R-value, making it little better than a single pane of glass. It’s a thermal hole in the wall.
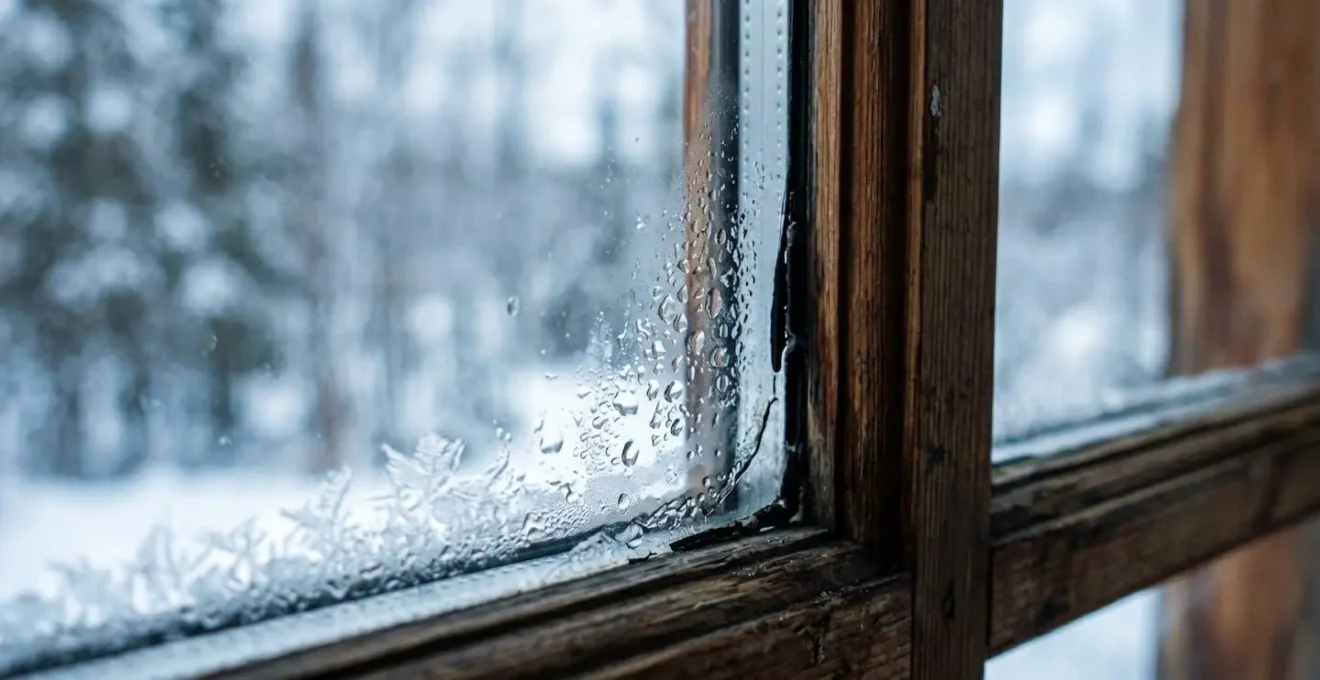
As the image above demonstrates, this failure is often visible as a hazy film or even droplets trapped inside the glass. Beyond this, look for other clues. Are the reflections in the glass crisp and singular, suggesting modern, efficient glass? Or are they distorted and doubled, hinting at older, less effective windows? Also, inspect the frames. Peeling paint, visible gaps, or significant weathering are red flags. Finally, be suspicious of heavy, floor-to-ceiling thermal curtains in every photo. While they can be a cozy feature, they are also an excellent way for owners to hide notoriously drafty windows from renters. An owner who is confident in their windows often shows them off.
Don’t be shy about asking the owner directly: « Are the windows double-pane, and have any of the seals failed? » An honest owner will give a straight answer. A vague or defensive response is as revealing as a foggy window pane.
The wet wood scam: How to recognize unseasoned logs?
You’ve found a cabin with a beautiful, modern wood stove. This is a huge asset, but it comes with a major caveat: the stove is only as good as the wood you feed it. Many renters are duped by what can be called the « wet wood scam »—a pile of logs that looks plentiful but is too green or waterlogged to burn efficiently. Burning unseasoned wood is not just frustrating; it’s a waste of energy. The fire must first boil off the excess water, a process that consumes a huge amount of heat and produces a smoldering, smoky fire that provides little warmth and creates dangerous creosote buildup in the chimney.
The industry standard for properly seasoned firewood is clear. To burn efficiently and produce maximum heat, wood must have a moisture content below 20 percent. Freshly cut « green » wood can have a moisture content of 50% or more. Asking the owner « Is the wood seasoned? » is a start, but their definition of « seasoned » may be lax. A better question is, « When was the wood split and stacked? » Wood needs at least six to nine months of proper storage to season correctly.
If photos of the woodpile are available, look for signs of properly aged wood. Seasoned logs are typically a faded grayish or yellowish color, not bright white or tan. They often have visible cracks, known as « checks, » radiating from the center of the cut ends. The bark should be loose or have fallen off in places. A pile of bright, clean-looking logs with tight bark is likely too fresh. While it’s impossible to be certain from a photo, you can spot obvious red flags.
Upon arrival, a few simple field tests can confirm your suspicions:
- The Knock Test: Strike two logs together. Seasoned wood will make a sharp, hollow « clack » or « ping. » Wet wood produces a dull, unsatisfying « thud. »
- The Weight Test: Seasoned wood is noticeably lighter than green wood of the same size because it has lost a significant amount of water weight.
- The Burn Test: If you can test a piece, watch for hissing and sizzling sounds as water boils out of the wood. A difficult-to-ignite log that produces excessive, dirty smoke is a clear sign of high moisture.
A good wood stove is a promise of warmth. Ensuring the fuel can deliver on that promise is your responsibility as an inspector.
South vs North facing: Which saves heating during the day?
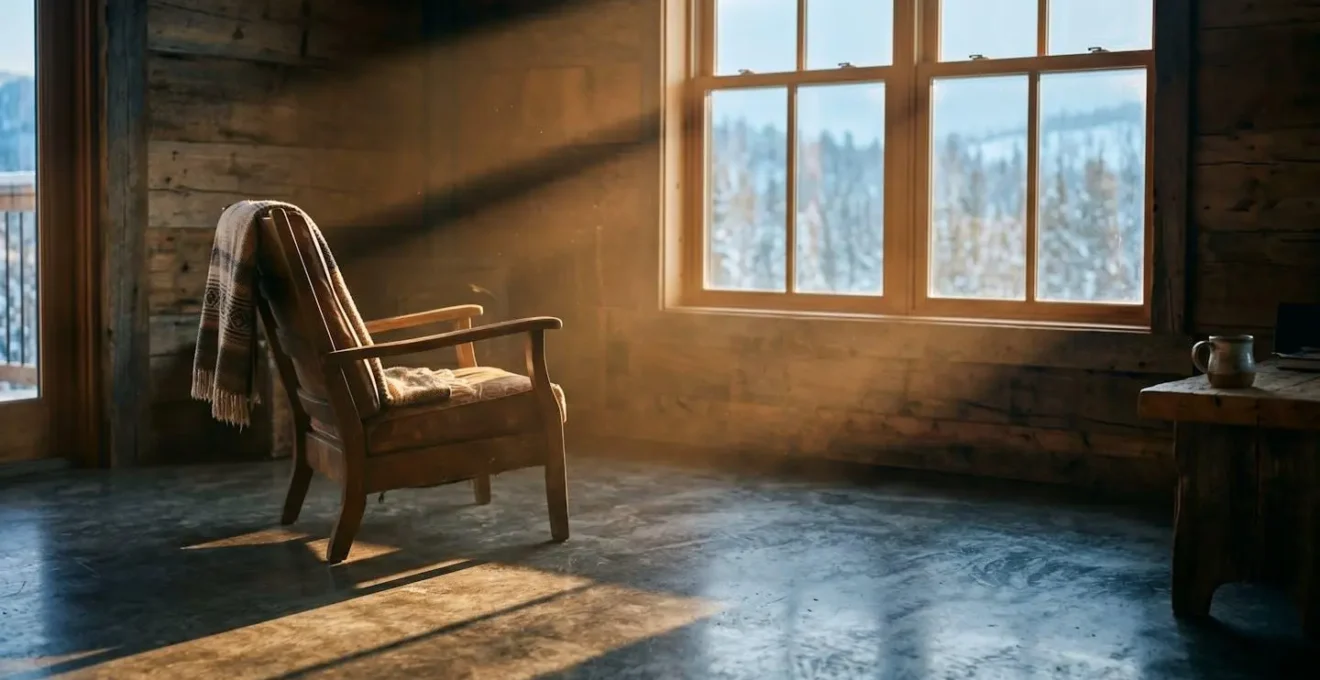
One of the most overlooked yet powerful factors in a cabin’s thermal performance is its orientation to the sun. A cabin designed with large, south-facing windows can leverage the power of passive solar gain, effectively using the sun as a free, secondary furnace during daylight hours. This is not a minor detail; it’s a fundamental architectural strategy that can dramatically reduce the heating load on the primary system. In the northern hemisphere, the winter sun travels low across the southern sky, allowing its rays to penetrate deep into a home through south-facing glass.
The impact of this free heat can be immense. Depending on the design and location, research shows that buildings with glazing on south facades can receive 20-90% or more of their space heating from the sun. This means a well-oriented cabin will be naturally warmer, more comfortable, and require significantly less energy to maintain its temperature during the day. Conversely, a cabin with its main windows facing north will receive almost no direct sunlight in winter, making it inherently colder and more reliant on its mechanical heating system.
When reviewing a listing, use the map view and satellite imagery to determine the cabin’s orientation. Look for listings that feature bright, sun-drenched interiors. If the photos show long shadows cast across the floor on a sunny day, it’s a strong indicator of good solar exposure.
Case Study: Passive Solar Performance in Colorado
A classic passive solar home built in Climate Zone 5 Colorado demonstrated the real-world impact of orientation. Its large south-facing windows, paired with a tiled concrete floor to act as thermal mass (absorbing heat during the day and releasing it at night), provided the majority of its winter heating needs. The upstairs rooms required supplemental heating on only about one-third of mid-winter nights, while the main floor almost entirely eliminated the need for active heating during the day.
A cabin with significant south-facing glass isn’t just a rental; it’s a thermally intelligent structure. Prioritizing these properties in your search is one of the smartest moves you can make to ensure a warm and energy-efficient stay.
When power fails: What to pack to stay warm in a cabin?
Even in the most well-vetted cabin, you must prepare for the unexpected. Winter storms can knock out power, and in a rural or remote location, it may not be restored for hours or even days. If the cabin relies solely on electric heat, a power outage is not an inconvenience—it’s a serious safety issue. Your pre-trip inspection must include an evaluation of the cabin’s backup systems, and your packing list must include a contingency plan for warmth.
The most critical question to ask the owner is, « What is the secondary, non-electric heat source? » The gold standard is a wood-burning or propane stove. If the answer is « none, » you must treat that cabin with extreme caution and be prepared to be entirely self-sufficient for heat. As experts from Lake.com’s heating systems guide note, « Having a secondary heating system like a wood-burning stove is recommended in the event the power goes down. » Without one, the responsibility for staying warm falls entirely on you.
Your emergency heating kit should be built around safety and efficiency. Never, under any circumstances, use outdoor equipment like a charcoal grill, standard propane burner, or camp stove inside an unventilated space. They produce lethal levels of carbon monoxide. Instead, your kit should include:
- An Indoor-Safe Heater: Invest in a portable propane heater specifically designed for indoor use, such as a Mr. Heater Buddy. These units have critical safety features like automatic tip-over shutoff and a low-oxygen sensor.
- The Indoor Thermal Cocoon: Don’t try to heat the entire frigid cabin. Instead, create a microclimate. Pack a small pop-up tent to set up over your bed, or be prepared to build a structured blanket fort. This traps your body heat in a tiny, manageable space.
- Hot Water Bottles: A simple, perfectly safe, and highly effective tool. Bring at least two per person. Filled with hot water (heated on an indoor-safe stove), they can pre-warm a sleeping bag for hours or keep your core warm.
- A CO Detector: A portable, battery-powered carbon monoxide detector is a non-negotiable piece of safety equipment if you plan to use any combustion-based emergency heat.
A proper contingency plan transforms a potential emergency into a manageable situation, ensuring your safety and relative comfort no matter what the weather brings.
Yurt or Geodesic Dome: Which structure offers better insulation in winter?
When considering more unconventional cabin structures like yurts or geodesic domes, the principles of thermal efficiency still apply, but they manifest differently. The question isn’t simply which shape is « better, » but which one has been outfitted with a superior insulation package. The effectiveness of any structure against the cold comes down to its ability to resist heat transfer, a quality measured by its R-value.
Insulating materials have varying levels of thermal resistance (R-value), with higher values indicating better insulation quality. In cold climates, investing in high-R-value insulation for your cabin minimizes heat loss and improves energy efficiency.
– Sonny’s Hideaway, The Benefits of Fixing Up and Renovating Your Winter Cabin Rental Property
Theoretically, a geodesic dome holds an advantage. Its spherical shape encloses the maximum amount of interior volume with the minimum amount of exterior surface area. This low surface-area-to-volume ratio means there is less skin exposed to the cold, and therefore, less opportunity for heat to escape. A yurt, being cylindrical with a conical roof, has a greater surface area for the same amount of interior space.
However, this theoretical advantage is meaningless if the dome is poorly insulated. Real-world performance is dictated entirely by the quality of the insulation system. A modern yurt equipped with a multi-layer arctic insulation package, often including felt, foam, and a radiant barrier like Reflectix, can vastly outperform a dome with a thin or poorly installed insulation layer. The radiant barrier is particularly crucial, as it reflects body heat and stove heat back into the living space instead of letting it escape.
Analysis: Insulation Package Trumps Structural Theory
While geodesic domes offer a superior surface-area-to-volume ratio for energy efficiency, their performance is critically dependent on the insulation. A yurt with a modern multi-layer arctic insulation system will consistently outperform a poorly insulated dome. The key is to move beyond the structure’s shape and investigate the specifics of its thermal protection. The critical questions for any yurt or dome rental owner are: « What is the R-value of the wall and roof insulation? » and « Does the insulation package include a radiant barrier layer? »
Ultimately, don’t be swayed by a shape. Demand data on the insulation package. An owner who can’t provide the R-value or describe the layers of insulation is an owner who likely hasn’t prioritized four-season comfort.
Gas vs Alcohol: Which poses a lower carbon monoxide risk in vestibules?
When using a small stove for cooking in an enclosed space like a cabin’s vestibule or a well-ventilated tent, a common concern is the risk of carbon monoxide (CO) poisoning. Renters might wonder if one fuel type, such as canister gas (isobutane/propane) or denatured alcohol, is inherently safer than the other. The answer is an unequivocal no. This is a critical point of safety that allows no room for misunderstanding.
ALL combustion fuels (gas, alcohol, white gas) produce deadly Carbon Monoxide (CO) in an oxygen-deprived environment. The primary risk factor is ventilation, not the fuel type itself.
– Multiple camping safety sources, Carbon monoxide safety consensus
The danger does not come from the fuel, but from incomplete combustion, which occurs when there is not enough oxygen for the fuel to burn cleanly. Both gas and alcohol stoves consume oxygen and release carbon monoxide. The idea that one is « safer » than the other is a dangerous myth. The only factor that mitigates this risk is adequate ventilation. A vestibule or any enclosed area must have a source of fresh air, such as a partially open door or window, to replenish the oxygen being consumed by the stove.
While the CO risk is identical, the stoves themselves have different characteristics. Alcohol stoves are simpler, unpressurized systems. A malfunction often just results in the flame going out. However, their flame can be nearly invisible in daylight, posing a burn risk. Canister gas stoves are pressurized and more complex, meaning a failure can be more dramatic, but they are highly efficient. Regardless of these differences, the safety protocol for CO is non-negotiable and identical for both:
- Rule 1: Ensure Cross-Ventilation. Always have vents or openings on opposite sides of the space to allow fresh air to flow through. Even in the cold, this is not optional.
- Rule 2: Use a CO Detector. A portable, battery-powered carbon monoxide detector is your only true safety net. It should be placed near the area where you are sleeping or operating the stove.
Your safety depends not on the fuel you choose, but on your unwavering commitment to providing your stove—and yourself—with sufficient oxygen.
Key Takeaways
- A cabin’s heating system is a primary indicator of potential comfort and cost; electric baseboards are often a financial and thermal liability compared to a well-maintained wood stove.
- You can perform « thermal forensics » from afar by scrutinizing rental photos for signs of failed window seals, poor insulation, and even the quality of the firewood.
- The cabin’s orientation is a critical, free source of heat. Prioritizing properties with large, south-facing windows can drastically improve daytime warmth through passive solar gain.
The 2-Week Timeline: How to Prep a Family Camping Trip without Panic?
After you’ve done the meticulous work of inspecting and selecting the perfect, thermally-sound cabin, the final phase begins: preparing for the trip itself. A common pitfall is to relax after booking, only to descend into a panic of last-minute packing and planning. Applying the same methodical, inspector-like mindset to your preparation can eliminate this stress. A structured timeline transforms the overwhelming task of « getting ready » into a series of manageable steps, ensuring nothing critical is forgotten.
The key to a zero-stress departure is delegation and hands-on testing. The burden of preparation should not fall on one person. By assigning clear domains of responsibility—gear, food, entertainment—you distribute the workload and create accountability. Furthermore, discovering that a tent pole is broken or you’re out of stove fuel in your backyard is a minor inconvenience. Discovering it at a remote cabin in the middle of winter can be a trip-ruining disaster. A pre-trip test run of all essential equipment is not optional; it’s a critical systems check.
This structured approach ensures that by the time you’re ready to leave, the process is smooth and automated, not chaotic. You’ve already solved the problems and packed the majority of your gear. The final day is for final checks and heading out the door with confidence, ready to enjoy the warm, well-chosen cabin you worked so hard to find.
Your Pre-Trip Panic-Proof Action Plan
- Week 2 (T-14 Days) – The Big Rocks & Delegation: Focus exclusively on three critical tasks: confirming your booking and time off, and assigning specific planning domains (e.g., ‘Dad is Head of Gear’, ‘Mom is Head of Food’, ‘Kid 1 is Head of Entertainment’). This prevents single-point-of-failure planning.
- Week 1 (T-7 Days) – The Backyard Test Run & Skill-Up: Conduct hands-on preparation. This includes a full test-pitch of any tents, a practice session with the camp stove, and a fire-starting challenge. This builds confidence and surfaces broken or missing gear before it becomes critical.
- Final 24 Hours – The Zero-Stress Departure Protocol: Load 80% of the vehicle the night before. Prepare a pre-made ‘grab-and-go’ breakfast. Assign a ‘Last Person Out’ responsible for a final house sweep with a checklist to prevent forgotten wallets, medications, or essentials.
By applying this methodical preparation, you guarantee that your well-inspected cabin getaway begins with calm and excitement, not a frantic scramble out the door.