In summary:
- Caravan snaking is not random; it’s a predictable outcome of incorrect weight distribution, specifically insufficient nose weight, which creates a pendulum effect.
- Vehicle dynamics like tire pressure and driving inputs either dampen or dangerously amplify this oscillation; understanding them is critical.
- In an emergency, the only correct response is to lift off the accelerator and steer straight. Braking or counter-steering will almost certainly lead to a loss of control.
The feeling is unmistakable. It starts as a gentle sway, a slight push from behind. Within seconds, it escalates. The caravan begins to dictate the direction of travel, its oscillations growing more violent, throwing your tow vehicle from side to side. This is the « snake, » and for many drivers, it’s their single greatest fear on the highway. Most advice focuses on generic tips: « drive slower » or « pack carefully. » While not wrong, this advice fails to address the fundamental, non-negotiable laws of physics that govern your rig. It treats snaking as a matter of bad luck rather than a predictable, mechanical failure.
As a heavy vehicle instructor, I don’t deal in luck. I deal in dynamics, leverage, and inertial forces. The truth is, a snake is almost always the direct result of a rig that is improperly balanced, creating a powerful inertial pendulum that overwhelms the tow vehicle. Common fixes like friction stabilizers can mask the symptoms, but they don’t cure the disease. They can provide a false sense of security right up until the moment the forces exceed their capacity, and by then, it’s too late.
This guide abandons platitudes. We will dissect the rig as a complete dynamic system. We will analyze the physics of why high loads cause instability, how your tires contribute to oscillation, and what the correct survival reflex is when it all goes wrong. By understanding the core mechanics of stability, you will gain the ability not just to react to a snake, but to prevent it from ever starting. This is not about tips; it’s about mastering the physics of control.
This in-depth analysis will break down the critical factors that determine the stability of your towing setup. By examining each component, you will build a comprehensive understanding of the forces at play and how to manage them effectively.
Summary: Towing a Caravan: How to Stop the « Snake » Wobble Before It Crashes?
- Why heavy items in high cupboards cause instability?
- How under-inflated tires amplify sway oscillation?
- The 7% rule: Measuring nose weight with a bathroom scale
- Friction stabilizers vs ATC systems: Which technology saves you?
- When to accelerate vs brake: The counter-intuitive survival reflex
- Sequencing the packing: Heavy items vs Accessibility
- Why the rear swings out and hits cars during tight turns?
- RV Awnings: How to Anchor Them Securely Against Sudden Gusts?
Why heavy items in high cupboards cause instability?
The most fundamental error in caravan loading is misunderstanding the concept of the center of gravity. Placing heavy items like canned goods, drinks, or kitchen appliances in high overhead cupboards raises the caravan’s overall center of gravity. A high center of gravity makes any vehicle more susceptible to roll and sway. When a lateral force is applied—such as from a crosswind or a sudden steering input—the mass located high up exerts a greater leverage, initiating a rocking motion that can quickly devolve into a snake.
Even more critical is the longitudinal placement of weight. Heavy items loaded at the extreme rear of the caravan, far behind the axle, create a catastrophic pendulum effect. The tow ball acts as a pivot point. With significant mass at the back, any side-to-side movement is amplified, swinging with immense inertial force. This force works against the tow car’s stability, effectively trying to steer the rear of the car. If the pendulum’s force exceeds the grip of the tow car’s rear tires, a loss of control is inevitable.
This isn’t theoretical. It’s the primary cause of accidents. The Clayton’s Towing team in Australia, after attending hundreds of rollovers, observed that many crashed caravans could be lifted at the drawbar with one hand, a clear sign of disastrously low nose weight from rear-heavy loading. They note that toy haulers with motorbikes in the back are especially prone to this, perfectly illustrating how a heavy object at the extreme rear creates an unstoppable pendulum. This is why improper weight distribution is identified as the biggest factor in the majority of caravan crashes.
How under-inflated tires amplify sway oscillation?
Tires are not rigid components; they are an active part of your rig’s suspension system. Their sidewalls are designed to flex. When a caravan’s tires are under-inflated, this flexion becomes excessive. During a sway, as the caravan moves side-to-side, the tire sidewalls on one side compress while the other side extends. An under-inflated tire exhibits significant sidewall deflection, essentially acting like a soft, uncontrolled spring. Instead of absorbing the lateral movement and returning to center quickly, it allows the caravan’s body to move further offline and then « bounces » back with more energy. This bounce feeds energy back into the sway, amplifying the oscillation.
This phenomenon turns a minor sway into a resonant feedback loop. A gust of wind initiates a small movement. The soft, under-inflated tire sidewalls deform, allowing the sway to become larger. The stored energy in the deformed rubber then pushes the caravan back the other way, overshooting the centerline. The process repeats, with each oscillation growing in amplitude until it becomes a violent snake. This is why correct tire pressure is a non-negotiable pillar of towing safety. Properly inflated tires provide the necessary sidewall stiffness to resist lateral forces, dampen sway, and keep the caravan tracking true behind the tow vehicle.
The visual below demonstrates the physical deformation of the tire wall under stress, the very mechanical action that, if not properly managed by correct pressure, will amplify a minor wobble into a major stability crisis.
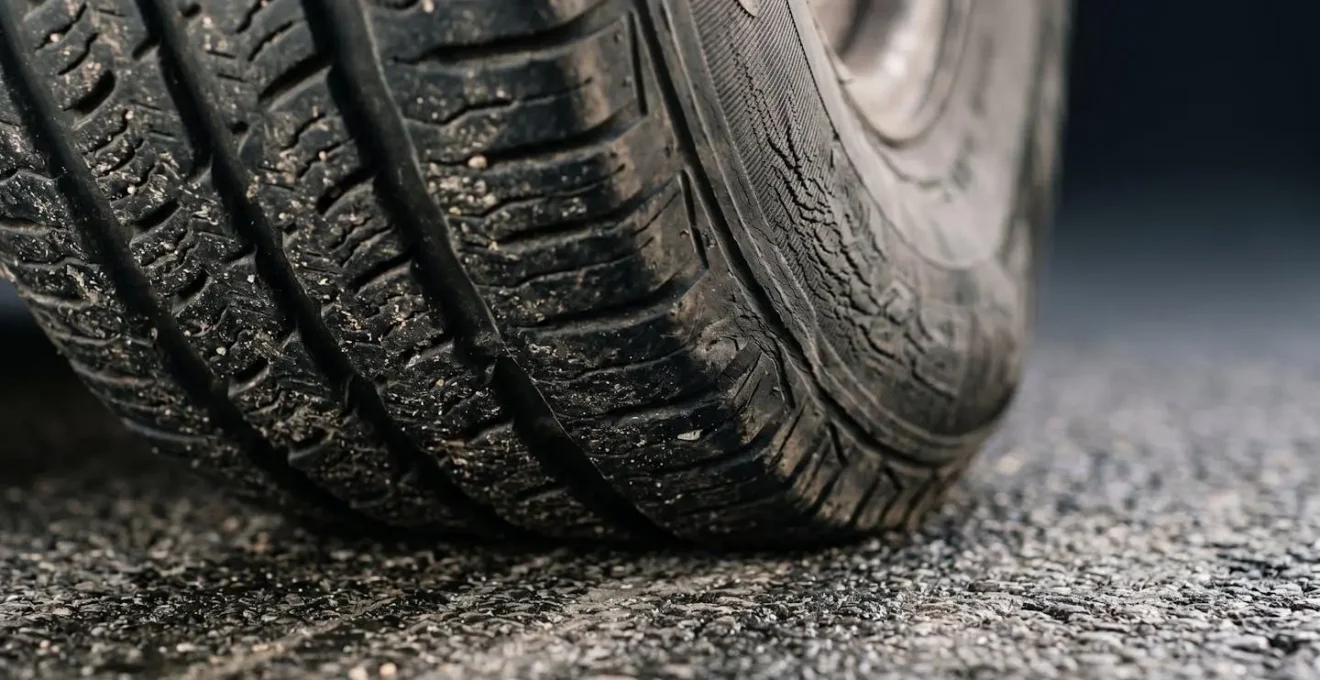
As you can see, the tire is an active participant in the dynamics of sway. It is not merely a rolling component but a critical suspension element whose performance is dictated by its pressure. Ensuring your tires are correctly inflated is a fundamental step in preventing sway amplification.
Your Pre-Trip Tire Integrity Protocol
- Initial Inspection: Inspect tire pressure on both the caravan and tow vehicle *before* you begin loading the caravan.
- Post-Loading Verification: After loading and hitching, perform a comprehensive safety check that includes re-verifying the tire pressures on the fully laden rig.
- Confirm Specifications: Check your caravan’s manual or tire placard for the manufacturer-recommended tire pressure specifications for a fully loaded state.
- Condition Assessment: Ensure all tires are inflated to the correct pressure and are in good condition, with no visible damage or excessive wear, before departure.
- In-Transit Monitoring: Monitor tire condition during your journey, especially after long highway drives or in hot weather, as pressures can change.
The 7% rule: Measuring nose weight with a bathroom scale
Nose weight, or the downward force the caravan coupling exerts on the tow ball, is the single most critical factor for towing stability. It is the force that keeps the caravan « leading » the tow vehicle, rather than the other way around. Insufficient nose weight allows the caravan’s center of gravity to shift behind its axles, creating the dangerous pendulum effect discussed earlier. Conversely, excessive nose weight can lift the tow vehicle’s front wheels, compromising steering and braking.
The industry standard, often referred to as the « 7% rule, » provides a reliable target. Your caravan’s nose weight should be between 5% and 7% of its actual laden weight (Gross Trailer Mass). For a 2,000 kg caravan, this translates to a target nose weight of 100 kg to 140 kg. This precise downward pressure ensures the coupling remains firmly seated and that the entire rig behaves as a single, stable unit. It is the leverage that allows the tow car to maintain authority over the trailer.
You do not need specialized equipment to verify this critical measurement. A standard bathroom scale and a piece of wood can provide an accurate reading. The key is consistency: measure your nose weight every time you pack for a major trip, as changes in load distribution will directly impact this figure. A reading that is too low is an immediate red flag that you have created an inherently unstable, crash-prone setup. Adjusting heavy items forward or backward is the only way to correct it.
Field Method for Nose Weight Measurement
- Setup the Lever: Place a sturdy piece of wood or a cut-down broom handle vertically between the hitch head and the bathroom scales. Ensure the wood is cut to a length that keeps the caravan level, as if it were hitched to the car.
- Position the Scale: Place the scales on a firm, level surface directly underneath the coupling head.
- Transfer the Weight: Using the jockey wheel, slowly raise the front of the caravan until the jockey wheel lifts off the ground and the full weight of the hitch is resting on the scales via the piece of wood.
- Take the Reading: Read the weight displayed on the scales. This is your nose weight. Verify it falls within the safe 5-7% range for your caravan’s total laden weight.
- Adjust and Re-measure: If the weight is too low, move heavy items forward of the axle. If it’s too high, move them rearward (but still close to the axle). Re-measure until the target is achieved. This information is based on the practical DIY measurement method.
Friction stabilizers vs ATC systems: Which technology saves you?
Towing stability aids are divided into two distinct technological philosophies: reactive friction-based systems and pre-emptive electronic systems. Understanding the difference is critical, as one masks a problem while the other actively prevents it. A friction stabilizer, often integrated into the coupling head, works by applying constant friction to any horizontal or vertical movement at the pivot point. It’s a simple, mechanical damper. It resists the start of a sway by making it harder for the caravan to pivot. However, its limitation is its fixed capacity. It can suppress a minor wobble at 50 mph, but if a larger force at 60 mph initiates a sway, the stabilizer’s friction can be overcome, leading to a sudden and violent loss of control. It masks the early warning signs of an unstable load.
In contrast, an electronic Trailer Control (ATC) system is an intelligent, pre-emptive safety device. It doesn’t apply constant resistance. Instead, it uses a sensor, typically mounted on the axle, to monitor the caravan’s lateral acceleration. It knows what normal, stable towing feels like. As AL-KO, a leading manufacturer, explains:
The ATC uses a lateral acceleration sensor to detect swaying movements on the caravan axle. If these movements exceed a stored tolerance range, the ATC activates the wheel brakes via Bowden cables before the caravan can start to snake.
– AL-KO Tech, AL-KO Trailer Control Technical Specifications
This intervention is subtle and precise. The system gently applies the caravan’s brakes for a split second, pulling the trailer straight and eliminating the oscillation before the driver is even aware of it. It’s not a damper; it’s a correction system. It doesn’t mask instability; it actively cancels it out. The driver’s hands, firm on the wheel, remain in command, unaware of the crisis that was just averted electronically.

The following table, based on an analysis of chassis technologies, breaks down the core differences in their operational principles.
| Technology Feature | Friction Stabilizer | ATC/Electronic System |
|---|---|---|
| Operating Principle | Constant friction dampers on every movement | Detects lateral sway via sensor and applies trailer brakes only when needed |
| Response Type | Reactive – dampens sway after it has started | Pre-emptive – intervenes before snaking becomes a problem |
| Sensor Location | None – purely mechanical friction | Mounted on axle for precise detection |
| Brake Application | Does not apply trailer brakes | Uses electric motor to gently apply trailer brakes in milliseconds |
| Maintenance Required | Friction pads require regular replacement (claimed 50,000 km lifespan for Al-Ko) | Fit-and-forget system with no maintenance required once active |
| Limitations | Masks early warning signs; can suppress wobble at 50mph but fail at 60mph when forces exceed capacity | Does not affect critical speed range; requires proper loading and maintenance to perform optimally |
When to accelerate vs brake: The counter-intuitive survival reflex
When a snake begins, every instinct in your body will scream at you to do two things: brake hard and steer against the sway. Both actions are catastrophically wrong and will escalate the situation into a crash. This is the single most critical moment where driver training and discipline must override panic. Trying to counter-steer a snake is a losing battle; the oscillation is too fast, and your inputs will almost certainly be out of phase, amplifying the sway instead of correcting it.
The most dangerous instinct is to slam on the brakes. When you brake hard in the tow vehicle, the caravan, which is still pushing forward with its own momentum, will try to overtake your car. This can lead to a jack-knife, where the caravan pushes the rear of your car sideways, causing a complete and unrecoverable loss of control. The common advice to « accelerate out of it » is equally perilous. While a slight, smooth acceleration *could* theoretically pull the rig straight, it is a high-risk maneuver that requires perfect conditions. In reality, over three-quarters of rescued drivers reported that accelerating to overcome wobbles made the situation far worse, very quickly, likely because the rig was already fundamentally unstable.
The only correct, professional response is counter-intuitive: do less. You must fight the panic and execute a precise sequence. The goal is to allow the rig to stabilize itself by gradually reducing speed without introducing any sudden, destabilizing inputs from braking or steering. This is not a passive action; it is a controlled, deliberate procedure to bleed energy from a chaotic system.
Emergency Snake Wobble Response Protocol
- Do NOT Panic: Immediately fight the instinct to make sudden movements. Rigid, jerky steering inputs will only feed the oscillation.
- Do NOT Brake: Under no circumstances should you slam on the brakes. This is the primary cause of jack-knifing.
- Lift Off the Accelerator: Take your foot off the accelerator completely. Let the engine’s natural drag begin to slow the entire rig as one unit.
- Steer Straight Ahead: Grip the steering wheel firmly but not in a death grip. Focus on keeping the front wheels pointed straight down your lane.
- Do NOT Counter-Steer: Do not try to correct the sway with steering inputs. You will be out of sync and make it worse. The car must lead; the caravan will follow.
- Scrub Off Speed Naturally: Allow the engine braking and aerodynamic drag to slow the vehicle. As the speed decreases, the forces driving the oscillation will reduce, and the sway should dampen itself.
- Pull Over Safely: Once the rig is completely stable, indicate and pull over at the next safe location.
- Conduct a Full Inspection: Before continuing, you must get out and check your load distribution, nose weight, and tire pressures. The snake was a symptom of a problem you must now find and fix.
Sequencing the packing: Heavy items vs Accessibility
The prevention of snaking begins before you even turn the key. It starts with a disciplined, physics-aware packing sequence. The mantra is simple, yet it is the absolute foundation of stability. As one experienced caravanner put it:
Heavy stuff low down and over the axle, light stuff at the ends.
– Club Together Caravan Community, Correct Method of Nose-Weight Measurement Discussion
This single sentence encapsulates the entire science of caravan stability. « Heavy stuff » refers to items like awnings, water containers, batteries, and canned goods. Placing them low to the floor directly over the axle area accomplishes two things: it keeps the center of gravity low, reducing the tendency to roll, and it concentrates the mass at the caravan’s pivot point, minimizing the moment of inertia. With mass centered over the axles, the caravan has less leverage to initiate a sway and is easier to control.
Conversely, « light stuff » like clothing, bedding, and empty containers should be stored in the overhead lockers and at the extreme front or rear. Placing light items at the ends has a negligible effect on the pendulum dynamic. A common mistake is to compromise this rule for convenience, placing a heavy toolbox in the front boot for easy access, or heavy items at the rear because the space is available. This is a critical error. Stability must always trump accessibility. A far better strategy is to pack the caravan for perfect dynamic balance for the long haul, and keep frequently needed but lightweight items in an accessible bag inside the tow vehicle itself.
The Professional’s Caravan Packing Sequence
- Foundation – Heavy Items: Load your heaviest items first. They must be placed on the floor, centered directly above the axles, and distributed evenly from side to side.
- Account for Fixed Masses: Factor in the location of water tanks and gas bottles. Remember that their weight changes as they are used, which can alter your balance mid-trip.
- Structure – Medium Items: Load medium-weight items next, positioning them slightly further out from the center but keeping them below the window line. Maintain side-to-side balance.
- Fill – Light Items: Your lightest items (clothes, bedding) should be the last to be loaded. These can be stored towards the front and back, and in overhead lockers.
- The Accessibility Compromise: Pack for perfect stability first. For items you need en route (e.g., a lunch bag), keep them lightweight and store them in the tow car, not in a way that compromises the caravan’s balance.
- Final Verification: Visually confirm that weight is distributed evenly from left to right. Perform your nose weight check to ensure your front-to-back balance is within the safe 7% limit.
Why the rear swings out and hits cars during tight turns?
While snaking is the most feared dynamic event on the open road, low-speed maneuvers present their own significant risk: tail swing and trailer cut-in. These are responsible for a huge number of costly, and entirely avoidable, incidents in petrol stations and campsites. In fact, accident data shows that 14% of RV crashes are angle collisions that occur during turns. This is not due to a lack of control, but a misunderstanding of the rig’s geometry.
There are two opposing forces at play. First is trailer cut-in: because the caravan’s wheels are set back from the tow vehicle’s rear wheels, they will always follow a tighter turning radius. When making a left turn, your caravan’s wheels will track significantly inside the path of your car’s wheels, threatening to hit the curb or any obstacle on the inside of the corner. To compensate, you must take the corner « shallow, » or wide, pulling the tow vehicle further away from the corner’s apex than you would in a normal car.
The second, and often more surprising, phenomenon is tail swing. As you turn, the rear of the caravan—the portion behind its axles—swings out in the opposite direction of the turn. During that same left turn, the caravan’s tail will swing out to the right. This is what clips the car parked in the next lane or the fuel pump you thought you had cleared. To manage this, you must pull « deep » out of the turn, continuing to drive straight for longer than feels natural before completing the turn, giving the tail time and space to clear the outside obstacle. Mastering tight turns is a constant exercise in monitoring these two opposing movements in your mirrors.
Professional Technique for Navigating Tight Turns
- Entry Position (Manage Cut-In): Approach the turn « shallow. » Position your tow vehicle further from the inside corner (apex) than you normally would, giving the trailer room to cut in without hitting it.
- Initiate and Observe: Begin steering smoothly while immediately shifting your focus to your mirrors to monitor the caravan’s path.
- Mid-Turn Monitoring: Specifically use the bottom, convex portion of your wing mirror. This is your best tool for watching the caravan’s wheels in relation to the inside curb and the rear corner in relation to outside obstacles.
- Exit Position (Manage Tail Swing): As you exit the turn, pull « deep. » Drive further forward in a straight line before fully straightening the wheel. This allows the rear of the caravan to swing clear of any obstacles on the outside of the turn.
- Confirm Clearance: Do not stop observing until the entire rig is straight and clear. Maintain constant mirror observation throughout the entire maneuver until you are certain the caravan has passed all potential hazards.
Key takeaways
- The primary cause of caravan instability is improper loading, specifically insufficient nose weight (target 5-7% of total weight) and a high center of gravity.
- In a snaking emergency, the only safe response is to lift off the accelerator and steer straight. Never brake hard or attempt to counter-steer the oscillation.
- Your tires are active suspension components. Correct pressure is non-negotiable to prevent sidewall deflection from amplifying a minor sway into a violent snake.
RV Awnings: How to Anchor Them Securely Against Sudden Gusts?
While the internal dynamics of your rig are paramount for on-road stability, external forces at the campsite can pose an equally significant threat to your vehicle and safety. Awnings, while providing comfort, can act as massive sails in a sudden gust of wind. The force generated can be enough to bend or break the support arms, tear the fabric, and in extreme cases, inflict serious damage to the side of the caravan itself. It’s a risk that is often underestimated, yet with flash floods and storms accounting for up to 29% of caravan insurance claims, managing wind becomes a critical part of your overall rig discipline.
Securing an awning is not a matter of simply putting a few pegs in the ground. It requires a proactive assessment of the conditions and the use of appropriate equipment. The difference between standard pegs and sprung storm straps, for example, is immense. Rigid pegs can be ripped from the ground by a sudden gust, whereas sprung straps are designed to absorb the shock, dissipating the energy without transferring it to the awning’s frame. Similarly, de-flapper devices, which clamp the awning fabric to the support arms, are not just for reducing noise; they prevent the fabric from catching the wind and starting a damaging ripple effect.
The most important rule, however, is to be preemptive. An awning is for shade, not for storm-proofing. Part of being a responsible rig operator is knowing when to retreat. Watching for environmental cues like swaying tree branches or « white caps » on nearby water is more reliable than a weather forecast. The decision to retract the awning should be made *before* conditions become dangerous, not in a panic as the wind is tearing it apart. It is an extension of the same mindset that governs on-road safety: anticipate, prepare, and act decisively to maintain control.
Advanced Anchoring Protocol for High-Wind Conditions
- Assess the Forecast: Before deploying, check a reliable weather app for both average wind speed and, more importantly, maximum gust speeds.
- Observe the Environment: Watch the trees. Are small branches moving, or are large limbs swaying? This is your most immediate and reliable wind indicator.
- Use Shock-Absorbing Anchors: For any conditions beyond a light breeze, use sprung storm straps. They are designed to absorb the sudden energy of a gust, protecting the mechanical components of the awning.
- Install De-Flappers: Always use de-flapper devices. They significantly reduce fabric flapping, which is both a source of noise and the starting point for mechanical stress and tearing.
- Adapt to Hardstanding: On hard pitches where pegs are useless, use heavy-duty water or sand barrels as anchor points for your storm straps.
- Retract Preemptively: The golden rule is: « if in doubt, roll it out »—of the way. Retract the awning before you go to bed or leave the site, and before the wind becomes a visible threat.
True towing safety is not achieved through gadgets or luck, but through a deep, ingrained understanding of the physical forces you are commanding. It is the disciplined application of the principles of weight distribution, tire integrity, and emergency procedure. By treating your rig as a single dynamic system and respecting the laws of physics, you move from a position of fear to one of absolute control. The next time you hitch up, perform these checks not as a chore, but as a non-negotiable professional procedure. Your safety, and the safety of everyone else on the road, depends on it.