In summary:
- Moisture isn’t just an inconvenience; it’s a system to be managed. The key is controlling condensation at its source.
- Your van’s metal frame acts as a « thermal bridge, » creating cold spots where moisture condenses first, even with good insulation.
- Effective moisture control relies on three pillars: eliminating thermal bridges, engineering consistent airflow, and actively removing airborne water vapor.
- Heating choices are critical: vented diesel heaters dry the air, while unvented propane heaters add significant moisture.
Waking up inside a metal box to find water dripping from the ceiling and pooling on the windowsills is a rite of passage for many vanlifers. This pervasive dampness, known as condensation, is more than just an annoyance. It’s the precursor to rust, damaged electronics, and the van dweller’s ultimate nemesis: mold. The common advice is often a frustratingly simplistic loop of « ventilate more » and « don’t dry things inside. » While not wrong, this advice fails to address the root of the problem.
Managing moisture in a compact space is a battle against physics. Every breath you take, every meal you cook, and every wet jacket you bring inside adds to the « moisture load » in the air. When this warm, humid air touches a cold surface—like a window or an uninsulated metal rib—it rapidly cools, releasing its water content as condensation. This process is governed by principles like thermal bridging, vapor pressure, and dew point.
But what if the solution wasn’t just to fight dampness, but to master the physics of your van’s micro-climate? This guide moves beyond the basics to offer a technical, strategic approach. It’s about transforming your van from a passive condensation trap into an actively managed environment. We will dissect the hidden weaknesses in your build and provide an engineered framework for keeping your small space warm, dry, and healthy, regardless of the weather outside.
This article provides a comprehensive roadmap to mastering your van’s internal climate. We’ll explore the science behind condensation, compare heating and ventilation technologies, and offer actionable strategies to ensure your rolling home remains a sanctuary, not a science experiment in mold cultivation.
Summary: Living in a Van: The Definitive Guide to Managing Moisture and Mold
- Why metal ribs dripping water ruin your insulation job?
- How to keep a roof vent open without freezing to death?
- The wet towel mistake that raises humidity to 90% inside
- Diesel heater vs Propane: Which releases moisture into the cabin?
- When to use passive crystals vs electric dehumidifiers?
- Why DWR failure makes you feel wet from sweat condensation?
- Gas vs Alcohol: Which poses a lower carbon monoxide risk in vestibules?
- Planning a Road Trip: How to Estimate Daily Mileage Without Burnout?
Why Metal Ribs Dripping Water Ruin Your Insulation Job?
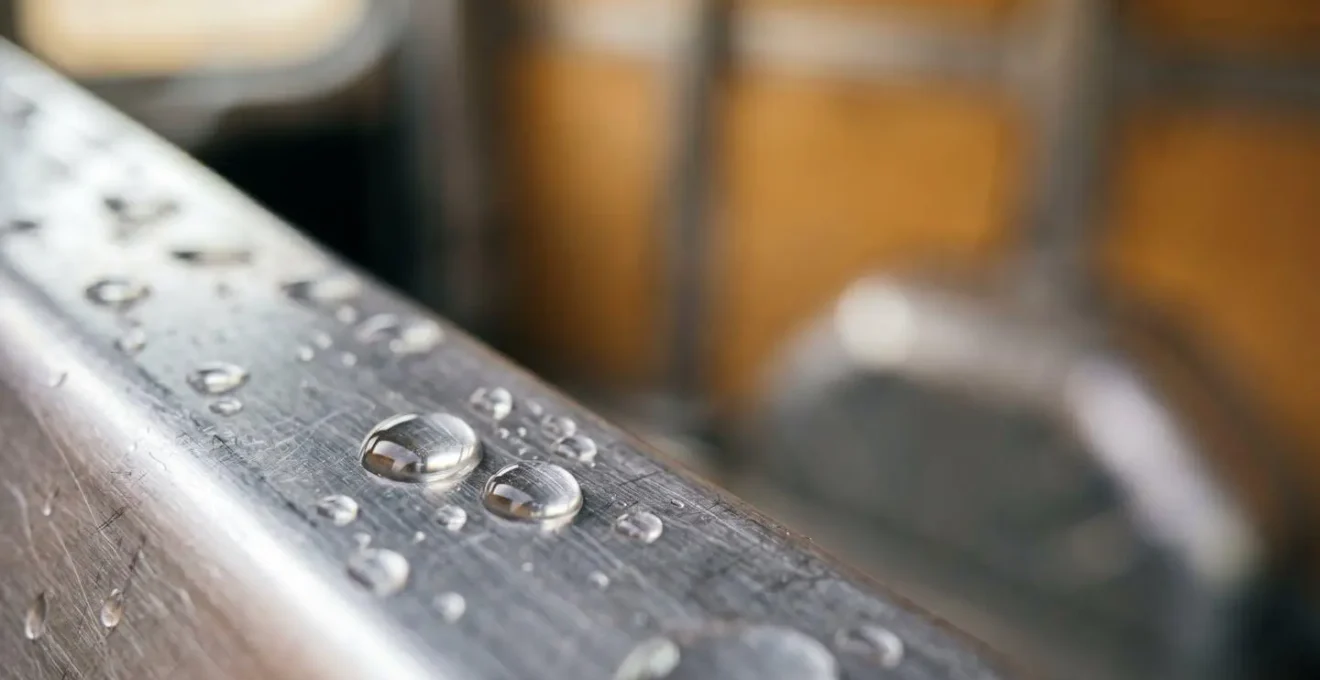
You’ve spent countless hours and a significant budget meticulously insulating your van’s walls and ceiling. Yet, on the first cold morning, you find moisture beading and dripping directly from the metal support ribs. This phenomenon is caused by thermal bridging, the single most critical concept in van insulation. Your van’s metal frame acts as a highway for heat to escape, creating localized cold spots that completely bypass your expensive insulation.
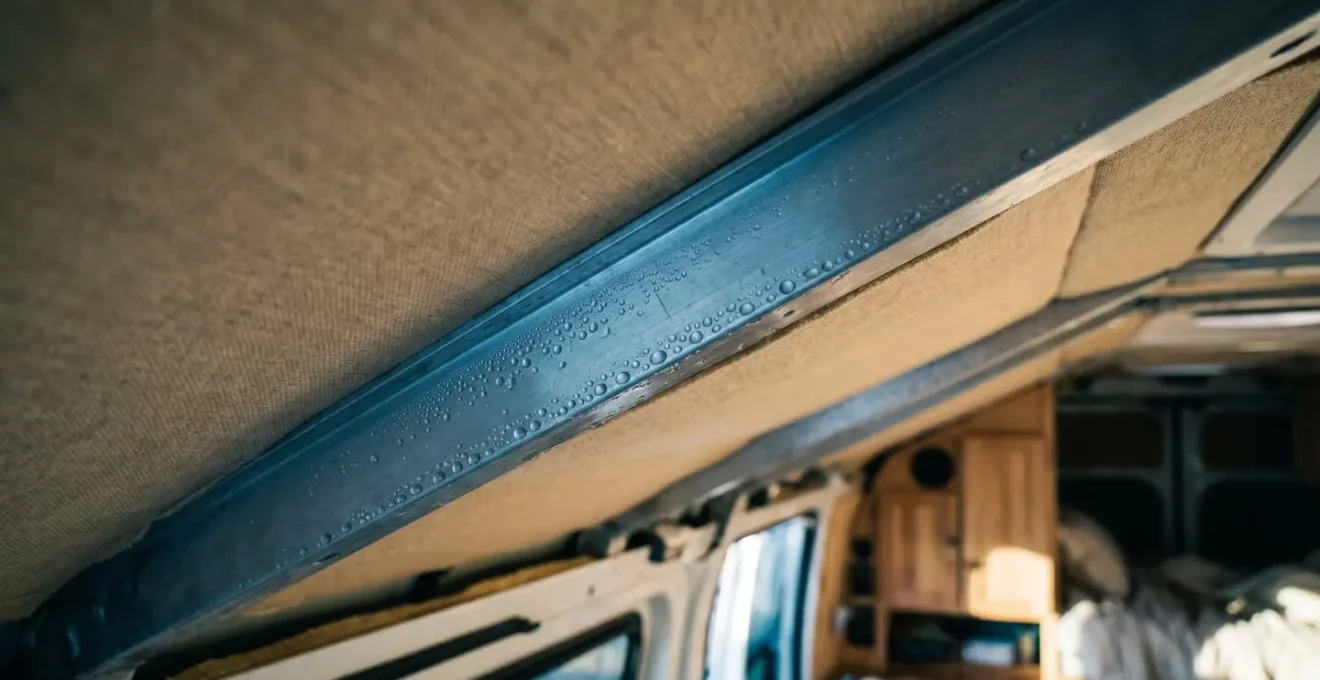
As the illustration shows, while the insulated panel might stay relatively warm, the exposed metal rib’s surface temperature plummets, quickly reaching the « dew point »—the temperature at which airborne water vapor condenses into liquid. A practical study by a van builder using thermal imaging found that with an interior air temperature of 70°F, the insulated panel surface was 65°F, but the exposed metal rib was a chilly 58.2°F. This differential is significant; analysis shows that each square inch of exposed metal frame loses heat at a dramatically higher rate. In fact, thermal imaging analysis revealed that these bridges can lose up to 2.4 times as much heat as an insulated section. This makes every exposed rib a condensation magnet, channeling moisture directly onto your subfloor and behind your walls, creating the perfect hidden environment for mold and rust.
Therefore, any effective insulation strategy must include applying a « thermal break » by covering these metal ribs with a material like closed-cell foam tape or cork, isolating them from the interior air.
How to Keep a Roof Vent Open Without Freezing to Death?
The standard advice to « ventilate » is often met with the valid concern of losing precious heat in cold weather. The solution isn’t to simply crack a window, but to create an engineered airflow system. This means establishing a deliberate, controlled, and slow-moving channel of air exchange to exhaust humid air while minimizing heat loss. The goal is to create a negative pressure environment that actively pulls moisture out.
The key is to use your roof vent fan on its lowest exhaust setting, especially while sleeping when your breathing releases a significant amount of moisture. This fan should be paired with a small, cracked-open window on the opposite side of the van, ideally at a lower level. This setup creates a targeted cross-flow channel. The warm, moisture-laden air, which naturally rises, is extracted by the roof fan, while a small amount of cold, dry air is drawn in from the window below, mixing and warming before it circulates. This targeted approach is far more efficient than random drafts. For safety and compliance, BS EN 721 ventilation standards recommend a minimum permanent ventilation area of 100cm² at a high level and 15cm² at a low level for a campervan, reinforcing the need for both intake and exhaust.
To optimize this, position your sleeping area away from the direct path of the incoming cold air. By running the fan at a minimal speed, you remove just enough air to keep the relative humidity in the ideal 40-50% range without creating a noticeable, uncomfortable draft. This micro-climate strategy allows you to breathe easy, knowing you’re actively preventing condensation buildup without freezing.
Ultimately, a good hygrometer is your best friend. It provides the data you need to fine-tune your fan speed and window opening, turning ventilation from a guessing game into a precise science.
The Wet Towel Mistake That Raises Humidity to 90% Inside
While breathing and cooking are well-known sources of interior moisture, the single fastest way to saturate your van’s air is by drying wet items inside, especially a standard cotton bath towel. The sheer volume of water a towel holds and releases into a small, sealed space creates an extreme moisture load that can overwhelm any passive ventilation system. Even simple daily activities can have a large impact; research on 500 square foot spaces shows that humidity can spike by 20-30% within minutes from tasks like boiling water.
The effect of a wet towel is far more dramatic. It acts as a high-capacity evaporator, continuously releasing water vapor until it reaches equilibrium with the air. As one expert analysis points out, the physics are startling:
A single wet bath towel can hold over 700ml of water. Evaporating this into a 10 cubic meter van can raise relative humidity from a comfortable 50% to a mold-promoting 95% in just a few hours.
– Van insulation analysis, Asobo Life moisture prevention guide
This massive spike in humidity means that the dew point temperature rises dramatically. Surfaces that were previously warm enough to stay dry will now start collecting condensation. The only solutions are to either wring out the towel as much as possible and hang it outside (even in cold weather), or to invest in ultra-fast-drying microfiber towels that hold significantly less water and can be stored in a waterproof bag if they can’t be dried externally. Treating your van’s interior as a « no-fly zone » for wet gear is not a suggestion; it’s a fundamental rule of moisture management.
Never underestimate the thermodynamic power of evaporation. That seemingly harmless towel is a humidity bomb waiting to saturate your living space and undo all your hard work.
Diesel Heater vs Propane: Which Releases Moisture Into the Cabin?
Your choice of heater is one of the most significant decisions affecting your van’s interior climate. While both provide warmth, their impact on humidity is drastically different due to their combustion mechanics. The critical distinction lies in whether the combustion process is vented to the outside or occurs within your living space. An unvented propane heater, like the popular « buddy heater » style, is a major source of interior moisture.
The chemical reaction of burning propane (C₃H₈) produces both carbon dioxide (CO₂) and a significant amount of water vapor (H₂O). In an unvented system, these byproducts are released directly into your cabin. The numbers are staggering: combustion chemistry demonstrates that burning one pound of propane produces approximately 1.6 pounds of water. This actively adds to your moisture load, forcing you to ventilate even more aggressively, which in turn negates some of the heat you’re producing. Conversely, a properly installed diesel air heater operates on a completely sealed, external combustion cycle. It draws air from the outside, burns the fuel in a sealed chamber, and exhausts all byproducts—including all the water vapor—back outside. Only clean, dry heat is blown into the cabin via a heat exchanger. This process is moisture-negative; by raising the air temperature without adding water, it actually lowers the relative humidity, helping to dry out your van.
This comparative table clarifies the humidity impact of common heating options, demonstrating why vented systems are superior for moisture control.
| Heater Type | Combustion Location | Moisture Released into Cabin | Heat Efficiency | Humidity Impact |
|---|---|---|---|---|
| Diesel Heater (Vented) | External combustion chamber | 0g/hour (vented outside) | High – retains heat, lowers RH | Moisture-negative (dries air) |
| Propane (Unvented) | Internal cabin combustion | ~200g/hour (at 3,000 BTU) | Moderate – adds humidity load | Moisture-positive (wet air) |
| Propane (Vented Furnace) | Sealed combustion, vented | 0g/hour (vented outside) | High – clean dry heat | Moisture-neutral |
| Electric Heater | No combustion | 0g/hour | Moderate – dry heat | Moisture-negative (dries air) |
While unvented propane heaters have a low upfront cost, their hidden cost is a constant battle against condensation. For serious four-season van life, a vented diesel or propane furnace is a non-negotiable investment in a dry, healthy environment.
When to Use Passive Crystals vs Electric Dehumidifiers?
Even with perfect ventilation and a dry heat source, there will be times when you need to actively remove water vapor from the air. This is the role of a dehumidifier. The choice between a passive desiccant system (like silica crystals) and an active electric dehumidifier depends on your power budget and the specific moisture problem you’re trying to solve. The overarching goal is to maintain a healthy and comfortable interior climate, as humidity management experts recommend keeping levels within a 30-50% relative humidity range to prevent mold growth.
Passive dehumidifiers, which use hygroscopic materials like calcium chloride or silica gel, are excellent for baseline moisture control and require zero power. They are best suited for tackling localized dampness in enclosed, low-airflow areas like closets, drawers, and under-bed storage. They work slowly but steadily, preventing musty smells and mildew in stagnant spaces. Their main limitation is their low capacity; they are not effective at reducing the overall humidity of the entire van after a major moisture event like cooking or a rainy day.
Electric dehumidifiers are the solution for active, large-scale moisture removal. They come in two main types for vans: low-power Peltier (thermo-electric) models and higher-power compressor models. A Peltier unit is a good middle ground, capable of removing a few hundred milliliters of water per day with a modest power draw, making it suitable for vans with moderate solar systems. A compressor dehumidifier is the heavy-duty option, ideal for quickly drying out the air after a shower or during prolonged periods of wet weather, but its high power consumption requires a robust electrical system (shore power or a large battery bank with significant solar/alternator charging). The most sustainable approach for many off-grid vanlifers is a regenerative silica gel system.
Action Plan: Building a Regenerative Silica Gel Dehumidification System
- Purchase bulk color-indicating silica gel beads (typically blue when dry, turning pink when saturated).
- Fill several breathable fabric pouches or mesh containers with 200-500g of beads each.
- Place these pouches in high-humidity zones: inside cabinets, under the bed, near the sink, and in clothing drawers.
- Monitor the bead color. When they have turned completely pink, they are saturated with moisture and are no longer effective.
- To regenerate, spread the saturated beads in a shallow pan and heat them. You can use a camp stove on low heat for 15-20 minutes or an oven at 250°F (120°C) for 2-3 hours when on shore power, until they return to their original blue color. Let them cool completely before refilling the pouches.
Ultimately, a hybrid approach is often best: use passive crystals for continuous maintenance in enclosed spaces and have a small electric unit or regenerative system ready for active intervention when humidity spikes.
Why DWR Failure Makes You Feel Wet From Sweat Condensation?
The clammy, wet feeling you get inside a rain jacket, even when it’s not leaking, is a perfect micro-example of the same condensation process happening in your van. The culprit is the failure of the Durable Water Repellent (DWR) coating. A new rain jacket’s outer fabric is treated with DWR, which causes water to bead up and roll off. This beading action is crucial because it keeps the fabric pores open, allowing the jacket’s breathable membrane (like Gore-Tex) to function.
This membrane is designed to let water vapor (your sweat) escape while blocking liquid water (rain) from entering. However, as DWR wears off from abrasion, dirt, and oils, the outer fabric becomes saturated with rain. This is called « wetting out. » When the fabric is waterlogged, the pores are blocked, and the breathable membrane can no longer transport your sweat vapor to the outside. Your body is constantly producing warm, moist air. Trapped inside the jacket, this air hits the now-cold, waterlogged inner surface of the fabric. The result? The water vapor from your sweat condenses back into liquid on the inside of your jacket. You feel wet not from rain getting in, but from your own sweat condensing. It’s the same principle as your breath fogging up a cold window.
This demonstrates that « breathability » is not a static property but a dynamic system dependent on a functional DWR coating. Regularly cleaning your technical outerwear with a specialized wash and reapplying a DWR treatment is essential to maintain its performance and prevent internal condensation.
This personal-scale climate control issue reinforces the core lesson of van life moisture management: you must manage both external water intrusion and internal vapor transport.
Gas vs Alcohol: Which Poses a Lower Carbon Monoxide Risk in Vestibules?
Cooking in a confined space like a van vestibule presents a serious risk of carbon monoxide (CO) poisoning. CO is a colorless, odorless gas produced by the incomplete combustion of carbon-based fuels. The choice between canister gas (an isobutane/propane blend) and an alcohol stove can influence this risk, though it must be stressed that any combustion in an enclosed space without adequate ventilation is dangerous.
The primary factor influencing CO production is the efficiency of combustion. Alcohol (ethanol or methanol) generally burns cleaner than canister gas in sub-optimal conditions. It has a simpler molecular structure and requires less oxygen for complete combustion. If ventilation is slightly restricted, an alcohol stove is more likely to continue burning relatively cleanly, producing mainly CO₂ and water. Canister gas, a more complex hydrocarbon, is more prone to producing significant amounts of CO during incomplete combustion. This can happen if a pot is too large for the burner, if the flame is starved of oxygen, or if the stove is operating in very cold temperatures which affect gas pressure and vaporization.
However, this doesn’t make alcohol stoves inherently safe. They still consume oxygen and can produce CO if airflow is severely limited. Their primary safety advantage in this context is a slightly more forgiving combustion process. Canister gas stoves, while more susceptible to producing CO in poor conditions, often have a higher heat output and are more efficient. The absolute, non-negotiable rule is ventilation. Regardless of fuel type, a vestibule must be well-ventilated (e.g., with a door or window partially open) to ensure a constant supply of fresh oxygen and the removal of combustion byproducts. A portable CO detector is an essential, life-saving piece of equipment for any vanlifer who cooks inside.
In summary, while alcohol may pose a marginally lower CO risk in slightly compromised conditions, this slight advantage is no substitute for the golden rule: always ensure robust and active ventilation.
Key takeaways
- Master Thermal Bridges: Your van’s metal frame is the primary source of condensation. Identify and isolate these « cold highways » with a thermal break to make your insulation effective.
- Engineer Your Airflow: Ventilation is not just opening a window. Create a slow, continuous cross-flow from a low intake to a high exhaust to actively remove moist air without significant heat loss.
- Quantify Your Moisture Load: Understand that activities like cooking and drying clothes add a measurable amount of water to the air. Choose technologies (vented heaters, external drying) that minimize this internal load.
Planning a Road Trip: How to Estimate Daily Mileage Without Burnout?
While mastering the internal climate of your van is crucial for comfort, mastering the external pace of your journey is essential for enjoyment. A common rookie mistake is overestimating daily mileage, leading to road trip burnout. Planning sustainable driving days isn’t about maximum distance; it’s about balancing driving time with activity time and accounting for the unpredictability of the road. A simple « distance divided by speed » calculation is deeply flawed.
A more realistic framework is to plan around driving hours, not miles. A good rule of thumb for a sustainable, enjoyable pace is to cap driving at 4-5 hours per day. This leaves ample time for meals, spontaneous stops, activities, and setting up camp before dark. Next, consider your « net travel velocity. » Driving 200 miles on an interstate at 70 mph is vastly different from 200 miles on winding mountain roads or through small towns with low speed limits. Always use a GPS estimate for travel *time* and add a 25% buffer for fuel stops, traffic, and unexpected detours. For a 4-hour GPS estimate, plan for 5 hours of actual travel.
Finally, build in « zero days. » These are days with no significant driving planned, dedicated entirely to exploring a location, resting, or catching up on chores. A healthy rhythm is often 2-3 driving days followed by one zero day. This prevents the van from feeling like a commuting vehicle and allows you to truly immerse yourself in the places you visit. By shifting the focus from miles covered to experiences gained, you can design a road trip that is exhilarating rather than exhausting.
To put these principles into practice, start by defining your priorities for the trip—is it about the destination or the journey? Answering this question is the first step in creating a mileage plan that truly works for you.