The secret to navigating narrow roads isn’t just driving slowly; it’s thinking like a professional hauler by mastering your vehicle’s geometry and anticipating challenges before they arise.
- Understanding the predictable physics of « tail swing » transforms tight turns from a guessing game into a controlled manoeuvre.
- Proactive « digital reconnaissance » and specialized navigation tools are non-negotiable for avoiding impassable routes and costly fines.
Recommendation: Shift your mindset from reacting to road conditions to proactively managing your space, time, and vehicle’s limitations. This is the foundation of stress-free travel.
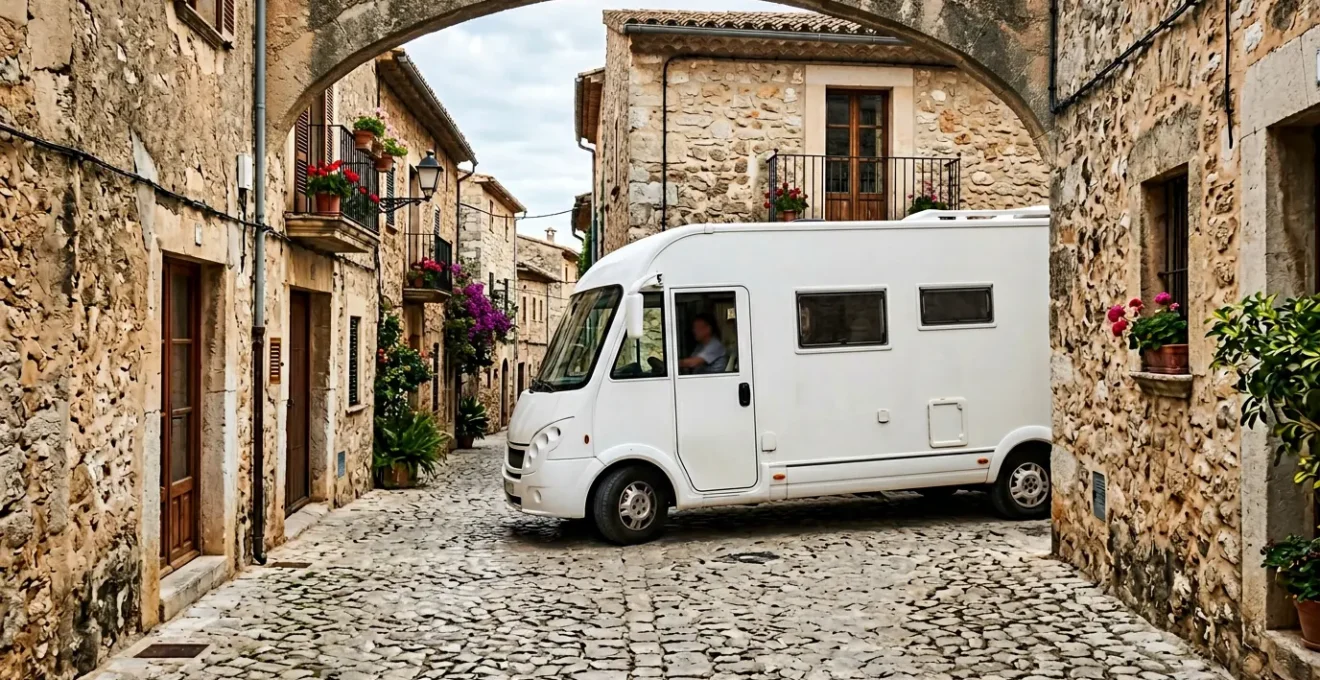
The feeling is universal for large motorhome drivers. You see the sign for a picturesque village, and as you turn off the main road, the lane seems to shrink. Your hands grip the wheel tighter. Every stone wall feels like a threat, every oncoming car a potential standoff. The joy of the journey is replaced by a low hum of anxiety. You’ve been told the standard advice: « go slow, » « get a good GPS, » « have a spotter. » While true, this advice only scratches the surface.
These tips treat the symptoms of stress, not the cause. The root of the anxiety isn’t the narrow road itself; it’s the feeling of being out of control in a large, expensive vehicle. It’s the fear of the unknown—the low bridge around the corner, the sudden market day blocking the main square, or the catastrophic scrape of fiberglass against ancient stone. Relying solely on luck or basic tips is a recipe for a stressful holiday and potentially expensive repairs.
But what if the real key wasn’t just caution, but *competence*? What if you could approach that narrow lane with the calm confidence of a seasoned truck driver? This guide is built on a professional’s perspective: driving a large vehicle is a science of anticipation. By understanding the physics of your motorhome, the logic behind road restrictions, and the strategies for managing your resources (from fuel to electricity), you can reclaim control. We’re going to move beyond the platitudes and give you the mental models to navigate not just the road, but the stress that comes with it.
This article provides a structured approach to mastering your vehicle. We’ll break down the most common high-stress situations into manageable, understandable components, equipping you with the knowledge to make calm, informed decisions on the road.
Summary: Driving a Large Motorhome on Narrow Roads: The Professional’s Guide to Stress-Free Navigation
- Why the rear swings out and hits cars during tight turns?
- How to filter out low bridges and narrow lanes automatically?
- The signage trap that leads to hefty fines in city centers
- Camera vs Partner guide: Which helps you park within 5cm?
- Highway vs Backroads: Is the view worth double the gas consumption?
- How to install tie-down kits without damaging the fabric mechanism?
- Campsite Electricity: Why Your Kettle Trips the Breaker Every Morning?
- When to detour: Avoiding market days in small towns
Why the rear swings out and hits cars during tight turns?
This is the single most misunderstood aspect of driving a large vehicle, and mastering it is the first step to true confidence. It’s not magic; it’s pivot point geometry. Your motorhome doesn’t bend in the middle. When you turn the front wheels, the entire vehicle pivots around the rear axle. Everything behind that axle—the overhang—will swing out in the *opposite* direction of your turn. The longer the overhang, the more dramatic the swing.
Thinking you can « squeeze » the rear end through a tight turn is a rookie mistake. A professional thinks differently: « To get my rear corner through, I need to move my pivot point forward first. » This means driving further into the intersection in a straight line before initiating your turn. You’re deliberately positioning your rear axle so the swinging overhang has a clear path. It feels counter-intuitive, like you’re going to hit something head-on, but it’s the only way. For every three feet of rear overhang, you can expect at least one foot of outward tail swing, a crucial ratio to visualize.
The consequences of getting this wrong are severe. I’ve seen a driver, focused only on his front corner, make a turn in a campground and wipe out the front of a parked vehicle with his tail swing. The damage was in the thousands, and their holiday was ruined. It wasn’t malice; it was a failure to understand the basic physics. Once you see your vehicle as a rigid body rotating around a fixed point, you stop guessing and start placing it with precision.
How to filter out low bridges and narrow lanes automatically?
Relying on a standard car GPS is one of the most dangerous gambles in a large motorhome. It sees you as a car. It doesn’t know your height, width, or weight. That charming « shortcut » it suggests could lead you directly to a low bridge that peels the top of your vehicle off like a tin can, or wedge you permanently into a medieval lane. The professional’s answer isn’t just « planning, » it’s using the right tool for the job: a specialized motorhome or truck GPS.
These devices are your first line of defense. You input your vehicle’s specific dimensions—height, width, length, and weight—at the very beginning. The device then uses this data to filter its entire map database, automatically eliminating routes that are physically impossible for you to take. It’s not just about avoiding the obvious dangers; it’s about reducing your cognitive load. You can trust the route it’s giving you, freeing up your mental energy to focus on the immediate task of driving, not constantly scanning for height-restriction signs.
The databases these units use are extensive, documenting thousands of low clearance obstacles, weight-restricted bridges, and roads designated as unsuitable for large vehicles. While no system is 100% infallible and you should always heed road signs, it transforms your journey. Instead of reacting to hazards, you are proactively guided around them. This is the essence of digital reconnaissance; using technology to clear the path ahead so you can drive with confidence, knowing the route is pre-vetted for your specific vehicle.
The signage trap that leads to hefty fines in city centers
In Europe especially, a new kind of trap awaits the uninformed motorhome driver: the Low Emission Zone (LEZ). These aren’t physical barriers but designated areas in city centers where only vehicles meeting certain emission standards are allowed. Entry is monitored by cameras, and failure to comply results in an automatic, hefty fine. The signs can be complex and confusing, often showing a series of vehicle categories and symbols that are meaningless if you haven’t done your homework.
For example, entering a French « Zone à Faibles Émissions » (ZFE) without the correct Crit’Air sticker on your windshield can result in an automatic €68 fine, even if your vehicle is clean enough to qualify. You are fined for a paperwork failure. Germany, Italy, Spain, and the UK have similar schemes, each with its own specific rules, sticker requirements, and penalty systems. Believing you can simply « figure it out » on arrival is a recipe for a collection of expensive letters in your mailbox weeks after your trip.

A professional driver treats these zones as part of their pre-trip « digital reconnaissance. » They know which cities on their route have these restrictions and they acquire the necessary permits or stickers weeks in advance. The table below gives a brief overview of the complexity involved, demonstrating why this cannot be an afterthought.
| Country | Zone Name | Sticker Required | Motorhome Restrictions | Fine Range |
|---|---|---|---|---|
| France | ZFE / ZPA | Crit’Air (€3.81) | Based on Euro standard and category | €68 |
| Germany | Umweltzone | Umweltplakette (Green) | Most zones require green sticker only | €80-€100 |
| Italy | ZTL | Varies by city | Camera-enforced, permits sometimes available | €75-€450 |
| Spain | ZBE | Environmental label | 150+ cities, foreign stickers accepted | Varies by city |
Camera vs Partner guide: Which helps you park within 5cm?
The question isn’t which one is better; it’s how to use them as a cohesive system. A reversing camera is an invaluable tool, but it has limitations. A partner is the ultimate sensor, but they need clear instructions. A pro uses both to achieve precision. The camera tells you what’s directly behind your bumper. It gives you hard data on distance to a fixed object. As the team at The Gap Decaders rightly points out, it’s a key piece of equipment.
A reversing camera is a motorhome essential. For a relatively small amount of money, you will have complete peace of mind when manoeuvring and reversing your motorhome.
– The Gap Decaders, Motorhome Reversing Camera Guide
However, the camera can’t see the top corners of your roof, nor can it spot the low-hanging branch just out of frame. This is where your partner comes in. They are not just a « spotter »; they are your « clearance officer. » Their job isn’t to shout « Stop! »; it’s to provide specific intelligence. Before you start the manoeuvre, establish a simple, non-verbal system of hand signals. One clear system is: hands apart for « plenty of space, » bringing them closer together as the gap narrows, and a clenched fist for « stop immediately. »
The driver’s job is to trust the fist. The second you see it, you stop. No questions. The camera is for the fine-tuning—getting that last 50cm to 5cm perfect. The partner is for the big picture—ensuring the entire 3-meter-high, 8-meter-long box you’re driving fits in the space without a scratch. When the camera gives you data and your partner gives you situational awareness, you can park with centimeter precision and zero stress.
Highway vs Backroads: Is the view worth double the gas consumption?
This is a classic dilemma, but the amateur frames it as « speed vs. scenery. » The professional driver knows it’s a much more complex cost-benefit analysis involving fuel, vehicle wear, and, most importantly, driver fatigue. The beautiful, winding backroad comes at a significant cost that goes far beyond the fuel pump.
On a highway, you’re in top gear, engine at a low, steady RPM, consuming fuel at a baseline rate. The moment you hit the scenic route, you’re constantly shifting, braking, and climbing steep grades in low gears. As many drivers have experienced, first and second gear fuel consumption can triple or quadruple compared to cruising. But the real cost is the mental energy. Navigating narrow lanes, watching for low branches, and managing oncoming traffic requires constant, high-level alertness. This « cognitive load » is exhausting.
After two hours on a scenic backroad, you are likely far more mentally drained than after six hours on a highway. This fatigue impacts your decision-making and your enjoyment of the destination. A professional hauler knows their daily limit for high-concentration driving. You should too. Sometimes, the « boring » highway is the smartest choice, saving your energy—and your vehicle’s brakes and transmission—for the destination itself. The decision isn’t emotional; it’s a strategic allocation of resources.
| Factor | Highway Route | Scenic Backroad Route |
|---|---|---|
| Fuel Consumption | Baseline (steady cruising) | 3-4x higher (low gear, inclines) |
| Mental Fatigue | Low (predictable conditions) | High (constant alertness required) |
| Vehicle Wear | Minimal (steady speed) | Significant (brakes, transmission, tires) |
| Risk of Damage | Very low (wide lanes) | Moderate to high (narrow passages, low branches) |
| Time Efficiency | Fast (direct routes) | Slow (winding roads, stops) |
| Scenic Value | Limited | Exceptional |
How to install tie-down kits without damaging the fabric mechanism?
The question of installation is directly answered by understanding how awnings get damaged in the first place, especially on the rough, uneven surfaces of village roads. It’s not usually a single catastrophic event, but a slow death by a thousand vibrations. An improperly installed or secured tie-down kit is a primary cause. The key is to ensure the system is secure but not over-stressed.
When you install tie-down brackets, their job is to secure the awning case, not to fight the natural flex of the vehicle’s body. On cobblestones or potholed roads, the motorhome’s chassis will twist and flex slightly. If your tie-down is installed too rigidly or if straps are cinched down with excessive force, that stress is transferred directly into the awning’s delicate mechanism, even when it’s closed. This can warp the housing, misalign the gears, and eventually cause the fabric to bunch or tear when you try to open it.
The goal of a proper installation is to allow you to pass a simple pre-drive security check every time. Before tackling a narrow, bumpy route, you must ensure there is zero opportunity for the awning to become a hazard. This checklist isn’t just about safety; it’s a diagnostic for your installation quality. If you can’t tick every box, your installation may be putting your awning at risk.
- Full Retraction: Verify the awning is completely closed and the locking mechanism has engaged. A partially open awning can unfurl from vibrations.
- Strap Management: Ensure all tie-down straps are stowed flat. A loose end is a snagging hazard that can rip the entire assembly from the vehicle.
- Hardware Check: Inspect the mounting bolts. If they are loose, it indicates vibration is already causing a problem. A good installation, using vibration-dampening washers, will prevent this.
- No Fabric Strain: When closed, the fabric should be relaxed. If the tie-downs are pulling on the case, they are transferring stress to the internal fabric roller, leading to future damage.
Key Takeaways
- Mastering tail swing is about understanding pivot point geometry, not just looking in your mirrors.
- Proactive planning with the right tools (specialized GPS, LEZ research) eliminates the majority of on-road stress.
- Every driving decision, from route choice to power usage, is a cost-benefit analysis of fuel, vehicle wear, and your own mental energy.
Campsite Electricity: Why Your Kettle Trips the Breaker Every Morning?
That frustrating « click » from the campsite hook-up post just as your morning tea is about to boil is a classic motorhome problem. It’s not a faulty kettle; it’s a failure in amperage budgeting. You’re simply trying to draw more electrical current (Amps) than the campsite’s circuit breaker is designed to allow. In Europe, hook-ups are often rated at 16, 10, or even just 6 Amps. Trying to run a high-power appliance on a low-amperage supply will trip the breaker every time.
To avoid this, you need to think like an accountant. Your amperage supply is your total budget. Every appliance you turn on « spends » some of that budget. A standard 2000W electric kettle pulls around 8.7 Amps. On a 10A hook-up, that leaves you with virtually no budget for anything else. If the water heater or a small space heater is also running, you’re instantly overdrawn, and the breaker cuts you off. The source of the table may be titled about low clearances, but the data on appliance power consumption is a vital safety resource for any RVer.
The first step is to identify the amperage limit of your pitch—it’s usually marked on the post. Then, know the power draw of your appliances. High-power « heating » items like kettles, toasters, hair dryers, and space heaters are the main culprits. You can’t run two of them at once on most campsite supplies. The solution is simple budgeting: turn off the water heater and space heater before you boil the kettle. Or, invest in low-wattage camping-specific versions of these appliances. The table below illustrates why your household kettle is the source of your morning frustration.
| Appliance | Typical Power Draw (Watts) | Amps at 230V | Compatible with 6A Hook-up? | Compatible with 10A Hook-up? | Compatible with 16A Hook-up? |
|---|---|---|---|---|---|
| Electric Kettle | 2000-3000W | 8.7-13A | No | No (if 3000W) | Yes |
| Toaster | 800-1500W | 3.5-6.5A | Yes (if alone) | Yes | Yes |
| Space Heater | 1500-2000W | 6.5-8.7A | No | Yes (if alone) | Yes |
| Microwave | 600-1000W | 2.6-4.3A | Yes | Yes | Yes |
| Hair Dryer | 1500-2000W | 6.5-8.7A | No | Yes (if alone) | Yes |
| Water Heater (immersion) | 1000-2000W | 4.3-8.7A | No | Yes (if alone) | Yes |
When to detour: Avoiding market days in small towns
Following your GPS blindly into a small town can lead to one of the most stressful situations a motorhome driver can face: getting stuck. The 2023 incident in Padstow, Cornwall, is a perfect cautionary tale. A driver, following their sat nav, ended up wedged on a narrow road completely blocked by the town’s market day. The result was not just a damaged clutch and high repair costs, but immense emotional distress for a driver who was, according to onlookers, « in bits. »
This is where the professional’s mindset of proactive de-escalation comes in. The goal is to never get into that situation in the first place. Temporary events like markets, local festivals, or even large funerals don’t appear on a standard GPS. Avoiding them requires a deeper level of « digital reconnaissance » before you even start your engine. You must assume the map is not the territory and actively look for temporary changes.
Before attempting to drive into any historic town center, take 15 minutes to scout ahead online. This small investment of time can save you hours of stress and thousands in potential damages. The process is simple and is the difference between a relaxing visit and a travel nightmare. The following plan of action should become a non-negotiable part of your pre-arrival routine.
Your pre-entry digital scouting plan
- Check local town hall websites (Mairie/Comune) 48 hours before arrival; many publish market schedules and event calendars.
- Search town-specific Facebook community groups for real-time updates on markets, festivals, and other street-blocking events.
- Use Google Maps’ « Popular Times » feature to spot unusual activity spikes that could indicate an event.
- If you do get stuck, turn on hazard lights, stay calm, and use simple hand gestures. A slow, patient retreat is always better than a forced, damaging advance.
- Identify perimeter parking areas on the town’s outskirts using satellite view *before* entry. The best strategy is often to park and walk.