In summary:
- Your awning isn’t just fabric; it’s an airfoil subject to powerful forces of lift, load, and leverage.
- Properly securing your awning means understanding and countering these physical forces, not just hoping for the best.
- Water is your awning’s heaviest enemy. A flat pitch allows water to pool, creating hundreds of pounds of focused weight that can buckle metal arms.
- Wind protection is about shock absorption. Tie-downs with springs are critical to convert destructive gusts into manageable oscillations.
- Maintenance is prevention. Storing an awning even slightly damp invites mold that chemically destroys the fabric’s integrity.
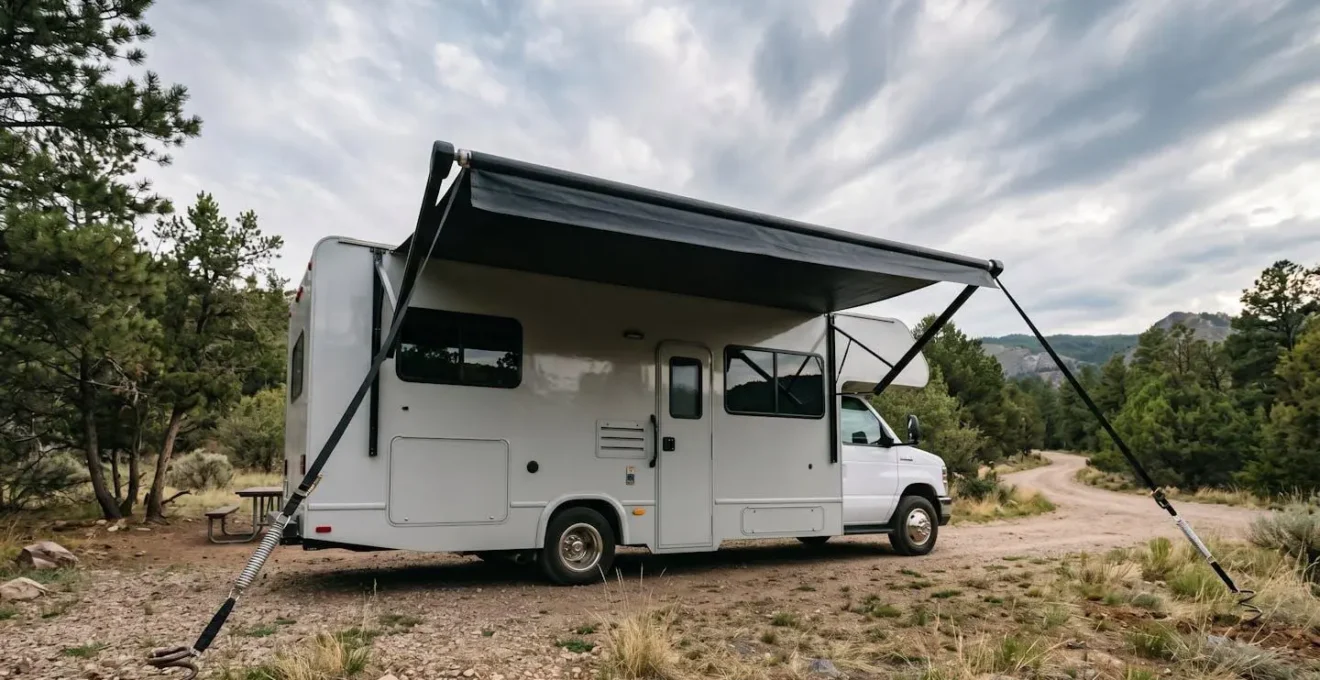
There’s a feeling every RV owner knows. You’re enjoying a peaceful evening, the awning perfectly extended, when the wind suddenly picks up. A nervous glance, a quick check of the weather app—and the question that haunts every trip: « Should I roll it up? » For many, especially owners between 40 and 65 who have invested heavily in their mobile freedom, this fear is palpable. It’s the fear of a sudden, violent gust catching that fabric sail and turning a five-figure investment into a mangled wreck of aluminum and vinyl, ripped from the side of your motorhome.
The common advice is often reactive and simplistic: « Roll it up when it gets windy » or « Just use some tie-downs. » While not wrong, this advice misses the fundamental point. It treats the symptom—a flapping awning—without addressing the cause. It fails to equip you with the mechanical understanding needed to proactively protect your gear. This isn’t about guesswork; it’s about physics. Your awning is a complex mechanical system, and protecting it requires a technician’s mindset.
But what if the key wasn’t just reacting to the weather, but systematically defeating the forces of nature before they can do damage? What if you could understand the principles of load distribution, shock absorption, and hydrostatic pressure to make your awning resilient, not just retracted? This is the core of true RV mastery: moving from fear-based reaction to knowledge-based prevention. This guide is built on that principle. We’re not just going to tell you *what* to do; we’re going to explain the mechanical *why* behind every action.
We will break down the hidden dangers that compromise your awning’s structure, from the silent but immense weight of pooled water to the corrosive attack of coastal air. We will detail the precise, non-negotiable techniques for installing tie-downs that absorb energy instead of just transferring it. By understanding these mechanical principles, you can transform your awning from a point of anxiety into a reliable and secure extension of your living space, no matter what the weather throws at you.
This article will guide you through the essential mechanical knowledge needed to secure your RV. The following summary outlines the key areas we will cover, from the physics of water and wind to the critical details of towing stability.
Summary: A Technician’s Guide to RV Awning Security and Stability
- Why a flat awning collapses under water weight in 20 minutes?
- How to install tie-down kits without damaging the fabric mechanism?
- The fabric tearing sound that signals immediate retraction
- Electric vs Manual: Which is more reliable when power fails?
- When to roll it up: The drying rule to prevent black mold
- Why salt spray destroys aluminum poles in less than a week?
- Why heavy items in high cupboards cause instability?
- Towing a Caravan: How to Stop the « Snake » Wobble Before It Crashes?
Why a flat awning collapses under water weight in 20 minutes?
The danger of rain on an awning is not the moisture itself, but its weight. A flat or improperly pitched awning acts like a bucket, and water is deceptively heavy—a single gallon weighs over 8 pounds. This leads to catastrophic failure with alarming speed. In a real-world incident reported by an experienced RVer, an electric awning collapsed after just 15-20 minutes of light rain. The owner returned to find both support arms buckled outwards, the structure destroyed by the immense force of the pooled water. This wasn’t a freak storm; it was a simple failure to account for hydrostatic pressure.
When an awning is flat, water has nowhere to go. It pools in the center, causing the fabric to sag. This sag creates a deeper pool, which collects more water, which causes more sagging—a rapid, vicious cycle. The fabric, while strong, is flexible. All of that focused weight is transferred directly to the rigid support arms at a point of maximum leverage. The arms are designed to handle downward pressure evenly, not a concentrated, thousand-pound load in their center. They don’t bend; they buckle, often at the elbow joints or attachment points to the RV, causing severe damage to both the awning and the vehicle’s sidewall.
The solution is simple mechanical engineering: you must create a slope. Even a slight angle of a few inches from one side to the other is enough to channel water off the fabric before it can accumulate. The principle is that water pooling can cause awning fabric to sag and collapse, so your primary goal is to prevent that pooling from ever starting. Never trust an « auto-dump » feature to save you. These systems only engage after a significant amount of weight has already accumulated—weight that is already stressing your fabric and hardware. Proactive pitching is the only reliable method.
Always assume your awning is a flat roof that needs a drain, and you are the one responsible for building that drain into its setup every single time.
How to install tie-down kits without damaging the fabric mechanism?
Installing a tie-down kit isn’t about just pinning the awning to the ground; it’s about creating a dynamic suspension system that can absorb energy. Doing it incorrectly can cause more damage than the wind itself by creating stress points and transferring shock directly to the RV’s structure. The goal is to manage forces, not just fight them. A proper installation follows precise mechanical principles to distribute load and absorb shock, turning violent gusts into manageable oscillations.
The most critical component is a shock-absorbing spring integrated into the strap. This small metal coil is what separates a professional setup from a damaging one. When a gust of wind lifts the awning, the spring extends, absorbing the sudden jerk and converting that sharp, potentially destructive force into a gentle stretch-and-recoil motion. Without a spring, the entire shock load is transferred instantly through the strap to the roller tube and the RV sidewall, risking a catastrophic failure.
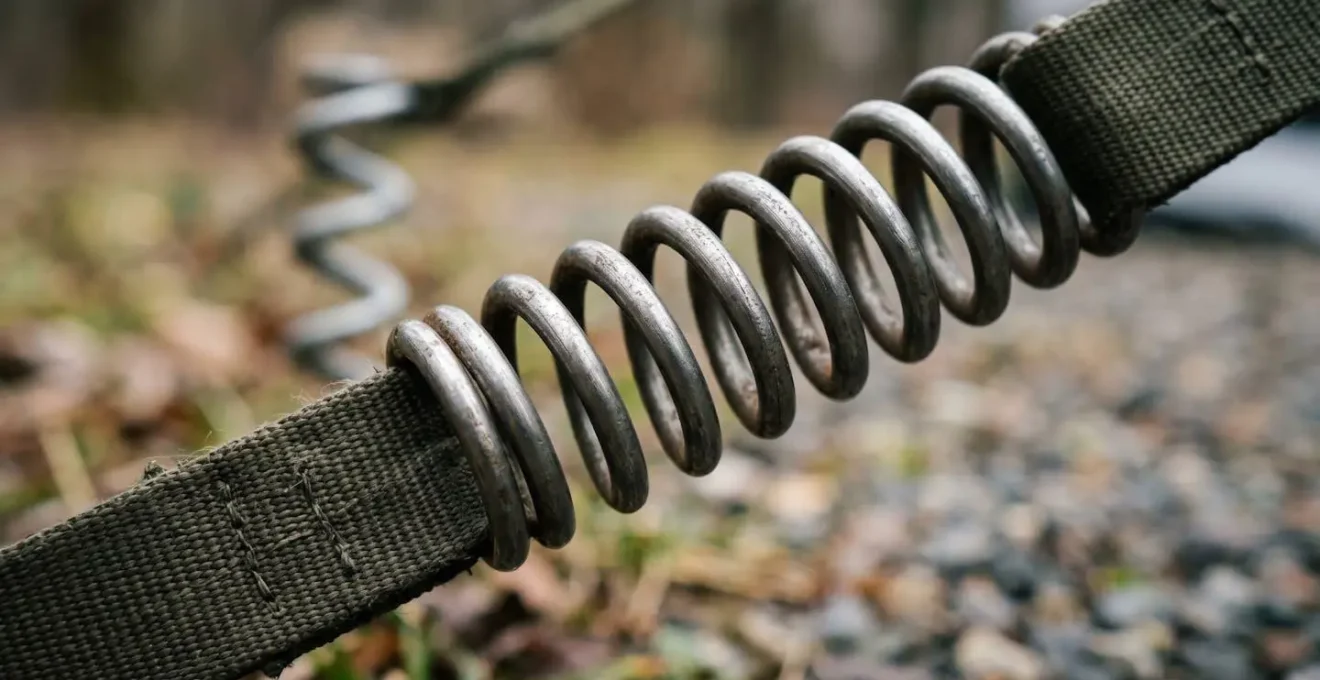
As the image above illustrates, the spring is the heart of the system. The rest of the setup is designed to allow it to do its job effectively. First, straps must be secured to the roller tube at each end, never in the middle, to distribute the load evenly and prevent bowing. Second, the straps must be angled at approximately 45 degrees to the ground. This specific angle is a matter of physics; it allows the anchor to resist both the lateral (side-to-side) and the vertical (upward) lifting forces of the wind simultaneously. Finally, ensure straps are snug but never over-tightened. Excessive tension pre-stresses the entire assembly, negating the spring’s ability to absorb shock and making the system rigid and brittle.
Protect chafing points where straps may rub against the fabric with a simple piece of pool noodle or cloth. This small step prevents abrasion that can lead to fabric fatigue and tearing over time, a crucial detail confirmed by RV maintenance engineers.
The fabric tearing sound that signals immediate retraction
There is a distinct set of sounds an RV awning makes under stress, and as a technician, I can tell you they are not to be ignored. It’s not the gentle flapping in a light breeze; it’s the sharp, percussive *whump* or a rapid-fire *stuttering* noise as the fabric violently tightens and slackens. This is the audible signal of your awning reaching its operational limit. When you hear this, it’s not a warning of what *might* happen; it’s the sound of damage already occurring on a microscopic level.
This sound is generated when the wind catches the underside of the awning, creating aerodynamic lift—the same principle that allows an airplane wing to fly. The fabric billows up, then the wind shifts, and it snaps taut. This rapid oscillation creates immense stress, not just on the fabric itself, but on every single stitch, grommet, and attachment point. Each « whump » is a shock load, causing micro-tears in the vinyl or acrylic and putting immense strain on the seams and the roller tube mechanism. You are literally hearing the components of your awning being violently jerked apart and slammed back together, hundreds of times per minute.
Manufacturer specifications are clear and should be treated as absolute law. According to technical guides, standard RV awnings are not engineered to handle sustained winds exceeding 20 mph, and gusts over 25 mph are sufficient to cause serious structural damage. That unnerving tearing sound is your final, audible warning that you are operating in or beyond this critical threshold. The moment you hear it, your only course of action is immediate retraction. Do not wait to see if it gets worse. Do not hope it will pass. The sound itself is the signal that the forces acting on your awning have become destructive.
Treat that sound with the same respect you would a smoke alarm. It is an unambiguous, urgent call to action to prevent catastrophic failure.
Electric vs Manual: Which is more reliable when power fails?
The choice between an electric and a manual awning is often framed as convenience versus cost. However, from a mechanical reliability and safety standpoint, the most important question is: which system is more dependable when things go wrong? Specifically, in a sudden storm with a power failure, how will you retract your awning? This is where the simple, robust nature of the manual awning proves its superior reliability.
An electric awning relies on a functioning 12V system. If your battery is low or dead, or if the motor stalls due to low voltage—a common occurrence—you are left with a fully extended awning acting as a massive sail in a growing storm. While most electric awnings have a manual override, it often requires a special tool or a cordless drill (which must be charged), and the procedure can be slow and difficult, especially in high winds and driving rain. The manual awning, by contrast, is completely independent of the RV’s power system.
The following table compares the two systems based on their performance in critical, real-world scenarios. As outlined by RV repair specialists at McBride’s RV Service & Paint, the simpler system often provides greater peace of mind.
| Feature | Manual Awning | Electric/Power Awning |
|---|---|---|
| Power Dependency | No power required – ideal for off-grid camping | Requires RV battery or electrical connection |
| Durability | More durable due to simpler design with fewer electrical components | More complex electrical and mechanical components prone to failure |
| Emergency Retraction | Always manually operable with hand crank or pull strap | Manual override requires special tool/cordless drill; difficult if battery is dead or motor stalled |
| Maintenance | Minimal maintenance, easier and more affordable repairs | Higher maintenance due to motors, sensors, and electrical systems |
| Power Failure Scenario | Unaffected – continues to function normally | Low voltage from dying battery can cause motor to stall halfway, leaving awning vulnerable |
| Cost | Significantly less expensive upfront | More expensive initially and for repairs |
| Adjustment Flexibility | Can be secured at various angles for weather conditions | Limited angle control on many models |
Manual awnings require physical effort to extend and retract, typically using a hand crank or pull strap. They are built with simple mechanisms and require minimal maintenance. Since manual awnings do not rely on electrical components, they are generally more durable and long-lasting than their power counterparts.
– McBride’s RV Service & Paint, Manual vs. Power RV Awnings Guide
While the push-button convenience of an electric awning is appealing, a technician’s perspective prioritizes predictable, reliable operation in adverse conditions. The manual awning, with its simple mechanics and lack of power dependency, is the undisputed winner in terms of pure reliability.
When to roll it up: The drying rule to prevent black mold
One of the most insidious and destructive enemies of your RV awning is not wind or rain, but what they leave behind: moisture. Rolling up a damp awning, even one that feels mostly dry to the touch, is like placing a petri dish in a warm, dark incubator. Within 24-48 hours, mold and mildew spores, which are always present in the air, begin to colonize the fabric. This is not just a cosmetic issue. As RV maintenance specialists confirm, mold and mildew are living organisms that feed on the materials of the fabric, causing irreversible staining and chemical degradation that severely compromises its structural integrity and shortens its lifespan.
The drying process is a matter of material science. The two most common awning fabrics, vinyl and acrylic, behave very differently with moisture. Vinyl is non-porous; water sits on its surface. It dries quickly but can trap moisture in the seams or hems. Acrylic is a woven, breathable fabric, much like a canvas jacket. It can hold moisture deep within its fibers for hours after the surface feels dry. It requires significantly more air-drying time to be truly moisture-free.

The cardinal rule is to always allow the awning to air-dry completely before storage. A critical but often overlooked area is the hidden moisture zone: the last foot of fabric that wraps around the roller tube. This section is compressed, gets the least air circulation, and is always the last part to dry. A good rule of thumb is to allow an extra 30 minutes of drying time after the main canopy feels completely dry to the touch. Never use heat to speed up the process, as it can damage the fabric.
Checklist: Awning Drying and Mold Prevention
- Material Check: Identify if your awning is vinyl (solid, plastic-like) or acrylic (woven, fabric-like) to estimate drying time.
- Air-Dry Completely: Ensure the entire canopy is 100% dry to the touch before rolling it up. Never store it damp, even for a short period.
- Inspect the Hidden Zone: Pay special attention to the last foot of fabric near the roller tube. Confirm it is as dry as the rest of the canopy.
- Post-Cleaning Treatment: After cleaning and drying, apply the correct protectant—UV treatment for vinyl, waterproofing for acrylic—to restore its protective qualities.
- Annual Cleaning: Perform a thorough cleaning at least once per year, before storage, to remove dirt and organic matter that mold feeds on.
If you are forced by a sudden storm to roll up a wet awning, make it your absolute top priority to unroll it and let it dry completely at the very next opportunity. Every hour it remains wet is an invitation for destructive mold to take hold.
Why salt spray destroys aluminum poles in less than a week?
For RV owners who love coastal camping, there’s a hidden danger that can compromise your equipment with terrifying speed: salt spray. Aluminum awning poles, which seem robust and rust-proof, can be severely damaged in under a week of exposure to salty air. This isn’t ordinary rust; it’s a rapid, aggressive electrochemical process called galvanic corrosion.
Here’s the simple science: for galvanic corrosion to occur, you need three things: two different metals, an electrolyte, and an electrical connection. Your awning pole provides the metals—the aluminum tube itself (a less noble metal, or anode) and any steel hardware like screws or brackets (a more noble metal, or cathode). The salt spray, mixed with morning dew or humidity, creates a powerful electrolyte. The direct contact between the steel and aluminum provides the electrical pathway.
The result is a natural battery where the aluminum pole actively sacrifices itself to protect the steel. The salt-filled moisture accelerates this process exponentially. You won’t see orange rust like on steel. Instead, you’ll see a white, chalky powder and pitting or blistering on the aluminum surface. This is the aluminum being eaten away. It’s not just a surface issue; this corrosion weakens the pole’s structural integrity, making it brittle and prone to snapping unexpectedly under the load of wind or rain. What was once a strong support becomes as fragile as a piece of chalk.
The only defense is a rigorous freshwater rinse of all poles and metal components every single day you are near the coast, followed by an application of a corrosion-inhibiting spray. It’s a chore, but it’s the only way to prevent your equipment from dissolving around you.
Why heavy items in high cupboards cause instability?
One of the most common mistakes new RV owners make is packing their motorhome like it’s a stationary house. They place heavy items like canned goods, bottles, and small appliances in the most convenient overhead cupboards. From a mechanical standpoint, this is one of the most effective ways to compromise your vehicle’s stability on the road. The reason lies in a fundamental principle of physics: the center of gravity (CG).
Think of your RV as a boat on the road. A low center of gravity makes it stable and resistant to rolling. A high center of gravity makes it « top-heavy » and prone to tipping. Every heavy item you place in an overhead cupboard actively raises your vehicle’s overall center of gravity. While a few cans may seem insignificant, the cumulative effect of hundreds of pounds of gear stored high up can dramatically alter the vehicle’s handling characteristics.
A higher CG has two dangerous effects. First, it increases the amount of body roll during turns, making the RV feel « wobbly » and less responsive. Second, and more dangerously, it makes the vehicle far more susceptible to crosswinds. A sudden gust of wind from the side has a much longer lever arm to act upon when the center of gravity is high, pushing the vehicle sideways with greater force. This can initiate the dreaded « tail wagging the dog » sway that is a precursor to losing control. Loading your RV isn’t just about fitting things in; it’s an exercise in weight management.
The rule is simple and non-negotiable: heavy items go low. Store canned goods, water bottles, tools, and other dense objects in lower cupboards, under beds, or in basement storage compartments, as close to the axles as possible. Keep the high cupboards for light, bulky items like clothes, towels, and plastic dishes. This single change will have a greater impact on your driving safety and comfort than almost any other.
Key Takeaways
- Defeat Water with Pitch: A sloped awning cannot pool water. Creating an angle is the only foolproof way to prevent catastrophic collapse from water weight.
- Tame Wind with Springs: Shock-absorbing springs in your tie-downs are non-negotiable. They convert destructive wind gusts into manageable energy, protecting your entire awning system.
- Preserve Fabric with Air: Mold is a chemical threat. Never store an awning damp, and always give the fabric extra time to air-dry completely to prevent its integrity from being destroyed.
Towing a Caravan: How to Stop the « Snake » Wobble Before It Crashes?
Trailer sway, often called the « snake » or « fishtailing, » is one of the most terrifying experiences a driver can have. It starts as a gentle side-to-side wobble and can escalate into a violent, uncontrollable oscillation that ends in a catastrophic crash. This isn’t a random event; it’s a feedback loop caused by a combination of factors, including improper weight distribution, crosswinds, and, most importantly, incorrect driver reaction. Understanding how to prevent it—and what to do when it starts—is a life-saving skill.
The primary cause of trailer sway is an imbalanced load, specifically insufficient tongue weight. If there’s too much weight at the very back of the caravan, it acts like a pendulum, initiating the sway. A proper setup requires about 10-15% of the total trailer weight to be on the hitch ball. Other contributing factors include mismatched tire pressures, excessive speed (especially downhill), and a sudden steering input or gust of wind that acts as the initial trigger.
When sway begins, your instincts will scream at you to do two things: slam on the brakes and jerk the steering wheel to correct. Both actions are a recipe for disaster. Hard braking on the tow vehicle will only lighten the rear wheels, making the sway worse and potentially causing a jackknife. Your one and only goal is to get the trailer pulling straight behind you again. The correct—and highly counter-intuitive—response is to take your foot off the brake and, if possible, manually apply *only the trailer brakes* using the override on your brake controller. This creates drag at the back of the system, pulling the entire rig into a straight line. If you don’t have a manual override, a very slight, steady acceleration can also help pull the trailer straight before you slowly ease off the power to decelerate.
Prevention is always the best cure. Use a tongue weight scale to ensure proper loading before every trip, invest in a quality anti-sway hitch system, and always adjust your speed to the conditions. Understanding and respecting the physics of your rig is the foundation of safe towing.