In summary:
- Successful camping isn’t about a longer checklist, but a smarter timeline that front-loads decisions.
- Transform packing from a chaotic scramble into a calm, systematic process by creating dedicated « staging zones. »
- Meal prepping at home is the single biggest factor in reducing daily campsite chores and increasing family fun time.
- Strategic packing isn’t just about fitting things in; it’s an architectural plan for safety, stability, and immediate access to essentials upon arrival.
- Minimize campsite stress by packing only what you need, preventing clutter that creates unnecessary work.
The vision of a family camping trip is idyllic: crackling campfires, starry nights, and happy children exploring nature. The reality for many parents, however, is a frantic, last-minute scramble of packing lists, grocery runs, and the nagging fear of forgetting something crucial. This pre-trip chaos often spills over into the vacation itself, turning what should be a relaxing escape into a stressful logistical exercise. Most advice focuses on what to pack, offering endless checklists that can paradoxically increase the feeling of being overwhelmed.
The common approach is to treat trip preparation as a single, monumental task to be tackled the weekend before departure. But what if the secret to a panic-free trip wasn’t a better list, but a better system? The key isn’t more information, but a structured timeline that distributes tasks, automates decisions, and transforms overwhelming chaos into manageable, bite-sized actions. This is the professional organizer’s method: shifting from a « what to do » mindset to a « when to do it » system.
This guide provides that system. Over the next two weeks, we will walk through a methodical sequence of planning, from meal prep and gear staging to packing architecture and activity planning. By front-loading decisions and creating predictable workflows, you can eliminate the source of panic and arrive at your campsite feeling prepared, in control, and ready to actually enjoy the trip you worked so hard to plan.
To help you navigate this systematic approach, we’ve broken down the process into key stages. This structure will guide you from high-level planning weeks in advance to the final, crucial details just before you leave, ensuring a smooth and organized preparation phase.
Summary: The 2-Week Timeline: How to Prep a Family Camping Trip without Panic?
- Why meal prepping at home saves 2 hours of daily camp chores?
- How to create a staging area to ensure nothing is forgotten?
- The weather check mistake made 3 days too early
- Reservation vs Walk-in: Is the stress of uncertainty worth the freedom?
- Sequencing the packing: Heavy items vs Accessibility
- Why structured activities prevent boredom tantrums before dinner?
- Why overpacking leads to a cluttered and stressful campsite?
- First-Time Campers: The 10 Items You Actually Need (And What to Leave)?
Why meal prepping at home saves 2 hours of daily camp chores?
The single greatest source of daily campsite labor is food: preparation, cooking, and cleanup. By shifting this work to your home kitchen in the week before your trip, you are not just packing food; you are « front-loading » decisions and labor. This strategy is the key to improving your chore-to-fun ratio. Instead of spending precious vacation time chopping onions and washing pots, you can execute simple, pre-planned meals in minutes, freeing up hours for hiking, relaxing, or spending time with family.
A simple case study illustrates the impact. One family blogger tested a « freeze-and-thaw » method, pre-cooking and freezing meals like chili. These frozen blocks acted as ice packs on day one and were perfectly thawed and ready to heat by day two. They reported saving approximately 90 minutes of daily cooking and prep time, directly converting chore time into activity time. The core principle is to make your campsite the place where you *assemble* and *heat*, not where you *prepare from scratch*.
Start by pre-chopping all vegetables, marinating meats, and storing them in labeled, ready-to-use bags. For breakfasts, pre-mixing pancake batter or oatmeal in squeeze bottles can turn a 20-minute process into a 2-minute one. The goal is to eliminate on-site decision-making and measuring. Packing complete one-pot meal kits with pre-portioned ingredients is an advanced technique that completely automates your camp kitchen, maximizing your time spent enjoying the outdoors.
How to create a staging area to ensure nothing is forgotten?
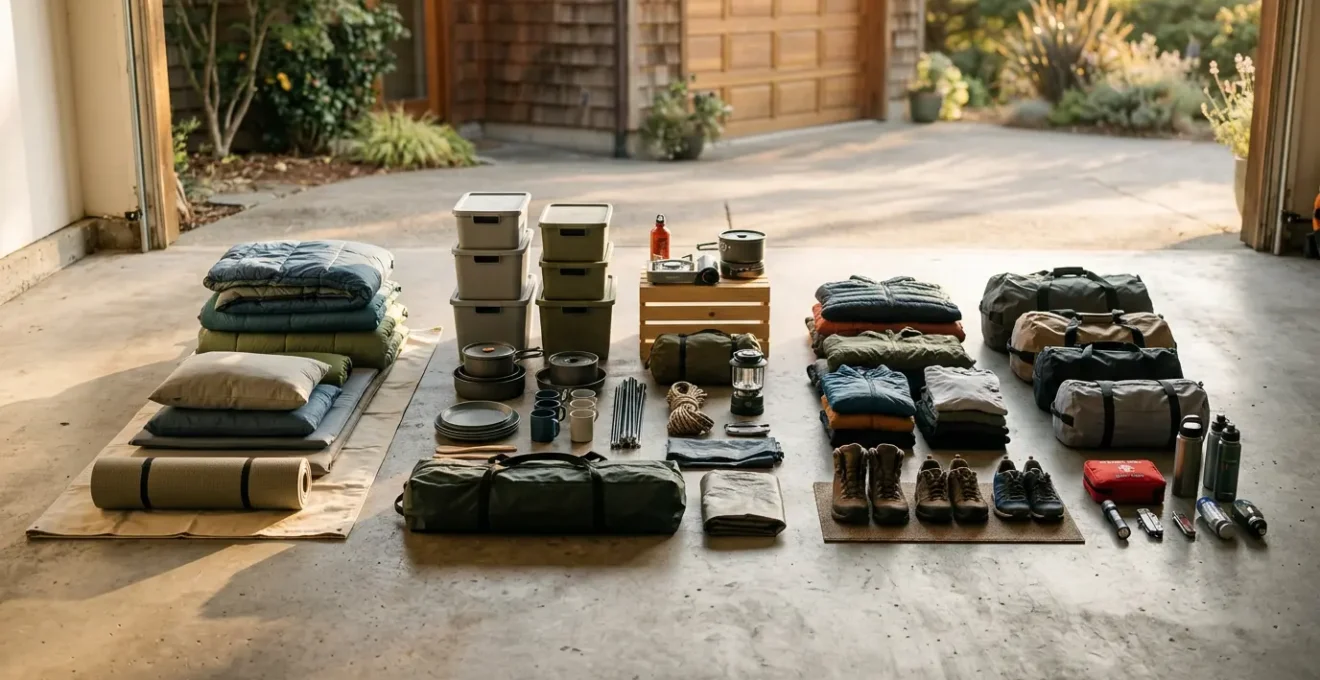
The fear of forgetting a critical item—from tent poles to a child’s favorite stuffed animal—is a primary source of pre-trip anxiety. A « staging area » is a professional organizer’s solution to this problem. It is a designated space in your home (a corner of the garage, a spare room) where all camping gear is gathered, sorted, and checked off a list *before* packing begins. This system transforms packing from a chaotic treasure hunt into a methodical assembly line, virtually eliminating the possibility of leaving something behind.
The most effective way to organize your staging area is with the « Zone Defense » method. Instead of a single pile of gear, you create distinct zones for each category of equipment. This visual organization makes it easy to see what you have and what might be missing. It also allows multiple family members to contribute to the packing process without creating chaos.
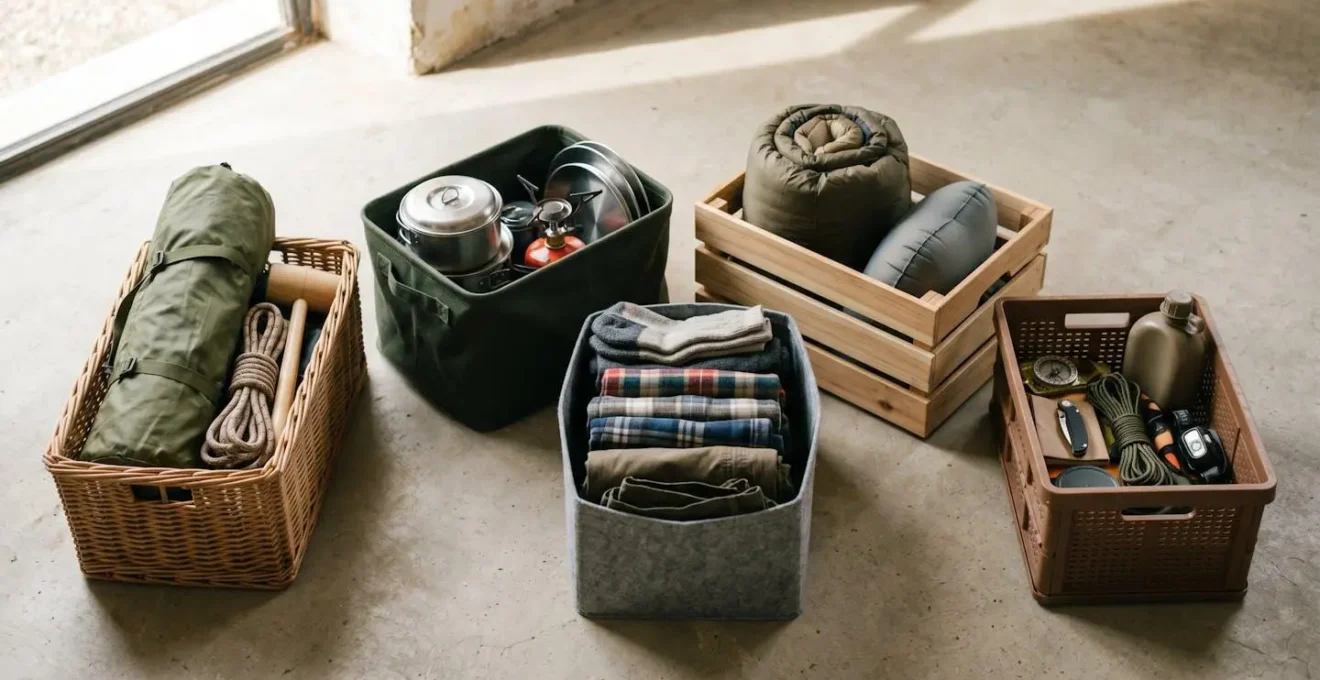
As you can see, organizing by zones provides immediate clarity. A typical setup includes:
- Zone 1 (Shelter): Tent, stakes, mallet, ground tarp, and rain fly.
- Zone 2 (Kitchen): Camp stove, fuel, cookware, utensils, cooler, and food bins.
- Zone 3 (Sleeping): Sleeping bags, pads, pillows, and blankets.
- Zone 4 (Clothing): Bins or bags organized by family member.
- Zone 5 (Safety & Essentials): First-aid kit, headlamps, lanterns, and daypacks.
Adopt the « Touch It Once » rule: once an item is checked off your list and placed in its designated zone, it does not move until it’s time to pack the car. This disciplined approach prevents items from being misplaced after they’ve been accounted for, ensuring everything that makes it to the staging area also makes it to the campsite.
The weather check mistake made 3 days too early
Checking the weather seems like a simple task, but timing is everything. A common mistake is to check the forecast too far in advance, make definitive packing decisions, and then be caught off guard by last-minute changes. Weather models are significantly less reliable more than a week out. According to outdoor weather forecasting experts, detailed accuracy for precipitation and hourly conditions really only solidifies within the 3-day window before your trip.
Instead of a single check, adopt a systematic, 3-tiered weather strategy to guide your packing decisions with increasing precision:
- 10 Days Out: The Big Picture. Look at general temperature trends and seasonal patterns. This is the time to make major gear decisions. Will you need a heavy-duty 4-season tent or a lighter 3-season one? Are overnight temperatures low enough to require warmer sleeping bags?
- 3 Days Out: The Detailed Plan. Now, forecasts become more reliable. Monitor wind speed, humidity, and specific overnight lows. This information allows you to finalize your clothing layers, confirm your rain gear needs, and decide on the number of blankets.
- 24 Hours Out: The Final Check. Review the hourly forecast and radar maps. This is for immediate operational decisions: will it be raining during your tent setup? Are there storm warnings that require adjusting your tarp configuration?
For maximum confidence, cross-reference multiple sources. Compare your local news forecast with a specialized outdoor model like Weather.gov or Windy to understand the range of possibilities. Finally, always pack for the unexpected. Even with a perfect forecast, a « just-in-case » rain jacket on a sunny trip or a pair of shorts for a cool-weather trip is cheap insurance against a forecast bust and a key part of a truly resilient plan.
Reservation vs Walk-in: Is the stress of uncertainty worth the freedom?
Choosing between securing a reservation and trying for a walk-in (or « first-come, first-served ») campsite is a fundamental decision that pits planning against spontaneity. For families, especially those with young children or on a tight schedule, the « guaranteed spot » offered by a reservation is almost always the superior choice. The peace of mind it provides eliminates arrival anxiety—the stress of driving for hours only to find that all campsites are full, a scenario that can derail a trip before it even begins.
While walk-in sites offer flexibility and can sometimes be cheaper (by avoiding reservation fees), they come with a high degree of risk, particularly during peak season, on weekends, or in popular national parks. Securing a walk-in site often requires arriving early in the morning, which may not be feasible for families traveling after work or from a long distance. The stress of uncertainty can outweigh the benefit of spontaneity. This concept of « Controlled Spontaneity »—where the core logistics are locked in to allow for freedom elsewhere—is key. A secured campsite is your foundation for a relaxing trip.
This comparative table breaks down the key differences to help you make the best choice for your family’s needs. As you can see from a recent comparative analysis, the choice depends heavily on your tolerance for risk.
| Factor | Reservation Sites | Walk-up (First-Come) Sites |
|---|---|---|
| Booking | Reserve months in advance online or by phone | Arrive in-person on the day; no advance booking |
| Availability Guarantee | Site is guaranteed upon arrival | No guarantee; depends on availability when you arrive |
| Best Time to Arrive | Anytime during check-in window | Early morning (before noon) for best selection |
| Stress Level | Low – eliminates arrival anxiety | High – uncertainty until spot is secured |
| Flexibility | Low – must commit to specific dates | High – can change plans spontaneously |
| Cost | Typically includes reservation fee ($8-10) | Usually no extra fees beyond nightly rate |
| Peak Season Risk | Books out months ahead | Very high risk of no availability |
| Best For | Families with kids, first-time campers, peak season trips | Experienced campers, off-season trips, flexible schedules |
For those who crave a bit of adventure, a hybrid « bookend » strategy can offer the best of both worlds. This involves reserving your first and last nights—securing your arrival and ensuring a calm pack-up day—while leaving the middle days open for exploring walk-up options. This approach works best during the shoulder season and with pre-scouted backup plans.
Sequencing the packing: Heavy items vs Accessibility
Packing the car is not just a game of Tetris; it’s a strategic process of « packing architecture » that balances vehicle safety, stability, and on-site accessibility. The wrong sequence can lead to a dangerously unstable vehicle or, more commonly, the frustration of having to unpack the entire car just to get to the tent. The key is to pack with a clear understanding of what you’ll need first upon arrival.
The system is guided by two principles: weight distribution and LIFO (Last-In, First-Out). Heavy items must be placed low and centered over the axles for driving safety, while the items you’ll need immediately upon arrival must be packed last so they are the first ones out. A trial pack a few days before departure is highly recommended to ensure everything fits and to avoid departure-day panic.
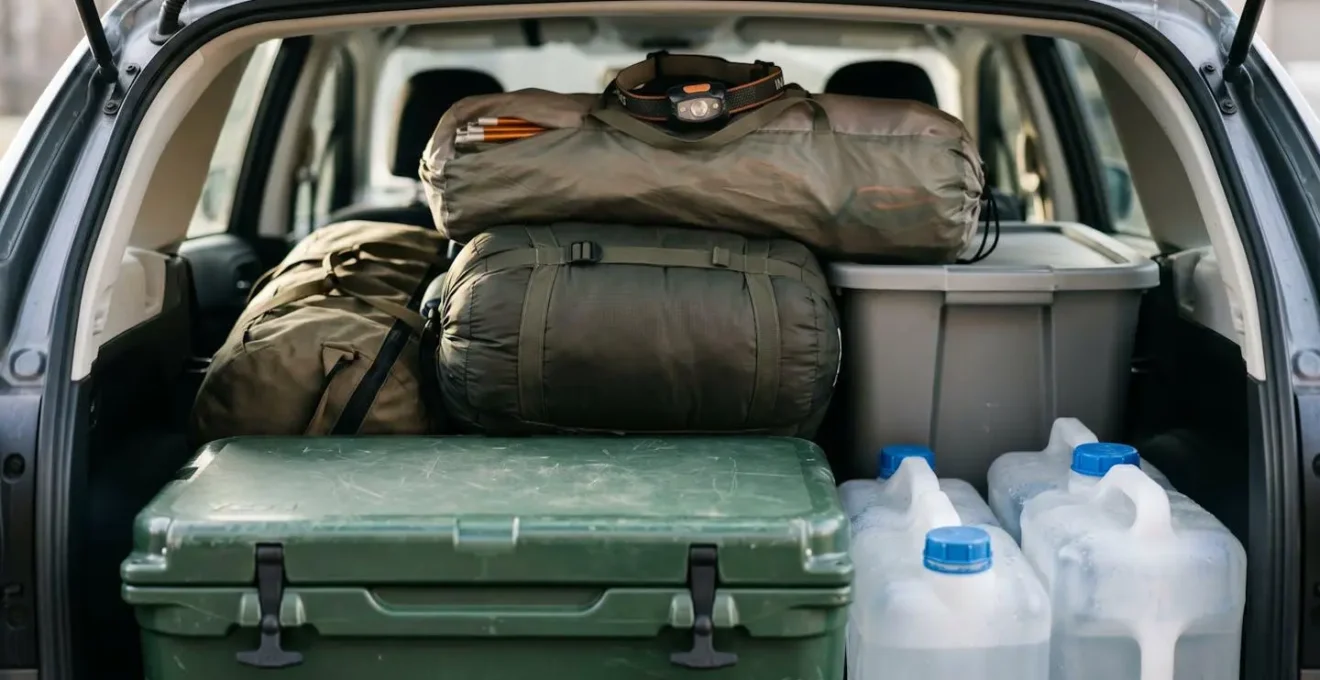
This layered approach ensures both safety and convenience. By using pre-sorted, modular bins from your staging area, you create predictable shapes that make packing much more efficient than dealing with dozens of loose items. A well-packed car is the final step in your pre-trip system, setting the stage for a smooth and organized campsite setup.
Your Car Packing Action Plan
- Heavy Bottom Layer: Start with the heaviest and most robust items. Pack coolers, water jugs, and heavy-duty gear bins low and centered in your vehicle to create a stable base and keep the center of gravity down.
- Structural Middle Layer: Next, add medium-weight, bulky items like sleeping bags in their stuff sacks, clothing bins, and camp chairs. Use these softer items to fill in gaps around the hard-sided bins.
- LIFO Top Layer (Accessibility): The final items to be packed are the first items you’ll need. Reserve the most accessible spaces (top of the trunk, back seat floor) for your « arrival kit »: the tent, mallet, a few headlamps, and the cooler with your first night’s dinner.
- Utilize Vertical & Small Spaces: Tuck smaller, flexible items like towels or tarps into the gaps along the sides and on top. Use the space under seats for items like shoes or daypacks.
- Final Safety Check: Ensure your packed gear does not obstruct the driver’s rear view. Nothing should be packed so high that it blocks the rearview mirror. Secure any loose items to prevent them from becoming projectiles during a sudden stop.
Why structured activities prevent boredom tantrums before dinner?
One of the most challenging times on a family camping trip is the « pre-dinner witching hour. » Adults are busy with crucial tasks like setting up the tent or starting the meal, while children, often tired from a day of excitement, can become bored, restless, and prone to meltdowns. The solution is not to demand quiet patience, but to proactively deploy a plan of structured, engaging activities that align with adult tasks.
This is about « task-pairing »: giving kids a fun, purposeful job that occupies them during the 20-45 minutes you need to focus. This strategy transforms them from potential disruptors into helpful contributors, boosting their sense of ownership and importance in the camp setup. Giving them an official title, like « Chief Stick Inspector » or « Head of Camp Chair Deployment, » can make a simple task feel like a vital role.
A brilliant tactic is the « Golden Hour Activity Box. » This is a special container, filled with novel items like new coloring books, glow sticks, or a simple card game, that is *only* opened during this specific pre-dinner period. The novelty factor is a powerful tool for capturing a child’s attention when their energy and your patience are at their lowest. The goal is to have a pre-planned menu of activities ready to deploy, preventing boredom before it can escalate into a tantrum and protecting the « chore-to-fun ratio » for the entire family.
Here are some proven task-pairing methods to implement:
- During Tent Setup: Launch a « Campsite Scavenger Hunt. » Give kids a short list of natural items to find within sight of the campsite (a pinecone, a y-shaped stick, a smooth grey rock).
- During Meal Prep: Assign them to the « Firewood Collection Crew. » Under supervision, have them gather small sticks and kindling for the campfire.
- Evening Wind-Down: After the active tasks are done, transition to a calmer routine with a designated stargazing time or a campfire story circle to prepare them for bed.
Key Takeaways
- A systematic, timeline-based approach to planning is more effective at preventing stress than a simple checklist.
- Overpacking creates clutter, which in turn creates unnecessary chores and mental stress, reducing your vacation time.
- For families and first-timers, the security of a campsite reservation provides far more value in peace of mind than the perceived freedom of walk-in camping.
Why overpacking leads to a cluttered and stressful campsite?
While the fear of forgetting something is a major source of stress, its opposite—overpacking—creates a different but equally potent form of anxiety. A cluttered campsite is a stressful campsite. Every extra, unnecessary item is one more thing to pack, unpack, keep track of, clean, and repack. This accumulation of « stuff » creates mental and physical work, directly chipping away at your relaxation time and negatively impacting your chore-to-fun ratio.
The Clutter-to-Chore Cascade Effect
A powerful example of this is the « Clutter-to-Chore Cascade. » One camping blogger documented how bringing a complex French press coffee maker, instead of simple instant coffee, created a chain reaction of chores. The device required 5 minutes to assemble, 10 minutes to brew, and 15 minutes to meticulously clean each day. This single « luxury » item cost 30 minutes of daily effort. As documented in a story about their trip, they calculated they lost over 2 hours daily to managing unnecessary gear. On their next trip, they adopted a minimalist approach, cut their gear by 40%, and reported a dramatic decrease in stress and a significant increase in quality family time.
Overpacking often stems from a lack of a clear plan. When you don’t pre-plan meals, you bring extra cooking pots « just in case. » When you don’t have a refined clothing system, you bring too many outfits to account for every possibility. Each of these decisions adds an item that takes up physical space in the car and tent, and mental space in your head. A tidy, organized campsite with clear surfaces and easy-to-find gear fosters a sense of calm and control, which is the ultimate goal of a camping trip.
The solution is to be ruthless in your packing decisions. For every item, ask: « Is the benefit of this item worth the effort of packing, managing, and cleaning it? » Often, a simpler, multi-purpose alternative is the better choice. Embracing minimalism is not about deprivation; it’s a strategic decision to maximize your time and energy for the experiences that truly matter.
First-Time Campers: The 10 Items You Actually Need (And What to Leave)?
For first-time campers, the sheer volume of available gear is overwhelming. The temptation to buy everything can lead directly to the overpacking problem we just discussed. The secret for a successful first trip is to focus on a core list of essential items that provide the highest return on investment for safety and comfort, while intentionally leaving behind the complex, single-use gadgets that add more work than value.
Your primary goal is to ensure you have reliable shelter, a safe way to sleep, and a dependable method for preparing food. Everything else is secondary. Focus your energy and budget on quality versions of these foundational items. A leaky tent or a failing camp stove will ruin a trip far more surely than the absence of a fancy coffee maker. This minimalist approach not only saves money and packing space but also drastically simplifies your entire camping experience, allowing you to focus on learning the basics.
Here is a definitive guide to what truly matters for your first trip, and what you can confidently leave at home. The « Panic-Prevention ROI » metric highlights why each « must-bring » item is non-negotiable for a stress-free experience.
| Must-Bring Item | Panic-Prevention ROI | Leave Behind Item | Why Skip It |
|---|---|---|---|
| Tent + Rain Fly | Shelter from elements; prevents midnight panic evacuation in rain | Cumbersome Dutch Oven | 20+ min scrubbing after dinner; use foil packs instead |
| Headlamps (one per person) | Hands-free light for nighttime tasks; prevents frustration and falls | Multiple specialized cooking tools | One good skillet does 90% of jobs; saves packing space |
| Sleeping Bags + Pads | Comfortable sleep = happy family; prevents cold, miserable nights | Elaborate espresso setup | Instant coffee saves 25 min morning prep; simplicity wins |
| Cooler with Ice | Food safety; prevents food poisoning and wasted supplies | Too many clothing options | Decision fatigue; 2 outfits per day is sufficient |
| First Aid Kit | Immediate response to cuts, blisters; prevents minor issues becoming major | Bulky electric gadgets | Camping is about disconnecting; extra weight for minimal use |
| Camp Stove + Fuel | Reliable meals regardless of fire restrictions; reduces cooking stress | ||
| Water (1 gallon/person/day) | Hydration and cooking; prevents dehydration emergencies | ||
| Layers (rain jacket, warm clothes) | Weather changes quickly; prevents hypothermia risk | ||
| Flashlights + Extra Batteries | Backup light source; prevents being stranded in darkness | ||
| Trash Bags | Keep site clean; prevents attracting wildlife and mess stress |
This list can still feel like a significant investment. As experts from the REI Family Camping Checklist wisely advise:
If it’s your first time camping, it might be best to borrow or rent some of these things.
– REI Outdoor Experts
This single piece of advice can make your first trip far more accessible. Borrowing from friends or using rental services allows you to test out the experience and learn what you truly value before committing to major purchases.
By transforming your preparation from a last-minute rush into a structured, two-week process, you are not just packing for a trip; you are designing an experience. You are investing time upfront to buy back hours of relaxation and family fun at the campsite. Start applying this methodical timeline to your next adventure and discover the peace of mind that comes from being truly, calmly prepared.