The inherent strength of a geodesic dome isn’t magic; it’s a direct result of superior structural engineering that actively channels aerodynamic load.
- A dome’s stability stems from its network of interconnected triangles, which transforms wind force from a breaking pressure into manageable tension and compression along its poles.
- Unlike tunnel tents which present a large sail-like wall to the wind, a dome’s curved surface maintains a low profile and disperses force in multiple directions simultaneously.
Recommendation: For expeditions in exposed, high-wind environments, choosing a true geodesic design isn’t a matter of preference—it’s a calculated decision for structural survival.
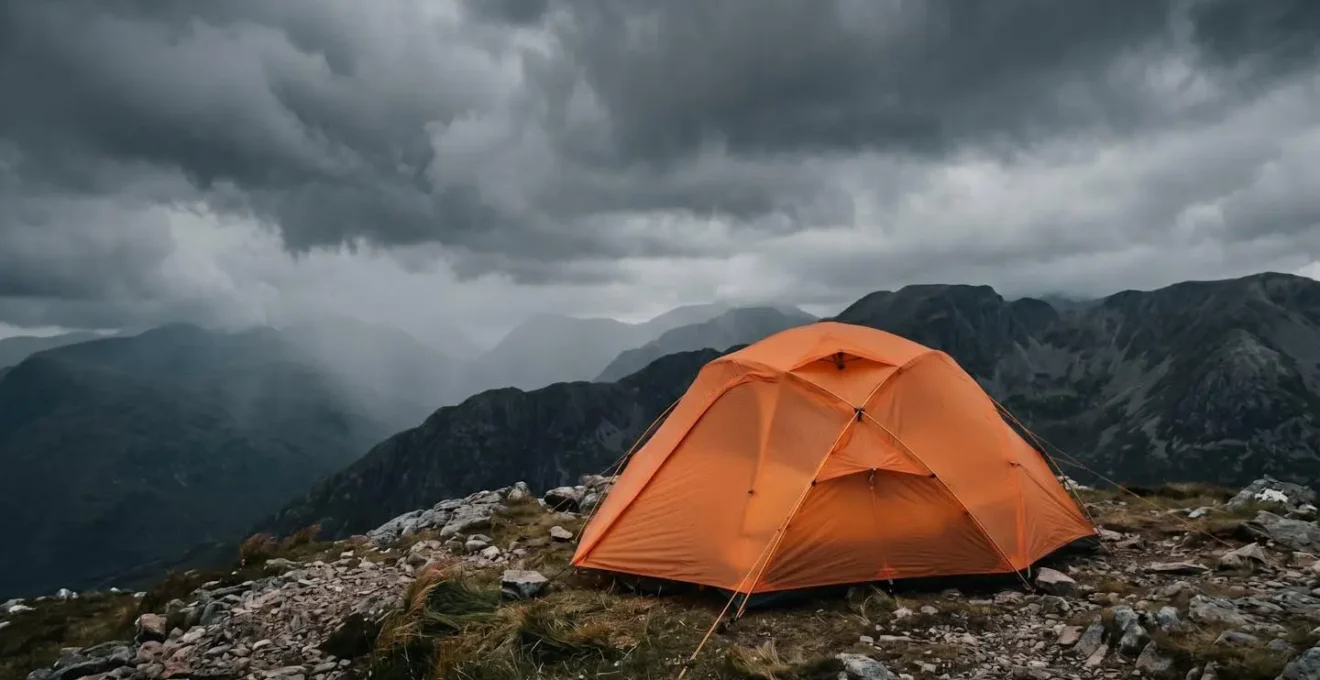
The sound is unmistakable. It begins as a low whistle, then builds to a roar that feels both outside and inside your head. The fabric of your tent, your only shield against the mountain’s fury, begins to shudder violently. In these moments, every camper who has faced a storm has the same thought: will it hold? For many, the answer depends less on the brand of their tent and more on its fundamental geometry. While conventional wisdom points to « 4-season » ratings and heavy-duty materials, these are only part of the equation.
Most discussions about wind-resistant tents revolve around tunnel, A-frame, or various hybrid designs. They focus on fabric denier, pole materials, and the number of guy-out points. These are important factors, but they address the symptoms of wind load, not the root cause of structural failure. They reinforce a structure that is inherently vulnerable. This is where the geodesic dome presents a fundamentally different approach, one born not from camping culture, but from architectural and engineering principles.
But what if the key to surviving a gale isn’t just about withstanding the force, but about intelligently redirecting it? This article moves beyond the simple « triangles are strong » adage. We will adopt the mindset of a lightweight structures architect to deconstruct the geodesic dome. We will analyze the specific physics of its pole intersections, the critical trade-offs in its design, and the precise techniques required to deploy it not just as a shelter, but as an integrated structural system designed to master the wind.
This guide provides a structural analysis of the geodesic design, explaining the engineering that makes it uniquely suited for high-wind conditions. We will explore the core principles of its strength, the practicalities of its use in the field, and the essential maintenance required to ensure its integrity when you need it most. The following sections break down exactly how this geometry translates into unrivaled stability.
Summary: A Structural Analysis of Geodesic Tent Stability
- Why crossing poles 3 times increases load bearing by 200%?
- How to position a symmetric dome relative to changing wind direction?
- The internal volume trade-off: Dealing with steeper walls
- Single vs Double wall domes: Which manages condensation in storms better?
- When to use all guy lines: The stability rule for 50mph gusts
- How to anchor a tent in loose sand when stakes fail?
- How to use the pliers to repair a bent tent pole safely?
- Coastal Camping: How to Protect Your Gear from Salt and Gale Force Winds?
Why crossing poles 3 times increases load bearing by 200%?
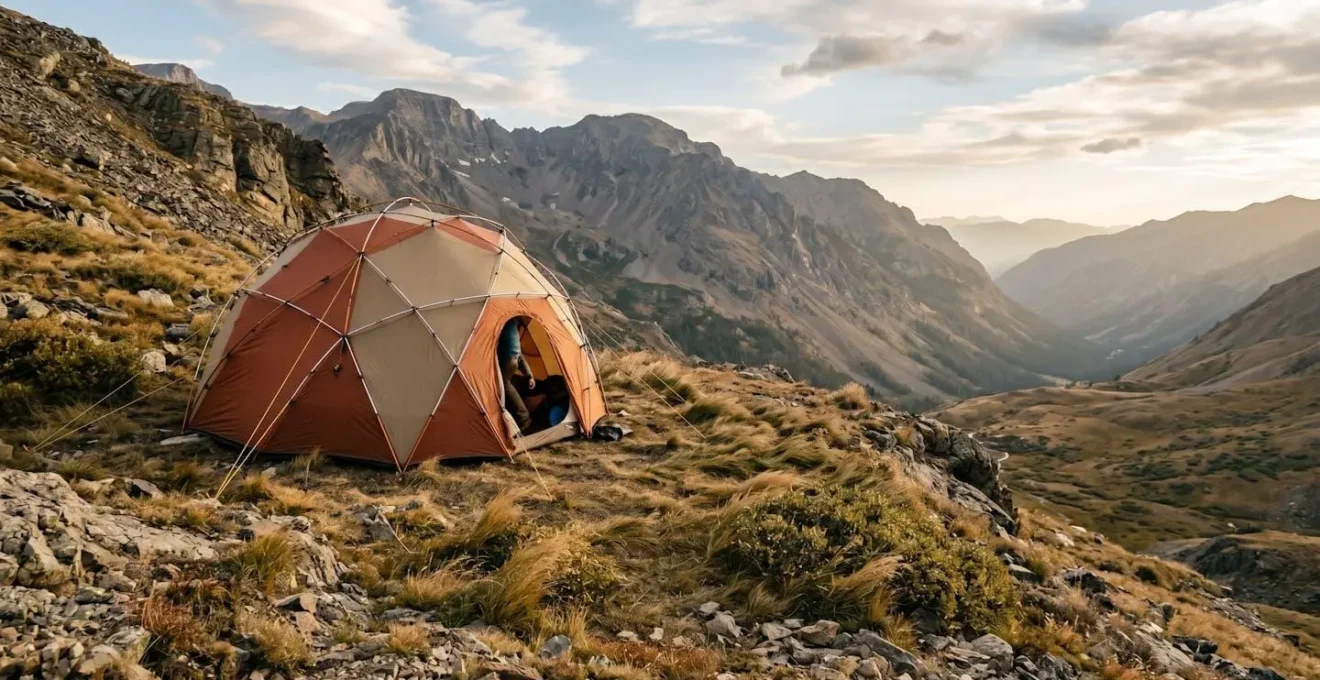
The exceptional strength of a geodesic dome is not a property of the materials alone, but of its geometry. The core principle lies in distributing stress across the entire structure, so no single point bears the brunt of the wind’s force. A simple two-pole cross design creates one intersection point. While functional, it leaves large, unsupported panels of fabric that can deform under load, placing immense bending stress on the poles. By adding a third pole that intersects the first two, the number of triangles in the framework multiplies, and the unsupported fabric spans are drastically reduced. This is the first step towards a true geodesic design.
Each intersection, or « node, » acts as a joint that transfers load from one pole to another. A tent with more intersections creates a more complex and redundant network of stress distribution pathways. When wind pushes on one side of the dome, the force isn’t met by a single resisting pole. Instead, it’s broken down and channeled through multiple tension and compression pathways across the entire hemispherical frame. This is why a dome flexes and « breathes » with the wind rather than rigidly opposing it until a breaking point is reached.
The distinction between designs is critical. True expedition-grade geodesic tents are defined by their complex pole structures. In fact, according to technical tent design standards, 5+ pole crossings are required for a structure to be considered truly « geodesic, » while those with 3-4 are classified as « semi-geodesic. » While the title’s « 200% » is a conceptual figure, the principle is sound: each additional intersection exponentially increases the structure’s ability to handle load by creating a more interconnected and resilient web. A semi-geodesic design is a significant step up from a tunnel tent, but a true geodesic structure operates in a different class of stability altogether.
How to position a symmetric dome relative to changing wind direction?
A key advantage of a symmetric geodesic dome is its non-directional strength. Unlike a tunnel tent, which has a clear « best » orientation into the wind (and a very clear worst), a dome presents a similar aerodynamic profile from almost any angle. This is a critical safety feature in mountainous or coastal terrain where wind can be shifty, gusting from different directions as weather systems move through. While the structure itself is non-directional, your positioning of its features—specifically the door—is a crucial strategic decision.
The cardinal rule is to position the tent’s main entrance on the lee side, or the side sheltered from the prevailing wind. This simple act has several benefits. First, it prevents gusts of wind, rain, or snow from blasting directly into your living space every time you enter or exit. Second, it creates a small zone of calmer air right outside your door, making tasks like cooking or organizing gear far more manageable and safe. Finally, it protects the door’s zippers, which are often a point of vulnerability, from the highest wind pressures and ice buildup.
To determine the lee side, you need to read the environment. Observe the direction of blowing snow, the sway of any hardy vegetation, or the « wind-tail » of snow accumulating behind rocks. Once you’ve identified the prevailing wind direction, orient the tent so the door faces the opposite way. In a storm, this small detail can be the difference between a secure shelter and a compromised one.
As the illustration demonstrates, the optimal setup places the entrance away from the oncoming force. Even in a symmetric dome, the windward side will experience slightly more fabric tension and pole flex. Placing the door on the sheltered side ensures the structure’s primary point of entry and exit remains functional and protected, preserving the integrity of the shelter’s internal environment regardless of the storm’s intensity.
The internal volume trade-off: Dealing with steeper walls
The superior strength of a geodesic dome comes at a cost: usable internal volume. This is a fundamental trade-off rooted in structural engineering. Tunnel tents, with their hoop-like poles, often feature near-vertical walls. This maximizes the floor-to-ceiling space, creating a roomy, livable interior. However, these same vertical walls act like sails, catching the wind and transferring massive stress to the two or three poles supporting them. They are strong in one direction but catastrophically weak when the wind shifts to the side.
A geodesic dome, by contrast, derives its strength from its curvature and steeper wall angles. The poles curve downwards more aggressively, creating a lower, more aerodynamic profile. This means the walls slope inwards, significantly reducing the usable space near the perimeter of the tent. While the floor dimensions might seem generous on paper, the actual « livable » volume—where you can sit up without your head touching the inner tent—is often less than in a tunnel tent of a similar footprint. This also contributes to a higher weight, as the complex pole structure required for strength is inherently heavier.
This trade-off is not a design flaw; it is a deliberate engineering choice. You are trading cubic inches of comfort for a massive increase in structural resilience. In exposed conditions, this is a trade you should be willing to make every time. The steep walls don’t « catch » the wind; they deflect it upwards and around the structure, distributing the load across the entire frame.
Case Study: Geodesic vs. Tunnel in Extreme Conditions
This principle is best illustrated by real-world events. In a widely discussed report among mountaineers, a climber detailed how their geodesic tent, an Ultra Trisar, withstood gusts reported to be over 100mph. During the same storm, nearby tunnel tents experienced catastrophic structural failures, with poles snapping under the load. The geodesic dome’s ability to flex and distribute the stress across its steep-walled frame allowed it to survive conditions that destroyed tents optimized for internal volume. The reduced space at the perimeter was a small price to pay for the shelter’s ultimate survival.
Single vs Double wall domes: Which manages condensation in storms better?
During a storm, a tent is a sealed system. With vents closed to keep out rain and snow, the moisture from your own breath and gear becomes a significant problem. A single person can produce a surprising amount of moisture; in fact, research shows that 1-2 liters of water vapor per person per night is a standard output. In a cold, stormy environment, this vapor will condense on the first cold surface it touches—the inner wall of your tent. The choice between a single-wall and double-wall design determines where this condensation forms and how you interact with it.
Single-wall tents are prized for their light weight and simple setup. They use a single layer of waterproof/breathable fabric. While breathable, no fabric can transport the sheer volume of moisture produced inside a tent during a storm fast enough. Condensation will inevitably form on the inside of the fabric. In a cramped dome, this means any contact with the walls—from your sleeping bag, your jacket, or an accidental bump in the night—will transfer that moisture to you and your gear, compromising your insulation and comfort.
Double-wall tents, while heavier, offer a superior engineering solution to this problem. They consist of a non-waterproof but highly breathable inner tent and a completely waterproof outer flysheet. The air gap between these two layers is the critical design element. It allows the system to function as intended, even when the external environment is saturated.
In a double-wall tent, water vapor can pass through the breathable inner tent fabric because it’s not waterproof, so it condenses on the fly where you won’t accidentally brush up against it. The tent body acts as a barrier between you and the wet fly.
– SlingFin Technical Team, Single-Wall Tents vs. Double-Wall Tents: Which is Best For You?
In storm conditions, the double-wall system is unequivocally better at managing condensation. The inner tent keeps you and your sleeping bag dry, even as the inside of the flysheet becomes coated with frost or water droplets. For multi-day trips in cold, damp, or snowy conditions, this separation is not a luxury; it is a critical component of safety and survival.
When to use all guy lines: The stability rule for 50mph gusts
A geodesic dome’s pole structure is the skeleton, but the guy lines are the muscles. They provide the crucial tension that allows the skeleton to perform under load. Using them is not optional. The question is not *if* you should use them, but *when* deploying the full set becomes a non-negotiable rule of survival. While a minimally-guyed dome is stable in calm weather, it is a dangerously incomplete structure in high winds. The poles are designed to work in tandem with the tension provided by the guy lines to create a rigid, unified system.
The threshold for this « all-in » approach is lower than many campers assume. It’s not just for hurricane-force gales. In high-altitude or exposed environments, wind can accelerate rapidly. Waiting until the tent is already being battered is too late. A good rule of thumb, backed by observation, is that any wind forecast at or above 40-50 mph necessitates deploying every single guy line your tent possesses. Indeed, field observations during documented storm events showed failures in tents that were not fully guyed out in winds as low as 42.8 knots (49 mph). At this speed, the aerodynamic forces are significant enough to cause dangerous pole deformation and potential catastrophic failure in an un-supported frame.
Proper deployment is as important as the decision to deploy. Simply staking out the lines is not enough; they must be positioned to create effective force vectors that counteract the wind’s pressure. The goal is to brace the poles, preventing them from flexing beyond their tolerance. Attaching lines midway up the poles is far more effective than only using points at the base, as this provides support where the bending moment is greatest.
Action Plan: Critical Guy Line Deployment
- Target Mid-Pole Loops: Prioritize utilizing guyline loops located midway up the rainfly. These add the most significant structural strength to the pole framework, bracing them against flexion.
- Establish Right Angles: Set up each guyline at an angle as close to 90 degrees with the pole it supports as possible. This configuration maximizes the reinforcement’s effectiveness by pulling directly against the bending force.
- Maximize Distance: Secure guylines far from the tent base. Longer lines create better force vectors and reduce the leverage on the stakes, making them less likely to pull out under heavy, repeated loading.
- Angle Stakes Correctly: Drive stakes into the ground at a right angle to the direction of the guyline’s pull, not straight up and down. This dramatically increases their holding power and prevents pull-out.
- Engage Internal Connections: If your tent has them, fasten all Velcro loops on the underside of the flysheet to the poles. This creates a crucial, unified connection between the external guy lines and the internal pole structure.
How to anchor a tent in loose sand when stakes fail?
Standard tent stakes are designed for compression in firm soil. They rely on the friction and density of the surrounding earth to hold fast. In loose, dry sand—or deep, unconsolidated snow—this principle breaks down entirely. The medium is not dense enough to provide purchase, and standard stakes will pull out with minimal force, leaving your shelter dangerously unsecured. In these environments, you must abandon the concept of a driven stake and adopt a new strategy: the buried anchor, commonly known as a « deadman. »
The principle of a deadman anchor is simple: instead of relying on friction, you rely on the weight of the sand itself. You bury an object with a large surface area, and the sheer volume of sand on top of it provides the anchoring force. While specialized sand stakes with wide fins exist, you can improvise a highly effective deadman anchor with gear you are already carrying. Stuff sacks are ideal for this purpose.
The technique is straightforward. First, dig a hole in the sand approximately one to two feet deep. Fill a stuff sack (or a durable plastic bag) with sand, cinch it closed, and attach your guy line to the closure. Place the filled sack in the bottom of the hole and bury it, compacting the sand on top as you go. The guy line should lead up out of the sand towards the tent. This method creates an incredibly strong anchor point that is almost impossible to pull out, as it would require displacing a huge volume of heavy sand.
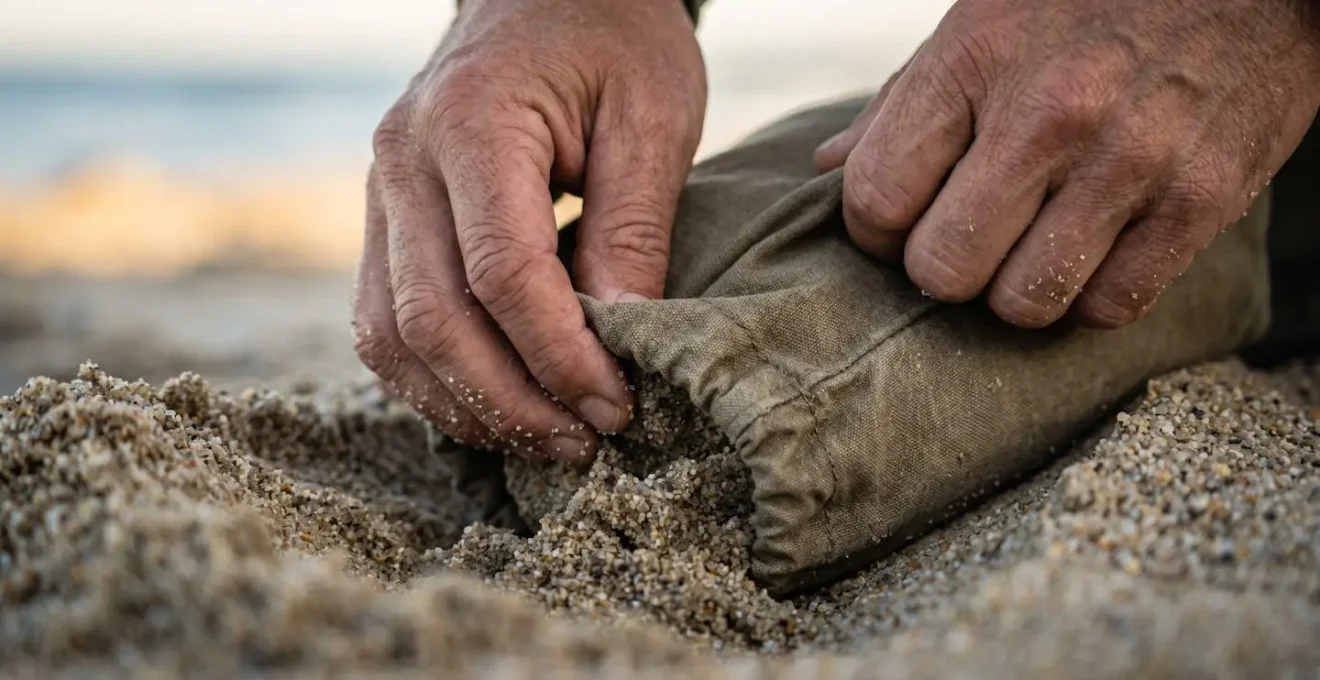
This technique can be adapted using various objects. A « fluke » style anchor, a buried trekking pole, or even a carefully placed rock can serve the same purpose. The key is to create a wide, buried object that the sand’s weight can pin down. For a geodesic dome, with its multiple guy-out points, you will need to create a deadman anchor for each critical line to ensure the structure is tensioned evenly and can withstand wind load from any direction.
How to use the pliers to repair a bent tent pole safely?
A bent pole is a critical structural failure. In a geodesic dome, where every pole is a load-bearing component, it compromises the integrity of the entire system. A field repair is often necessary for survival, but it must be undertaken with a clear understanding of the material’s properties. The goal is to restore the pole’s shape enough to maintain the tent’s structure, not to achieve a permanent fix. Aluminum, the most common material for expedition tent poles, has a finite capacity for bending.
The primary danger in repairing an aluminum pole is a phenomenon known as work hardening. When you bend aluminum, you are creating microscopic dislocations in its crystal structure. Bending it back causes more dislocations. Each cycle of bending and straightening makes the material harder but also more brittle, until it fractures with very little warning. Your multi-tool pliers give you the leverage to bend the pole back, but they also give you the power to break it.
The safe procedure is one of gentle, minimal correction. Do not try to make the pole perfectly straight. Lay the bent section on a firm, flat surface like a rock. Use the pliers to apply slow, steady pressure to the *apex* of the bend, gently encouraging it to straighten. Avoid sharp, jerky movements. It is better to have a pole that is still slightly curved than one that has snapped in two. Many tent repair kits include a « pole sleeve » or « splint »—a short, wider-diameter tube. This is the most crucial component. Slide this sleeve over the repaired (but weakened) section to reinforce it. The sleeve, held in place with tape, will now bear the structural load at that point.
Bending aluminum back and forth weakens it significantly (work hardening). Emphasize that a field repair is temporary and the pole section must be replaced. The goal is survival, not a permanent fix.
– Tent repair specialist discussion, Aluminum vs Carbon Fiber pole repair techniques
Understanding the material is key. High-end expedition poles often use advanced alloys, and industry specifications indicate 7001-T6 and 7075-T9 alloys as standard for their high strength-to-weight ratio. These are robust materials, but they are not immune to the laws of metallurgy. Treat any field repair as a temporary measure to get you home safely, and replace the damaged pole section as soon as possible.
Key Takeaways
- Geometry is Strength: The dome’s stability comes from its network of triangles, which distributes wind load across the entire structure, not from the brute strength of any single pole.
- Active Positioning is Crucial: A dome is non-directionally strong, but you are not. Always position the door on the lee side (away from the wind) to maintain a liveable, protected interior.
- Anchoring Completes the System: The structure is only as strong as its connection to the ground. In adverse conditions (sand, snow, or gales), you must use every guy line and the correct anchoring technique (stakes or deadmen) to create a fully integrated, stable system.
Coastal Camping: How to Protect Your Gear from Salt and Gale Force Winds?
Coastal environments present a unique and severe combination of threats to a tent structure: high-velocity winds that can be relentlessly sustained, a shifting direction as fronts move in from the sea, and corrosive, salt-laden air. This is where the geodesic dome’s architectural superiority becomes most apparent. It is a setting that will systematically find and exploit the weakness in any lesser design. A tunnel tent, perfectly oriented for an offshore breeze, can be flattened in minutes when a coastal squall causes the wind to swing 90 degrees and hit its broadside.
The dome’s inherent non-directional strength makes it the premier choice for this environment. It doesn’t matter if the wind is coming from the north, east, or south; the structure presents a consistently low and efficient aerodynamic profile. This resilience was validated when professional wind tunnel testing at the Institute of Aviation demonstrated that geodesic structures could withstand forces equivalent to 120 km/h (74 mph) sustained winds. This is a level of performance that tunnel tents, reliant on a specific orientation, simply cannot match in shifty conditions.
Case Study: Storm Eunice Geodesic Survival
The real-world performance during Storm Eunice in 2022 provided a dramatic illustration. As one of the most powerful storms to hit the south coast of England in decades, it famously tore the fabric roof from the massive O2 Arena. Yet, customer testimonials from coastal Kent reported that their properly anchored residential geodesic domes survived the same storm with no damage. This showcases the design’s ability to handle the chaotic, multi-directional gusts typical of coastal gales.
Beyond wind, the fight against salt is a battle of maintenance. Saltwater spray is insidious. It accelerates corrosion on metal components like zippers and pole ferrules and can degrade nylon fabric over time. After any coastal trip, a thorough cleaning is not optional. Rinse the entire tent—flysheet, inner, and poles—with fresh water to remove all salt deposits. Pay special attention to zippers, lubricating them with a silicone-based product after they are clean and dry. This preventative maintenance is the only way to protect your investment and ensure the structure’s long-term reliability.
Now that you understand the architectural principles that make a geodesic dome a fortress against the wind, your next step is to apply this knowledge. Evaluate your current or future shelter not just as a piece of gear, but as an engineered system, and ensure you have the skills to deploy it to its full potential.