The key to a dry single-wall tent isn’t just passive ventilation; it’s actively engineering pressure differentials to force moisture out.
- Campsite selection is an exercise in fluid dynamics, avoiding low-lying « condensation bowls » where cold, moist air pools.
- Your tent’s pitch—specifically the differential height of its walls—is your primary tool for creating a venturi effect that pulls damp air out.
Recommendation: Stop fighting condensation as an inevitable annoyance; start directing it like an engineer managing a system.
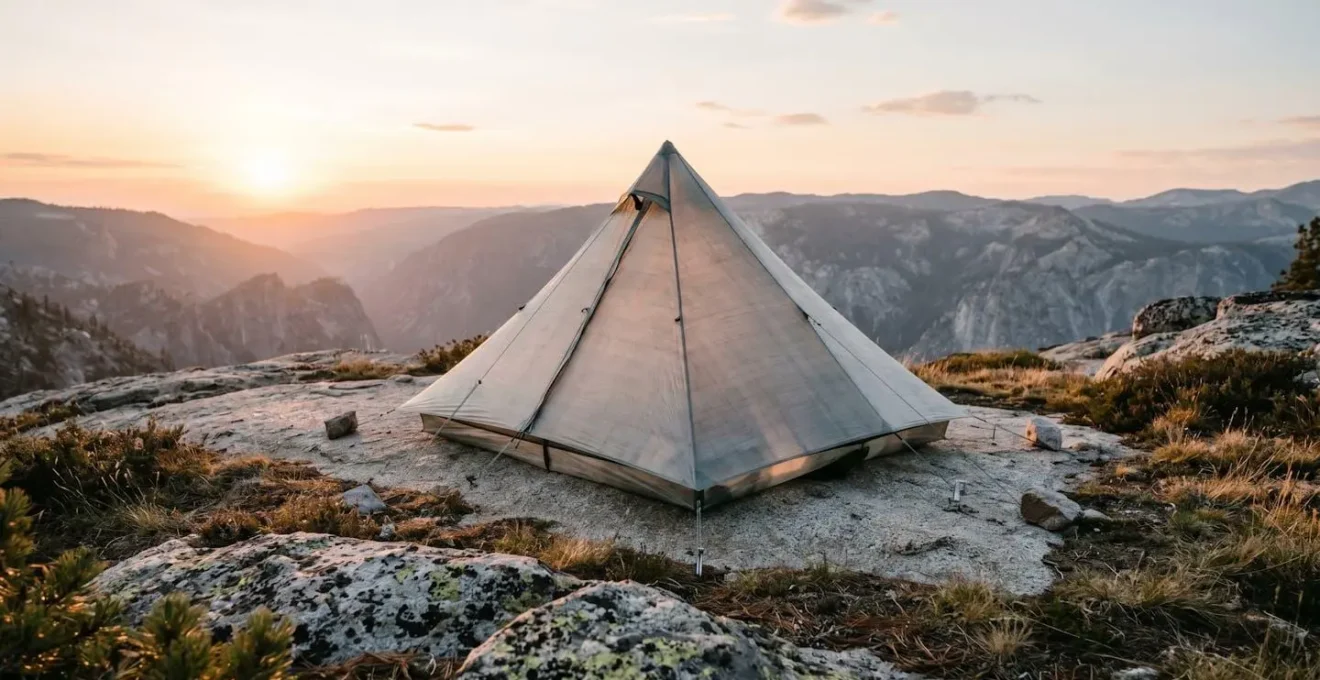
The moment of truth for any lightweight backpacker: you stir in the pre-dawn chill, your feet brush the wall of your single-wall shelter, and you feel it. Dampness. That dreaded, pervasive moisture that threatens your down sleeping bag and your morale. The common wisdom offers simple solutions: « crack a door, » « pick a dry spot, » or « don’t breathe so much. » For the serious user who has already tried these platitudes, this advice feels inadequate, failing to address the root of the problem.
The reality is that managing moisture in a minimalist shelter is not a matter of simple tricks; it’s a matter of applied physics. Your single-wall tent is not a static object but a dynamic system, a micro-climate governed by principles of fluid dynamics, vapor pressure, and thermodynamics. The generic advice fails because it ignores the ‘why’ behind the ‘how’. It tells you to ventilate, but not how to create an effective pressure differential. It tells you to pick a good site, but not how to read the landscape for invisible rivers of cold, moist air.
But what if the solution wasn’t to passively hope for the best, but to actively engineer airflow? This guide reframes the problem. We will move beyond the superficial and into the mechanics of moisture transport. We will explore how to manipulate airflow, choose materials based on their physical properties, and implement protocols that treat condensation as a predictable variable to be managed, not an unpredictable foe. By understanding the physics at play, you can transform your shelter from a condensation trap into a high-performance, dry machine.
This article provides a systematic approach, from macro-environmental factors down to the micro-management of your sleep system. Explore these sections to build a comprehensive strategy for staying dry.
Summary: The Definitive Guide to Managing Single-Wall Shelter Moisture
- Why pitching near a stream guarantees a wet sleeping bag?
- How to adjust trekking pole height to create airflow drafts?
- The towel trick that saves your footbox from touching the wet wall
- Dyneema vs Silnylon: Which holds less moisture on the surface?
- When to dry your tent: The lunch break drying protocol
- How to keep a roof vent open without freezing to death?
- Synthetic vs Down layers: Which saves more space in a 50L pack?
- Sleeping Bags: How to Stay Warm When the Temp Drops Below Rating?
Why pitching near a stream guarantees a wet sleeping bag?
The picturesque campsite by a babbling stream is a classic beginner’s mistake, and the reason is a fundamental principle of geophysics: katabatic airflow. At night, as land radiates heat and cools, the air in contact with it becomes denser. On sloped terrain, this dense, cold air begins to flow downhill, much like water. This phenomenon is not just a gentle breeze; research on katabatic wind behavior shows it results in cold, moist air pooling in valleys, depressions, and along watercourses. Pitching in one of these « condensation bowls » means you are setting up your tent in a location where relative humidity is naturally highest and will remain elevated all night.
The proximity to the stream itself exacerbates the issue. The water body acts as a massive source of atmospheric moisture through evaporation. Combined with the katabatic drainage, you are effectively choosing to camp in a localized high-humidity zone. Your tent’s ventilation system, no matter how good, will be overwhelmed. The air entering your tent is already near its dew point, meaning it has very little capacity to absorb the additional moisture you produce through respiration and perspiration. This leads to rapid saturation of the air inside your shelter and, consequently, heavy condensation on the interior walls.
Therefore, a superior site selection strategy involves thinking like a fluid dynamics engineer. Avoid low points at all costs. Instead, seek out a slightly elevated position, even if it’s just a small knoll or bench a few meters above the valley floor. This allows the colder, wetter air to flow past and below your location. Pitching under a light tree canopy can also be beneficial, as trees create a warmer microclimate and condensation will tend to form on the leaves above you rather than on your tent fabric. However, avoid dense canopies that trap humid air and prevent any air movement. The goal is to find a balance that maximizes air drainage and minimizes exposure to saturated ground.
How to adjust trekking pole height to create airflow drafts?
A single-wall shelter’s pitch is not merely for structural integrity; it is your primary mechanism for engineering airflow. The most effective way to ventilate is to create a pressure differential across the shelter, forcing air to move in a controlled path. This can be achieved by deliberately pitching one side of the tent higher than the other, a technique often called the « high-low » pitch. By setting your windward-side trekking pole or tie-outs slightly lower and your leeward-side pole higher, you create an aerodynamic profile.
This setup leverages Bernoulli’s principle. Wind flowing over the taller, more curved leeward side of the tent has to travel a longer distance, so it speeds up. This increase in velocity creates a low-pressure zone. The higher-pressure air on the windward side then naturally flows through the tent’s lower vents, across the interior, and out through the upper vents towards the low-pressure zone. This creates a consistent, cross-shelter draft that actively pulls moisture-laden air from inside your tent and replaces it with fresher, drier air from outside. The key is creating a clear, unimpeded path for this flow. A tight, taut pitch is essential to make this work effectively.
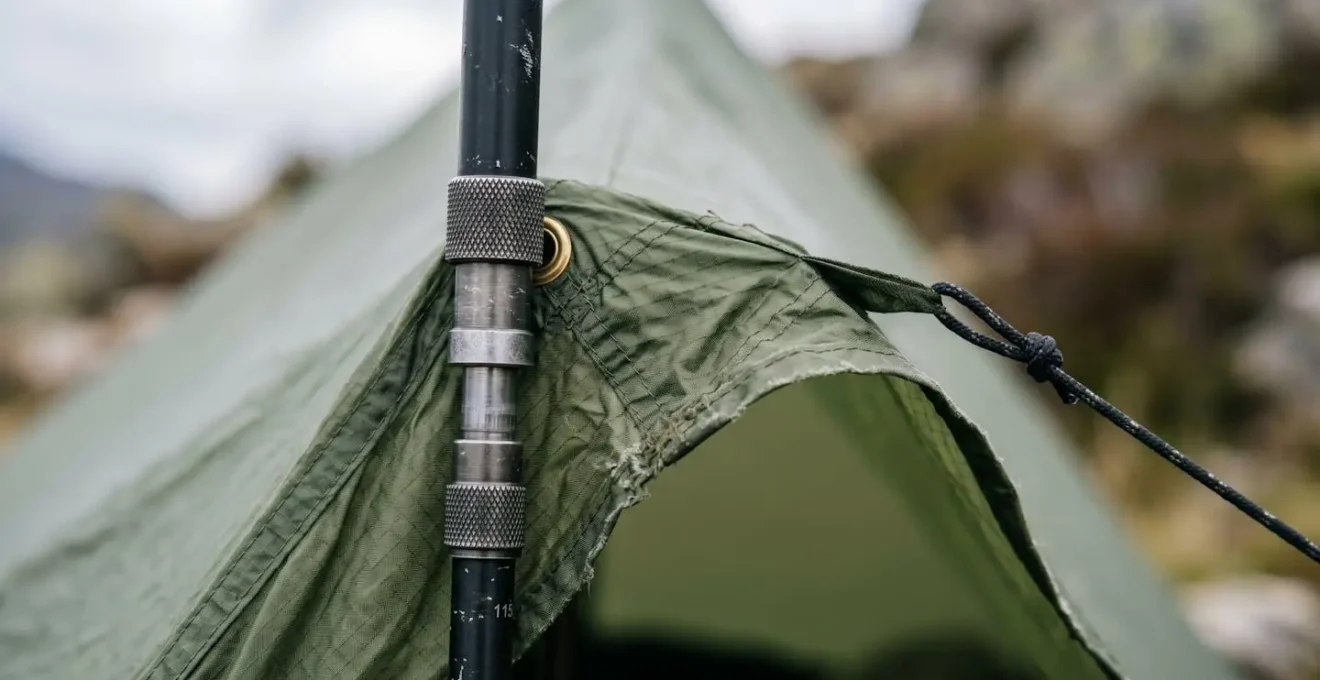
The image above illustrates the critical junction where this control is executed. The precise adjustment of pole height, combined with the tension in the guy lines, dictates the shelter’s aerodynamic shape. Even a small adjustment of 5-10 cm in differential height can have a significant impact on the velocity of the airflow through the shelter. Experiment with this on your next trip. In windy conditions, you will physically feel the draft being created. In calm conditions, the effect is driven by the natural convection of warm, moist air rising and exiting through the higher vents, but the principle of having a clear high and low exit remains just as important for maximizing this passive flow.
The towel trick that saves your footbox from touching the wet wall
Even with perfect site selection and an engineered pitch, some condensation is inevitable, especially on calm, cold, humid nights. The next layer of defense is proactive internal moisture management. The primary failure point is often the sleeping bag’s footbox, which, due to the sloping walls of most ultralight shelters, inevitably makes contact with the damp inner fabric. This direct contact facilitates conductive moisture transfer, wetting your insulation and compromising its thermal efficiency. The simplest and most effective solution is a small, ultralight microfiber towel.
The towel serves two functions. First, it’s a reactive tool for wiping down the interior walls in the morning or even in the middle of the night if condensation becomes severe. A quick wipe-down can remove a surprising amount of water before it has a chance to drip or be transferred to your gear. Second, and more strategically, the towel can be used as a proactive barrier. By draping or clipping the towel to the inside of the tent wall at the foot-end, you create a physical and air-gap barrier between your sleeping bag and the wet fabric. This prevents the direct conductive transfer of moisture.
Case Study: Proactive Moisture Barrier in Scotland
During a two-week coast-to-coast trek across Scotland, a group of backpackers using single-wall shelters faced consistently damp conditions. They successfully managed interior moisture not just by wiping down walls, but by strategically placing microfiber towels as barriers. Hanging the towels from internal loops created a crucial air gap, preventing their sleeping bag footboxes from touching the condensation-prone walls and keeping their insulation dry throughout the multi-day trip.
Choosing the right tool for the job is a matter of balancing weight against function. Not all absorption tools are created equal, and an expert user should understand the trade-offs.
This table outlines the performance characteristics of common condensation management tools, allowing you to make an informed decision based on expected conditions and your tolerance for pack weight.
| Tool Type | Weight (oz) | Absorption Capacity | Wringability | Best Use Case |
|---|---|---|---|---|
| Standard Microfiber Towel | 1.5-3 | High (absorbs 7x its weight) | Excellent—quick wring & reuse | Morning wipe-downs, multi-purpose |
| Synthetic Chamois (automotive) | 2-4 | Very High (holds more water) | Good—requires more effort | Heavy condensation, floor pools |
| Silicone Squeegee (small) | 0.5-1 | None (channels water only) | N/A—directs water to edges | DCF tents where beading occurs, quick field dry |
Dyneema vs Silnylon: Which holds less moisture on the surface?
The material of your shelter is not just a passive barrier; it’s an active participant in the condensation equation. The two dominant fabrics in the ultralight world, Dyneema Composite Fabric (DCF) and Silnylon/Silpoly, have fundamentally different physical properties that dictate how they handle moisture. Understanding this difference is key to advanced condensation management. The core issue is water absorption: Silnylon is nylon-based and inherently hydrophilic, meaning it absorbs water.
While the silicone coatings on Silnylon make it waterproof, the underlying nylon fibers do not become impervious. In high-humidity environments, material performance data reveals that silnylon can absorb 2-3% of its weight in water. This has two negative consequences. First, the absorbed water adds weight to your packed tent. Second, and more critically for pitching, the fibers stretch when wet, causing the fabric to sag. A sagging tent loses its taut, aerodynamic profile, which collapses the air gap between the inner and outer canopies (if applicable) and ruins the pressure differential you worked to create, reducing airflow and exacerbating condensation. It requires re-tensioning, often in the middle of a cold, wet night.
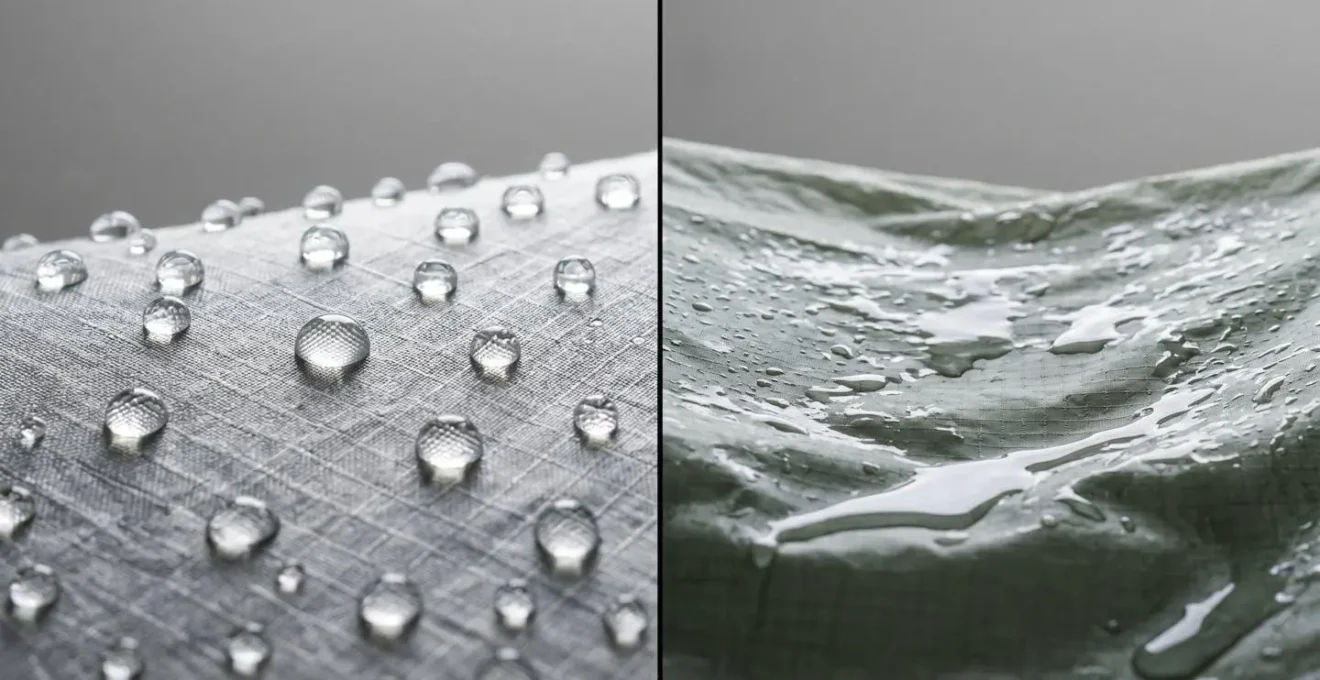
In contrast, DCF is fundamentally hydrophobic. It is a laminate of polyester films and Dyneema fibers, neither of which absorbs water. As the image shows, water on DCF beads up into distinct droplets on the surface, which can be easily shaken or wiped off. It does not absorb water, does not stretch, and does not sag. This means a DCF shelter maintains its taut pitch and its engineered airflow characteristics all night long, regardless of humidity. While condensation will still form on the inside of a DCF tent (the physics of the dew point are unchanged), it remains on the surface as beads and is far easier to manage. For the user focused on a systems-based approach to moisture, DCF’s non-absorbent, stable nature makes it the technically superior material for condensation management.
When to dry your tent: The lunch break drying protocol
Packing up a wet tent is sometimes unavoidable. However, carrying that moisture all day adds significant weight and guarantees a damp start to your next night. The expert backpacker treats a wet tent not as a failure, but as a temporary state to be corrected at the first opportunity. The « lunch break drying protocol » is a proactive strategy that turns a 15-minute rest stop into a highly efficient drying session, leveraging sun and wind to your advantage. This isn’t about passively draping your tent over a bush; it’s about applying principles of evaporative efficiency.
The core principle is maximizing surface area exposure to the two primary drivers of evaporation: solar radiation (heat) and airflow (wind). A tent packed away in a stuff sack has zero surface area exposed and will not dry. Simply laying it on the ground is only marginally better, as the underside remains damp and trapped. The goal is to elevate and orient the shelter to make the most of any available sun and breeze. By turning the tent inside-out, you expose the coated, non-porous inner surface—where the condensation is—directly to the elements for the fastest possible drying time. This protocol transforms a midday break into a powerful tool for resetting your moisture balance to zero before you even reach your next campsite.
Action Plan: 15-Minute Solar Drying Technique
- Initial Shake-Off: Immediately after taking the tent down, shake off excess water. Use a light swaying or snapping motion; this is more effective for dislodging water beads from DCF than aggressive shaking.
- Invert for Efficiency: Turn the tent completely inside-out. The goal is to expose the slick, coated interior surface where condensation formed directly to the sun and wind for maximum evaporative speed.
- Orient to the Elements: Position the inverted tent so that the wettest surfaces face both direct sunlight and the prevailing breeze. Understanding wind direction is key to maximizing airflow across the fabric.
- Elevate for 360° Airflow: Use trekking poles, guylines, or even strategically placed branches to create an improvised ‘hiker’s clothesline’. Suspending the tent allows air to circulate on both sides simultaneously, drastically reducing drying time compared to draping it on the ground or a bush.
- Strategic Packing: If you must pack the tent wet, shake it out first and pack it separately on the outside of your pack (e.g., in a large mesh pocket). This prevents moisture from migrating to other gear and allows you to deploy it instantly at the next sunny break.
This simple but systematic approach ensures you are actively managing your gear throughout the day, not just at night. It’s a hallmark of an experienced and self-sufficient backpacker.
How to keep a roof vent open without freezing to death?
The fundamental conflict in cold-weather condensation management is the battle between ventilation and warmth. Every bit of warm, moist air you vent out of the tent takes precious heat with it. Closing up the tent to preserve warmth, however, traps moisture and creates a feedback loop of escalating humidity. The key is to understand the scale of the problem: physiological data shows you exhale about 1 liter of moisture during a single night. This is a non-negotiable amount of water vapor that must be removed from the system if you hope to stay dry.
Therefore, keeping vents open is not optional; it’s a requirement. The question is how to do so efficiently. The « chimney effect » is your best ally. Warm air is less dense and naturally rises. By ensuring your highest vents (often at the peak or along the roofline) are open, you provide a natural escape route for the warmest, most moisture-laden air—the air from your own breath. This allows cooler, drier air to be drawn in through lower vents, establishing a slow but steady convective loop that continuously cycles air through the shelter. Closing these peak vents is the single fastest way to guarantee condensation, as you are trapping all that respired moisture at the highest point of the tent.
Many hikers worry about the perceived airflow restriction of noseeum mesh on vents. While mesh does impede airflow to some degree, its role in preventing insects is often critical. However, in conditions where bugs are not a concern, an expert’s insight highlights the potential for maximizing airflow.
unless flying bugs are really bad, when I get into my shelter for the night I leave a bit of the screen open at the top which facilitates heat escaping (according the Dan the noseeum screens restrict air flow more than you might imagine)
– Dan Durston, Backpacking Light forum discussion
The strategy is not to eliminate heat loss, but to direct it productively. The small amount of heat you « lose » by venting is the engine that drives out a massive moisture load. A slightly cooler but dry tent is infinitely warmer and safer than a notionally « warm » but saturated one. Prioritize opening the highest vent on the leeward (downwind) side to minimize wind-driven rain or snow entry while maximizing the chimney effect.
Key Takeaways
- Condensation is not a random event, but a predictable outcome of temperature, humidity, and airflow physics.
- Proactive management—through site selection, aerodynamic pitching, and daytime drying—is more effective than reactive wiping.
- Your gear choices, from tent fabric (DCF vs. Silnylon) to insulation (Synthetic vs. Down), must be made with condensation’s impact in mind.
Synthetic vs Down layers: Which saves more space in a 50L pack?
The question of pack volume is not as simple as comparing the uncompressed size of a down jacket versus a synthetic one. In the humid, condensation-prone environment of a single-wall shelter, the *effective* volume of your insulation is what matters. Down’s incredible warmth-to-weight ratio and compressibility are its key advantages, but they are entirely dependent on it staying dry. When down clumps with moisture, it loses its loft and its insulating properties plummet. A « 10L » down sleeping bag that has absorbed moisture might still take up 10L of space, but it offers the warmth of a 2L fleece.
Synthetic insulation, on the other hand, is hydrophobic. It does not absorb water, and it retains a significant portion of its insulating value even when damp. While it is heavier and bulkier than down for the same temperature rating *when dry*, its performance degrades far less in the face of condensation. This resilience is a critical strategic advantage in a single-wall shelter where some contact with moisture is almost guaranteed. A synthetic insulated jacket that gets pressed against a wet tent wall will still keep you warm. A down jacket in the same situation becomes a liability.
Case Study: Insulation Performance in High Condensation
In a scenario involving winter camping at 15°F (-9°C) with heavy frost and condensation inside single-wall tents, the difference became stark. Campers reported that their synthetic insulation layers maintained significant warmth despite being visibly damp from contact with tent walls and breath condensation. Conversely, those relying on down found their gear’s performance severely compromised, leading experienced users to reconsider the true « usable volume » of down versus synthetic insulation in consistently humid micro-climates.
Therefore, the calculation of « space saved » must be adjusted for risk. Down saves more space on paper, but synthetic insulation often saves more *usable* space in practice within a single-wall system. A slightly bulkier synthetic puffy that you can rely on 100% is more volume-efficient than a highly compressible down puffy that you have to spend all your energy protecting from the inevitable moisture of your shelter. For multi-day trips where drying gear is difficult, the reliability of synthetic insulation becomes a paramount safety consideration.
Sleeping Bags: How to Stay Warm When the Temp Drops Below Rating?
A sleeping bag’s temperature rating is determined in a controlled, dry lab environment. It is a measure of its potential performance, not a guarantee of its real-world performance. In the high-condensation environment of a single-wall shelter, you must assume your sleeping bag’s performance will be degraded. A damp sleeping bag loses heat far faster than a dry one due to the powerful effect of evaporative cooling. This means a 20°F bag might only perform like a 30°F or even 40°F bag once it has absorbed moisture from the tent walls and your breath.
The first step is to recalibrate your expectations. As an expert user, you should apply a mental correction factor to your gear. A common rule of thumb is to consider your bag effectively rated 10°F (5°C) warmer than its label indicates when used in a single-wall tent in humid conditions. This means choosing a warmer bag than you think you need for the forecasted temperatures, anticipating the inevitable loss of performance due to moisture.
The second step is aggressive physical management inside the tent to prevent moisture transfer. This goes beyond the « towel trick » and involves creating structural barriers to keep your insulation from ever touching the tent walls. One technique is the ‘Quilt Lift’: use a sit pad, an empty stuff sack, or folded spare clothing to physically prop up the footbox of your sleeping bag, creating a 2-3 inch air gap from the sloping wall. A similar technique, the ‘Head Block,’ involves using your pack or stuff sacks to build a buffer between your head/pillow and the tent wall where breath moisture heavily accumulates. These simple mechanical barriers are incredibly effective at preventing the direct conductive transfer of moisture that so often compromises a sleeping bag’s warmth.
Start applying these physics-based principles on your next trip. By moving from passive hope to active engineering, you can transform your single-wall shelter from a condensation trap into a high-performance system and finally stop waking up wet.