In summary:
- Orient the tent with the narrow end into the wind before you even unroll it.
- Insert all poles into the sleeves first, but do not tension them.
- Secure the windward end to the ground first; this creates a stable « kite anchor ».
- Use the « concertina » method, lifting one arch at a time with your body’s momentum, not just arm strength.
- Work with physics, not against it, to make the process calm and controlled.
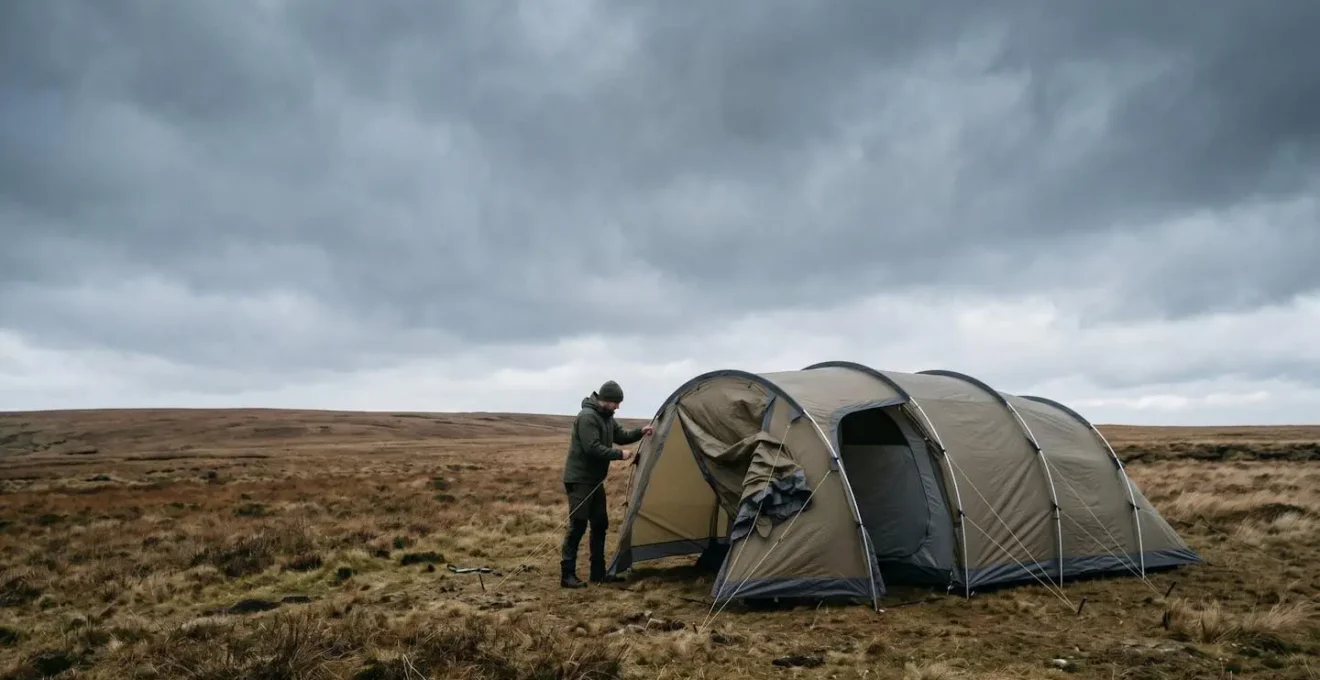
You’ve arrived. The car is parked, the kids are a whirlwind of frantic energy, and your partner is on toddler-containment duty. Before you lies a duffel bag containing 20kg of fabric and poles—the family tunnel tent. The wind is picking up, and the daunting task of pitching this behemoth falls squarely on your shoulders. The usual advice, « get help » or « wait for a calm day, » is useless in this moment. Panic begins to set in as you imagine a giant, flailing kite of a tent dragging you across the campsite.
Forget that scenario. The secret to pitching a large tunnel tent solo isn’t about brute strength or having four hands. It’s about method and physics. It’s about understanding that the tent is a tool, and you can make it work for you, even in a breeze. Many campers focus on staking everything down haphazardly or trying to lift the whole structure at once, which leads to torn fabric and snapped poles. This is a battle you can’t win with force.
But what if the key wasn’t to fight the wind, but to use it as an anchor? What if lifting the tent’s massive weight required almost no effort at all? This guide is designed for you, the solo-pitching parent. We will break down the process into a calm, repeatable sequence. By understanding the *why* behind each step—from pole insertion to anchoring in sand—you’ll transform a stressful chore into a demonstration of quiet competence. You’ll learn to see the wind as an ally and the tent’s structure as a series of levers you can control effortlessly.
This article provides a step-by-step framework to master the solo pitch. We will cover the core principles of tension management, wind anchoring, and structural mechanics to ensure you can get your shelter up safely and efficiently, leaving you more time to actually enjoy the camping trip.
Summary: Pitching Large Tunnel Tents Solo: A Methodical Guide
- Why inserting all poles before pinning prevents tension tears?
- How to peg the windward end first to acting as a kite anchor?
- The « concertina » move that lifts 20kg of tent effortlessly
- Tunnel vs Dome: Why tunnels tolerate sloping ground poorly?
- When to add storm straps: Anticipating the « side slap » effect
- Why crossing poles 3 times increases load bearing by 200%?
- How to anchor a tent in loose sand when stakes fail?
- 7 Low-Cost Family Camping Activities That Keep Teens off Phones
Why inserting all poles before pinning prevents tension tears?
One of the most common and costly mistakes is trying to raise and tension a tunnel tent one pole at a time. This approach concentrates the entire force of the bend, the fabric tension, and any wind load onto a single point. It’s the fastest way to rip a pole sleeve, put undue stress on the seams, or even snap a pole. The correct, methodical approach is to assemble and insert all poles into their respective sleeves while the tent fabric lies flat on the ground.
Why does this work? By having all poles in place before applying any tension, you ensure that the load is distributed evenly across the entire structure from the very beginning. Think of it as pre-loading a system. Each pole and seam shares a small, manageable part of the overall stress. As wilderness experts emphasize, this technique prevents the creation of localized pressure points that cause damage. When you start to lift the tent later, the entire frame works together as a cohesive unit, rather than fighting against itself.
This principle is so fundamental that many high-end mountaineering tents are designed to be staked out *before* the poles are even inserted, further controlling the fabric. For large family tents, the « all poles in first » rule is your primary defence against damage. It turns a chaotic wrestling match with fabric into a controlled assembly process. According to experienced wilderness hikers, proper pitching technique can prevent the majority of structural failures, and this is the foundational first step.
It might seem slower, but this methodical preparation is the difference between a frustrating, potentially damaging setup and a smooth, successful one. It’s your first move in working with the tent’s design, not against it.
How to peg the windward end first to acting as a kite anchor?
With the poles inserted but the tent still flat, the single most important next step is to control the wind. A 20kg bundle of fabric can quickly become an uncontrollable sail, creating a dangerous and stressful situation. The solution is to turn the wind from an enemy into an ally by creating a « kite anchor. » This means securely pegging the narrow, rear end of the tent directly into the wind before you attempt to lift anything.
Position the flat tent so the most aerodynamic end faces the breeze. Now, take your strongest pegs and secure the two corners of that windward end. This action is crucial: it anchors the entire structure and prevents the wind from getting underneath and lifting it. The rest of the tent will now simply flutter downwind like a flag, completely under your control. You’ve effectively neutralized the wind’s lifting power.
For this anchor to be effective, your pegging technique is vital. Don’t just push the stake straight down. The peg should be driven into the ground at a 45-degree angle away from the tent. This maximizes the friction and holding power in the soil, ensuring the stake resists the pulling force rather than being ripped out vertically.
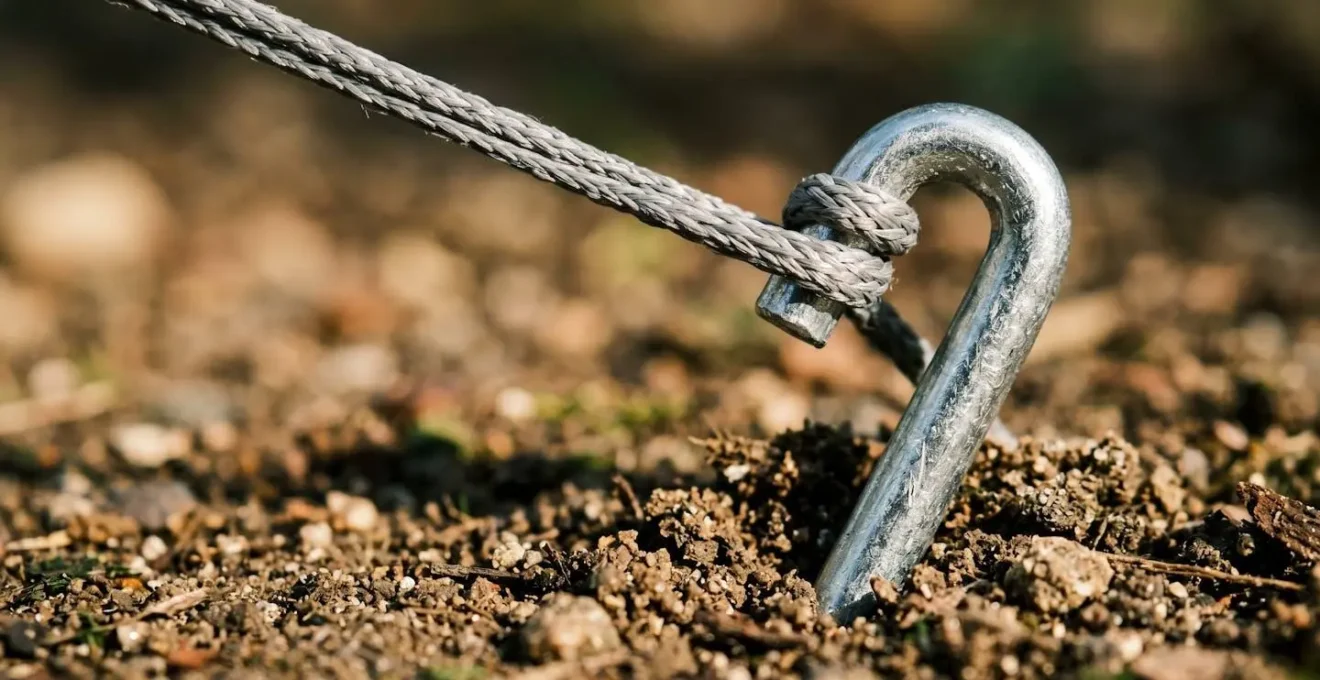
As you can see in the image, this angle forces the tension from the guyline to pull against a much larger volume of soil, creating a far more secure anchor point. For ultimate security on that first anchor point, you can even double-stake the windward corners by placing a second stake a few inches behind the first and connecting both to the corner loop.
The « concertina » move that lifts 20kg of tent effortlessly
The tent is laid out, poles are in, and the windward end is securely anchored. Now comes the moment of truth: lifting several metres of heavy, floppy fabric and poles. Attempting to deadlift the front arch is a recipe for a strained back and little success. The secret is the « concertina » move—a technique that uses leverage and momentum to make the process feel almost weightless.
This method involves walking the tent up from the inside, letting a wave of air and your own body weight do the heavy lifting for you. Instead of fighting gravity, you are guiding the structure into place, one arch at a time. It’s a calm, controlled, and surprisingly easy motion once you understand the mechanics.
Your Action Plan: Mastering the Concertina Lift
- Position Yourself: Stand at the front, anchored end of the tent and walk down the middle towards the first (front) pole arch, bunching the fabric in front of you.
- Get a Grip: Stand just inside the first arch. Grab the pole sleeve or the pole itself with one hand and hold the bunched fabric with the other. Your feet should be shoulder-width apart for a stable base.
- The First Push: Use your body’s forward momentum, not just your arms. Push the first arch upwards and simultaneously step forward into the space you’ve just created. This forward-walking motion is the engine of the lift.
- Ride the Wave: As the first arch rises, immediately continue your push-walk motion to the next arch. The air trapped under the rising fabric will help to lift the subsequent sections. You are creating a ‘wave’ that flows down the tent.
- Secure and Repeat: As you walk the final arch up, immediately pull out the front guyline and peg it down to secure the structure. The tent is now up and stable, ready for final pegging.
This technique transforms you from a lifter into a conductor. You are simply guiding the tent through a motion it is designed to make, using minimal physical effort for maximum result.
Tunnel vs Dome: Why tunnels tolerate sloping ground poorly?
Finding a perfectly flat pitch is a luxury. However, when using a large tunnel tent, site selection is far more critical than with a dome tent. While a dome tent can be pitched on a slight slope without much complaint, a tunnel tent’s stability is severely compromised on uneven ground. This isn’t a design flaw; it’s a direct result of the different physics that keep each tent standing.
A dome tent is a freestanding structure. Its strength comes from its triangulated, interconnected poles that create a rigid, self-supporting skeleton. It stands up on its own before a single peg is in the ground. A tunnel tent, conversely, is a tension-based structure. It has no inherent rigidity. Its strength comes from the opposition of forces: the curved poles pushing outwards and the guylines pulling inwards and downwards. For this to work, the tension must be symmetrical.
When you pitch a tunnel tent on a slope, that symmetry is broken. The guylines on the downhill side will be looser, and those on the uphill side will be under extreme strain. This imbalance causes the arches to deform, the fabric to sag or stretch, and the entire structure to become unstable and much more vulnerable to wind. The following table breaks down the fundamental differences.
| Design Feature | Tunnel Tent | Dome Tent |
|---|---|---|
| Structural Principle | Tensioned parallel arches – stability from opposing tension via guylines | Triangulated freestanding frame – interconnected poles create rigid triangles |
| Ground Requirement | Must be level – slope breaks tension symmetry | Can tolerate slope – self-supporting structure |
| Pegging Necessity | Essential for structure – tent collapses without pegs | Optional for basic setup – freestanding design |
| Wind Sensitivity | More sensitive to side winds, must pitch into wind direction | More resilient from all directions due to crossed poles |
| Weight to Space Ratio | Better – fewer poles, more interior volume | Lower – more poles needed for structure |
As this in-depth structural comparison shows, the tunnel tent’s excellent space-to-weight ratio comes with the non-negotiable requirement of a level pitch. Always take the extra five minutes to find the flattest ground possible; it’s the most important factor for a stable and secure shelter.
When to add storm straps: Anticipating the « side slap » effect
Your tunnel tent is pitched, and it looks solid. But the forecast mentions « breezy conditions. » This is the time for proactive thinking, not reactive panic. Storm straps, also known as tie-down straps, are not just for gales; they are essential for managing the unique way a tunnel tent behaves in the wind. Their main job is to prevent the dreaded « side slap » effect.
Because a tunnel tent’s stability is directional, it’s very strong head-on into the wind but vulnerable to side gusts. A strong gust from the side can flatten the arches, causing the fabric to « slap » down violently. This is not only noisy and alarming, but it can also deform poles and put immense stress on the seams. Storm straps are wide bands that run over the top of the pole sleeves and are pegged out at a distance, creating a rigid ‘A-frame’ that dramatically reduces this lateral movement.
The question isn’t *if* you should use them, but *when*. Don’t wait for the tent to start shaking. A good rule of thumb is to anticipate. According to professional tent equipment specialists, tie-down straps greatly improve stability and decrease the risk of storm damage. A practical way to decide is to use a simplified Beaufort Wind Scale as your guide:
- Force 4 (13-18 mph / 20-28 kph): Small branches move, and dust is raised. It’s good practice to add storm straps as a preventive measure now.
- Force 5 (19-24 mph / 29-38 kph): Small trees begin to sway. Storm straps are now essential to maintain the tent’s shape and integrity.
- Force 6+ (25+ mph / 40+ kph): You hear the wind whistle. Straps are critical, and you should also re-evaluate your location for any better natural shelter. Above 38 mph, safety becomes the primary concern.
Think of storm straps as part of your standard setup in anything but a dead calm. Putting them on early, before the wind really hits, is a simple, five-minute job that can save your tent—and your peace of mind—later.
Why crossing poles 3 times increases load bearing by 200%?
The title of this section refers to a core principle of geodesic dome tents. In a geodesic design, the poles cross over each other multiple times, creating a web of interconnected triangles. This is the strongest shape in engineering, and it’s why dome tents are inherently rigid and can withstand wind from any direction. Each intersection point distributes the load across multiple poles, increasing the structure’s overall load-bearing capacity exponentially. A pole crossing three times is part of a highly complex and strong structural web.
But how does this apply to your tunnel tent, which has parallel, non-crossing poles? You can’t change the tent’s fundamental design, but you *can* borrow the principle of triangulation to dramatically increase its strength in side winds. The expert technique is called V-guying or triangulation.
Instead of running each guyline to its own peg, you create triangles with the guylines themselves. Advanced campers use the V-guying method to achieve this. Here’s how it works: take the guyline from the middle of one arch and the guyline from an adjacent arch and run them both to the same single pegging point. This creates a ‘V’ shape. This simple change creates a rigid triangle of tension between two arches and the ground. This setup dramatically reduces the ability of the arches to flex laterally in side winds. You are essentially building an external, tension-based geodesic structure that buttresses your tent.
By creating a series of these V-guys along the side of your tent, you are mimicking the load-distributing strength of a dome tent without the extra weight and poles. It’s an advanced, highly effective way to apply engineering principles to make your tunnel tent practically bomb-proof in challenging conditions.
How to anchor a tent in loose sand when stakes fail?
You’ve found the perfect beach spot, but there’s a problem: your tent pegs are useless. In loose, dry sand or even soft, loamy soil, standard stakes have almost no holding power. The moment any tension is applied, they pull right out. This is where you need to abandon conventional thinking and use an age-old technique known as the « deadman anchor. »
The deadman anchor works by burying an object attached to your guyline, using the weight and surface area of the sand itself as the anchor. It’s an incredibly effective method that requires no special equipment. You can use stuff sacks filled with sand, a sturdy stick, a log, or even a rock.
Here is the step-by-step process for creating a secure deadman anchor:
- Prepare Your Anchor: Find a suitable object. A stuff sack is ideal because it’s light to carry and can be filled on-site. Attach your guyline securely to the middle of the object.
- Dig the Hole: Dig a hole about 8-10 inches (20-25 cm) deep in the sand.
- Bury the Object: Place your anchor object horizontally at the bottom of the hole. This horizontal placement is key, as it maximizes the surface area resisting the pull.
- Bury and Compact: Bury the anchor, ensuring the guyline exits the sand at a very low angle, almost parallel to the ground. This ensures you are pulling against the buried weight, not pulling it upwards. Firmly compact the sand on top.
For those who camp frequently on sand, modern equipment offers a convenient alternative. According to sand camping equipment specialists, purpose-built screw-style anchors with specially shaped threads can dig deep into shifting sand and provide exceptional holding power without the need for digging.
Key takeaways
- Pitching a large tent solo is a game of physics and technique, not strength.
- Always control the wind first by creating a « kite anchor » with the windward end of the tent.
- Use the « concertina » method—walking the tent up—to lift it effortlessly.
- Tunnel tents require a level pitch to maintain the structural symmetry they need for stability.
7 Low-Cost Family Camping Activities That Keep Teens off Phones
Congratulations, the tent is up! It’s stable, secure, and you pitched it all by yourself. You’ve earned a moment of peace. But now, a new challenge emerges: the bored teenager, thumb endlessly scrolling, disconnected from the nature around them. Winning this next battle doesn’t require physics, but a little creativity.
The key is to offer engaging, low-effort activities that feel more like discovery than a forced family march. The goal isn’t to ban phones, but to make the real world more interesting for a while. Here are seven low-cost ideas that work:
- Campsite Geocaching: Before you leave home, hide a few small « treasures » (a favourite snack, a small waterproof gadget) in discreet locations around the campsite. Write down the GPS coordinates or create simple clues. It turns a simple walk into a treasure hunt.
- The « Master of Fire » Challenge: Give them the responsibility. Provide them with a fire steel, some cotton balls with vaseline, and challenge them to get the evening’s campfire started (under supervision, of course). It’s a primal, satisfying skill to learn.
- Night-Time « Glow-in-the-Dark » Ring Toss: All you need are a few glow stick necklaces and a thicker glow stick bracelet to use as a peg. It’s a simple, mesmerizing game that only works when it’s dark.
- Gourmet S’mores Competition: Move beyond the basic marshmallow. Bring a « gourmet » kit with different types of chocolate (dark, white, with caramel), different cookies, and maybe some sliced fruit. Judge on creativity, taste, and messiness.
- The « Found Object » Art Project: Give everyone a small bag. Their mission is to collect interesting, non-living natural objects: a cool-shaped leaf, a weird rock, a piece of bark, a pinecone. Back at camp, use a piece of cardboard and some glue to create a temporary piece of camp art.
- Cloud Gazing / Stargazing Storytelling: A classic for a reason. Lay down and have each person describe what they see in the clouds or invent a story about a star constellation. Apps like SkyView Lite can help identify stars and planets, a rare phone use that enhances the experience.
- Card Games with a Headlamp: A simple deck of cards can be magical in a tent. Teach them a fast-paced game you used to love. The focused circle of light from a headlamp creates a unique, intimate atmosphere that’s hard to replicate anywhere else.
These activities are less about entertainment and more about creating shared moments. They provide a gentle nudge away from the screen and towards the simple, tangible pleasures of being outdoors together.
With the tent secure and the family engaged, you can finally sit back and enjoy the results of your hard work. The next step is to start planning the food, the hikes, and the memories you’re about to create.