The survival of your camping gear on the coast doesn’t depend on how expensive it is, but on your understanding of the destructive forces of salt, wind, and water.
- Salt spray initiates galvanic corrosion that can destroy aluminum poles in days, not years.
- Standard tent stakes are useless in sand; buried « deadman » anchors are the only reliable method in high winds.
- Mistaking a spring tide for a normal high tide is the most common reason campers wake up in a flooded tent.
Recommendation: Shift your focus from buying « better » gear to mastering the techniques that respect the physics of the marine environment.
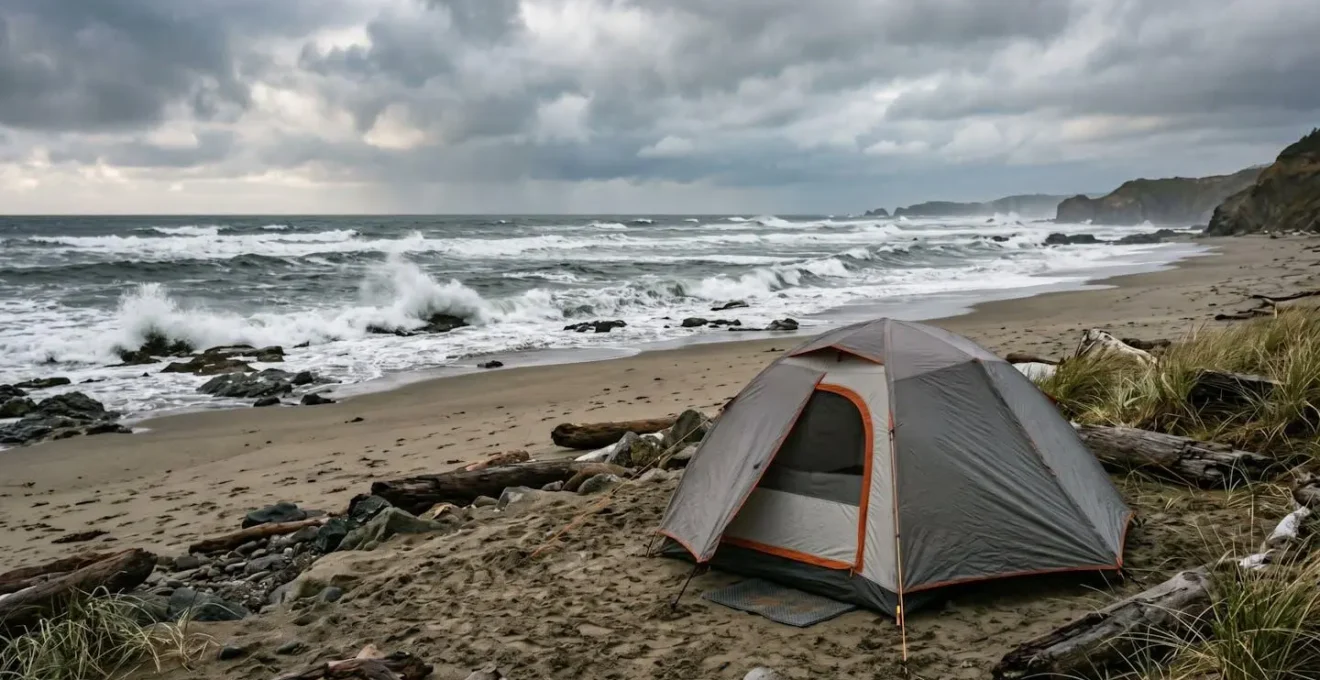
The allure of coastal camping is undeniable: the rhythmic sound of waves, the salty air, and the panoramic ocean views. Many campers, drawn by this romance, arrive with standard woodland gear, assuming it will suffice. They believe a sturdy tent and a few heavy-duty stakes are all it takes to conquer the elements. This assumption is the first, and often most costly, mistake. The coast is not simply a campsite with a better view; it’s a fundamentally different environment governed by aggressive and relentless forces.
Common advice often circles around generic tips like « rinse your gear » or « check the tides. » While not wrong, this advice fails to address the underlying physics that make the coast so destructive. The real threat isn’t the wind itself, but its aerodynamic effects on your shelter. It’s not just the water, but the lunar cycle that dictates its reach. And most insidiously, it’s not just rust, but a specific electrochemical reaction called galvanic corrosion that silently eats away at your equipment. But what if the key to survival wasn’t fighting the coast, but understanding and cooperating with its powerful, predictable mechanics?
This guide moves beyond the platitudes. We will dissect the specific threats—corrosion, anchoring failure, tidal miscalculations, and wind dynamics—that inexperienced coastal campers face. By understanding the ‘why’ behind each failure, you’ll learn not just what to do, but how to think like a seasoned mariner, ensuring your gear—and your safety—endure the beautiful hostility of the shore.
To navigate these challenges effectively, this article is structured to address each critical aspect of coastal camping survival. The following sections break down the science and provide the practical strategies needed to protect your equipment and ensure a safe experience.
Contents: A Guide to Surviving the Coast
- Why salt spray destroys aluminum poles in less than a week?
- How to anchor a tent in loose sand when stakes fail?
- The tide calculation mistake that floods your tent at 3 AM
- Dune shelter vs Cliff top views: Which is safer during a storm?
- When to rinse gear: The maintenance schedule to prevent corrosion
- How to position a symmetric dome relative to changing wind direction?
- The hiking trail trap: When the path crosses a nude beach unexpectedly
- Geodesic Domes: Why They Survive Winds That Flatten Tunnel Tents?
Why salt spray destroys aluminum poles in less than a week?
The salty mist that feels refreshing on your skin is a relentless chemical agent working against your gear. The rapid destruction of aluminum tent poles is not simple rust; it’s a fast-acting electrochemical process known as galvanic corrosion. This occurs when two dissimilar metals (like an aluminum pole and a stainless steel shock-cord ferrule or grommet) are connected by an electrolyte—in this case, saltwater. The salt-infused moisture creates a battery, causing one metal (the less noble one, aluminum) to corrode at an accelerated rate to protect the other (steel).
This isn’t a slow, years-long process. In a harsh saltwater environment, the difference in electrical potential between the two metals is the critical factor. Galvanic compatibility charts used by marine engineers show that for long-term survival, the voltage difference should not exceed 0.15V. The gap between aluminum and common stainless steel is far greater, making rapid corrosion almost inevitable without preventative measures. The fine, crystalline salt deposits left by evaporating spray are hygroscopic, meaning they attract moisture from the air, keeping this corrosive process active even on a dry day. This is why a pole can look fine in the evening and be pitted and weakened by morning.
Aluminum negatively reacts to stainless steel but with a conducive environment (marine environment); if the surface area of aluminum is larger than stainless steel, corrosion of the aluminum surface is likely to occur.
– Industrial Metal Service, Galvanic Corrosion Chart Guide
The result is a structural failure waiting to happen. The poles lose their integrity at connection points, becoming brittle and prone to snapping under wind load precisely when you need them most. Understanding this is the first step toward mitigation, which involves creating barriers between metals and a strict cleaning regimen.
How to anchor a tent in loose sand when stakes fail?
Driving standard tent stakes into loose, dry sand is an exercise in futility. They offer virtually no holding power because sand lacks cohesion. Under the constant, variable load of wind, a normal stake will wiggle, create a cone of failure around it, and pull out. The physics of anchoring in a non-cohesive substrate like sand requires a different approach: increasing the surface area and using the weight of the sand itself as the anchor.
The most effective and time-tested method, borrowed from mountaineering, is the « deadman » anchor. Instead of relying on a thin stake’s friction, you bury a broad object—a stuff sack filled with sand, a dedicated snow/sand fluke, or even a sturdy piece of driftwood—and use its resistance to being pulled upward through the compacted sand to secure your guylines. The holding power is immense because the force is distributed over the entire buried object and the column of sand above it. For this to work, the anchor must be buried deep enough (at least 12-18 inches) and the sand above it must be thoroughly compacted by stepping on it.
This technique transforms the ground’s weakness into its greatest strength. A properly set deadman anchor will hold fast in winds that would pull out even the longest, most aggressive stakes. The key is understanding that you are no longer fighting the sand, but enlisting its immense weight to work for you.
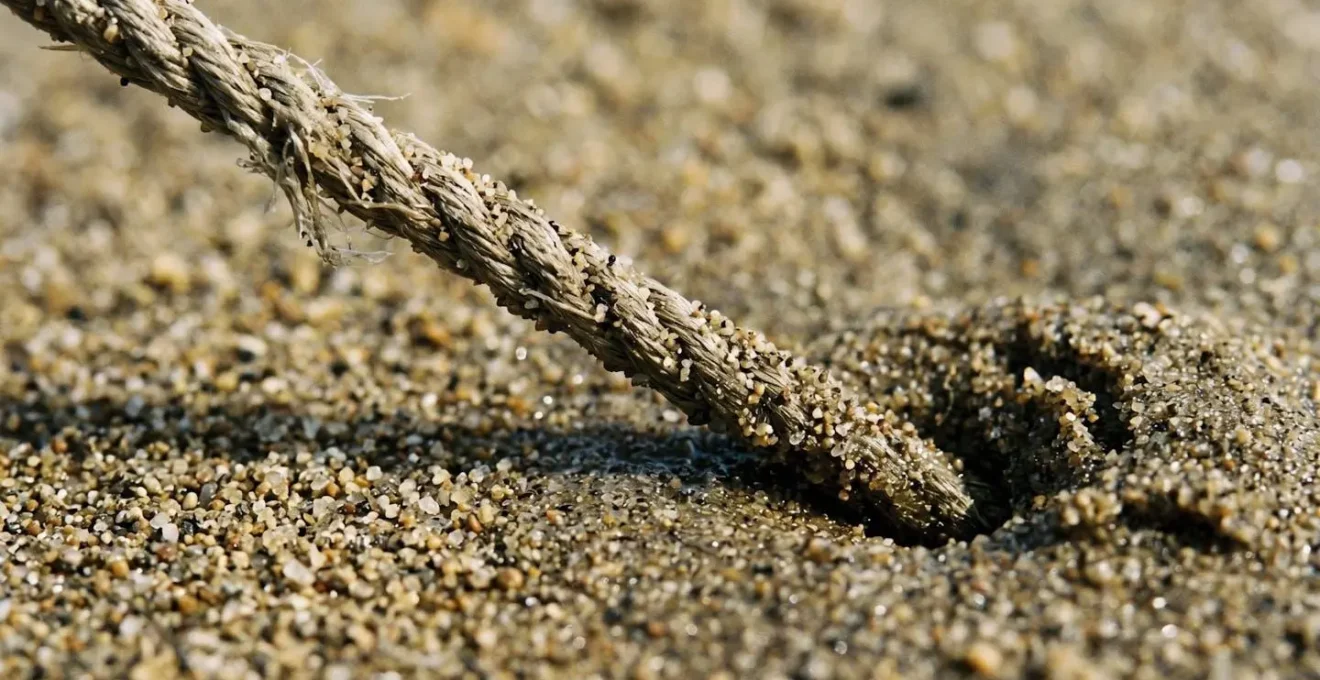
As you can see in this close-up, the tension from the guyline is transferred horizontally to the buried anchor. The compacted sand on top creates immense downward pressure, preventing the anchor from lifting. It is a system based on weight and resistance, not friction, which is why it is so effective in loose terrain.
The tide calculation mistake that floods your tent at 3 AM
One of the most dangerous and common errors in coastal camping is underestimating the tide. Many campers check a tide chart, note the high tide line, and pitch their tent what they feel is a « safe » distance away. They fail to account for the most critical variable: the difference between a neap tide and a spring tide. This isn’t a small variation; it can be the difference between a dry night and a catastrophic flood.
Spring tides are exceptionally high high tides and low low tides that occur twice each lunar month, during the full and new moons. This is when the gravitational pulls of the sun and moon align, creating a much larger tidal range. Conversely, neap tides, which occur during the quarter moons, have the smallest tidal range. A camper who observes a neap high tide and bases their campsite position on it could be caught completely off guard if a spring tide arrives a few days later, pushing the water line dramatically farther up the beach.
The danger is compounded by other factors like onshore winds and low barometric pressure during a storm, which can create a « storm surge » that pushes the water level even higher than the predicted spring tide. Relying on a casual observation of the previous day’s high tide line is a recipe for disaster. The only safe method is to consult a reliable, location-specific tide chart for the *entire duration* of your stay, identify the highest predicted tide, and then add a generous buffer zone for storm surge.
Case Study: Halifax Harbor Spring vs. Neap Tide Differential
A tidal analysis of Halifax Harbor demonstrated the critical difference. During spring tides, high water reached almost 6.5 feet, but during neap tides at the same location, high water was only approximately 4.8 feet. This 1.7-foot difference in vertical height translates to a massive horizontal distance on a gently sloping beach, illustrating why a storm paired with a spring tide causes significantly more coastal flooding.
Dune shelter vs Cliff top views: Which is safer during a storm?
Choosing a pitch site is a trade-off between aesthetics and safety, a conflict that becomes critical during a storm. The cliff top offers breathtaking, panoramic views, but it’s arguably the most dangerous place to be in high winds. The clifftop view comes at the cost of total exposure to the full, uninterrupted force of the wind. Furthermore, wind hitting a cliff face is forced upward, creating significant turbulence and powerful updrafts that can lift a tent or destabilize its structure.
The lee side of a large, stable sand dune, by contrast, offers superior protection. While it may seem counterintuitive to seek shelter behind a mound of sand, the aerodynamics are sound. The dune acts as a natural windbreak, forcing the main airflow up and over your position. A pocket of relatively calm air forms directly behind the crest of the dune. The key is to pitch your tent close enough to benefit from this shelter but not so close that you are on the unstable slope of the dune itself. You must also ensure the dune is well-vegetated and stable, as camping on fragile dunes can cause ecological damage.
This decision requires respecting the power of wind dynamics. The goal is not to face the wind head-on, but to use the natural topography to deflect its energy away from your shelter. The spectacular view from the cliff is a trap; the humble, sheltered position behind a dune is the choice of a prudent mariner.

This landscape shows how a primary dune system creates a significant barrier. The grasses bending in the wind on the crest indicate the high-velocity airflow passing overhead, while the area immediately behind the dune remains a zone of relative calm—the ideal location for a storm-proof camp.
When to rinse gear: The maintenance schedule to prevent corrosion
The fight against salt corrosion is not a one-time, post-trip task. It’s a continuous process that must be integrated into your camping routine. Waiting until you get home to rinse your gear is often too late; the galvanic corrosion process begins the moment salt spray dries on your equipment. As the experts at Outside Magazine bluntly state, the threat is absolute and requires a proactive defense.
Salt water is basically the enemy of everything. And, in particular, it likes to eat metal.
– Outside Magazine Gear Team, Zipper Protection Guide for Saltwater Environments
A disciplined maintenance schedule is the only effective countermeasure. This doesn’t mean dousing everything in gallons of precious fresh water every hour. It means a targeted, prioritized approach. The most critical components are metal-on-metal contacts: zipper sliders and teeth, pole sections and ferrules, and metal stakes. These require the most frequent attention. A small amount of fresh water from a water bottle, strategically applied after a period of heavy spray, can neutralize the salt and halt the corrosive process. For fabrics, rinsing is less about corrosion and more about performance. Salt crystals left on a tent fly can abrade the fabric and compromise its Durable Water Repellent (DWR) coating, causing it to « wet out » in the rain.
Your Gear Maintenance Checklist for Coastal Trips
- Daily Task: Use a dry, stiff-bristled brush (like a toothbrush) to meticulously clean sand and salt crystals from all zipper teeth to prevent grinding and premature wear.
- After Heavy Spray: Immediately rinse critical metal parts—zippers, pole ferrules, and stakes—with a small amount of fresh water to neutralize the corrosive electrolyte.
- Mid-Trip Refresh: On a dry, sunny, and windy day, give the tent fly a quick rinse with fresh water to remove accumulated salt and help restore its DWR performance.
- End-of-Trip Deep Clean: Upon returning home, submerge and rinse all gear thoroughly in fresh tap water, paying special attention to flushing zippers and seams completely.
- Pre-Storage Protocol: Ensure every piece of gear, especially the tent, is 100% bone-dry before packing it away loosely in a breathable storage sack to prevent mildew and mold.
This disciplined approach transforms gear maintenance from a chore into a critical survival skill. It’s the difference between gear that lasts one season and gear that lasts a decade.
How to position a symmetric dome relative to changing wind direction?
One of the inherent strengths of a symmetric dome tent is its uniform aerodynamic profile. Unlike a tunnel tent, which has a clear « front » and « back » and must be pitched with its narrowest end into the wind, a dome is designed to handle wind from any direction with roughly equal stability. This is a significant advantage in coastal environments where wind direction can shift dramatically with passing weather fronts or diurnal sea breezes.
However, this omnidirectional strength doesn’t mean positioning is irrelevant. The primary consideration for a dome tent becomes the door placement. You should always orient the main entrance away from the prevailing wind direction. This simple step prevents wind-driven rain from blasting directly into your living space every time you open the door and reduces the chance of the wind catching the open door like a sail, putting immense stress on the zipper and fabric. If your tent has two doors, position it so the downwind door is your primary entrance and the upwind door remains closed.
While the dome’s structure handles the wind, its fabric must handle the water. Wind-driven rain exerts significant pressure on the flysheet. This is why a high waterproof rating is critical. A rating of 1500mm might be adequate for calm woodland rain, but for coastal gales, a 3000mm minimum hydrostatic head is recommended for tent specifications. This ensures that even under the pressure of sustained, wind-driven downpours, water won’t be forced through the fabric’s coating, keeping you dry and safe inside your well-positioned shelter.
Therefore, the strategy for a dome is two-fold: leverage its symmetrical strength by worrying less about its overall orientation, but remain tactical by positioning its openings for maximum shelter and livability.
The hiking trail trap: When the path crosses a nude beach unexpectedly
Coastal trails often meander through a diverse range of landscapes and jurisdictions, and occasionally, they can lead a hiker to an unexpected social situation: a clothing-optional or nude beach. For the unprepared, this can be an awkward or uncomfortable encounter. This isn’t a moment for panic or judgment; it’s a time for situational awareness and simple, respectful etiquette.
The first line of defense is preparation. Before your trip, study your maps and guidebooks. Many designated clothing-optional beaches are marked on official park maps or mentioned in local hiking resources. Being aware of these areas beforehand allows you to either choose an alternate route or be mentally prepared. If you do find yourself on such a beach unexpectedly, the protocol is straightforward and based on mutual respect. These are public spaces where nudity is permitted, and the other beachgoers are simply enjoying the area in a way that is legal and accepted there.
The appropriate etiquette is to behave as you would on any other beach. Do not stare, point, or make comments. Absolutely do not take photographs or videos. The privacy of others is paramount. Simply continue on your way along the trail, keeping your eyes forward or focused on the scenery. If you need to stop for a break, it’s generally best to do so once you are clearly past the clothing-optional section. By treating the situation with maturity and discretion, you ensure a comfortable experience for everyone and show respect for the diverse ways people enjoy the coast.
This is less a « trap » and more a test of a camper’s worldliness and respect for others. A calm, respectful demeanor is the only tool you need to navigate the situation gracefully.
Key Takeaways
- Galvanic Corrosion: Saltwater acts as an electrolyte between dissimilar metals (like aluminum and steel) in your gear, causing rapid, destructive corrosion.
- Anchoring in Sand: Standard stakes are ineffective. Use « deadman » anchors by burying a stuff sack filled with sand to utilize the weight of the sand itself for immense holding power.
- Tidal Awareness: Always check for spring tides (during new/full moons), which are significantly higher than neap tides, and pitch your tent well above the highest predicted tide line.
Geodesic Domes: Why They Survive Winds That Flatten Tunnel Tents?
In the face of gale-force coastal winds, not all tent designs are created equal. While tunnel tents can be strong when pitched perfectly into the wind, they are vulnerable to side winds, which can cause them to deform and collapse. The geodesic dome, however, owes its legendary stability to a fundamental principle of engineering: triangulation. This design philosophy is what allows it to withstand complex, multi-directional wind loads that would flatten lesser structures.
The structure of a geodesic dome is a web of triangles. Since triangles are inherently rigid shapes, the wind load is distributed across the entire structure.
– Coastal Camping Technical Guide, Beach Camping Gear: Handling Wet & Humid Conditions
A geodesic dome’s framework is an interconnected web of triangles. When wind pushes on one point of the tent, the force isn’t absorbed by a single pole. Instead, it’s instantly distributed through the network of intersecting poles. The push (compression) on one side is converted into pull (tension) on the other, with the forces spreading out across the entire frame. This load distribution means no single component is overwhelmed. It’s the same principle that gives bridges and architectural domes their incredible strength.
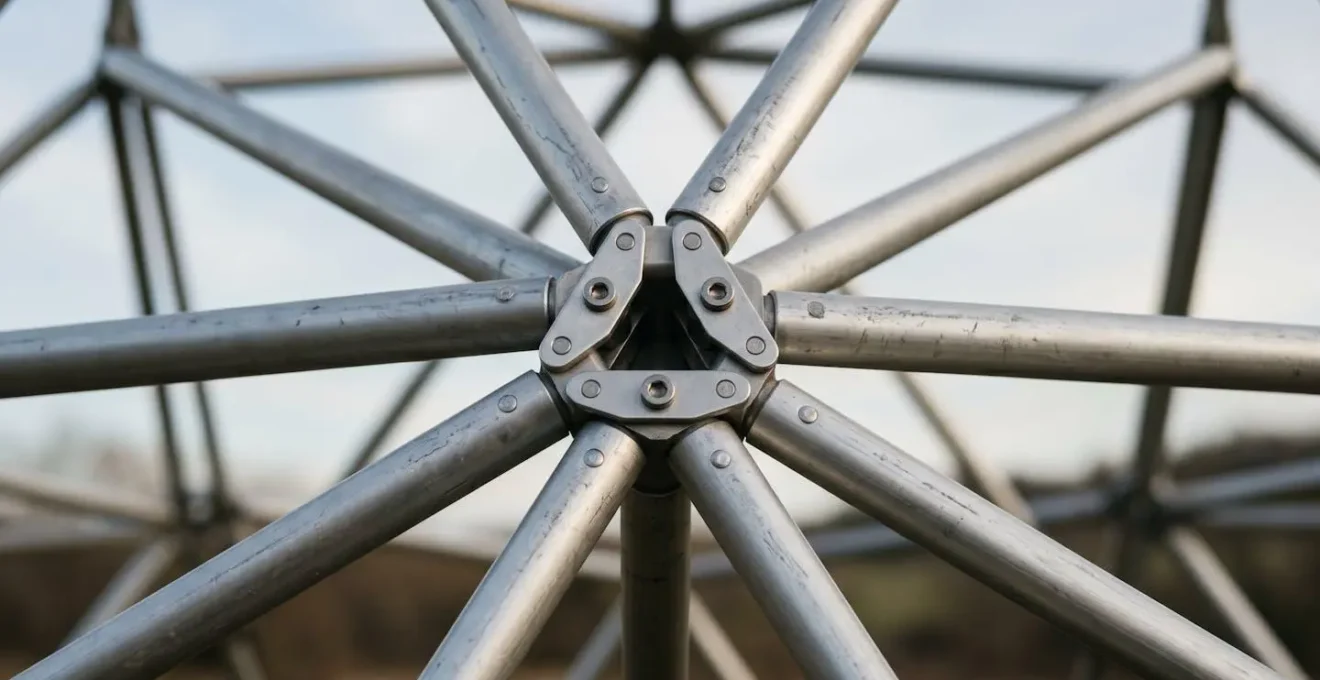
This structural integrity makes the geodesic dome inherently free-standing and robust, even before a single guyline is deployed. While tunnel tents rely heavily on tension from stakes to maintain their shape, a geodesic dome’s strength comes from its internal geometry. This is why it’s the preferred shelter for high-altitude mountaineering and polar expeditions—and why it’s the wisest choice for the serious coastal camper who refuses to leave their safety to chance.
By internalizing these principles of physics and environmental science, you transform from a passive visitor into an active, knowledgeable partner with the coast. Your gear will last longer, your trips will be safer, and your appreciation for the raw power of the marine environment will be profoundly deeper. Start applying this knowledge on your next trip to camp safer, smarter, and with the quiet confidence of a seasoned mariner.