The frustrating reason you’re cold isn’t your expensive sleeping bag; it’s that you’re losing a thermal war against the ground, and your sleeping pad is your only real weapon.
- Your body weight crushes your sleeping bag’s insulation, creating a « thermal bridge » that funnels heat directly into the ground.
- The ground conducts heat away from your body at a shockingly efficient rate, making it a far greater threat than cold air.
- A pad’s R-value is the only standardized measure of its ability to fight this conductive heat loss and insulate you effectively.
Recommendation: Stop evaluating your gear in isolation. Treat your sleeping pad and bag as a single, integrated thermal system where the pad’s primary job is to defeat the ground.
It’s a scenario every camper has faced with bitter disappointment: zipped into a high-tech, expensive sleeping bag rated for freezing temperatures, yet shivering uncontrollably through the night. The logical assumption is to blame the bag, question the temperature rating, or simply conclude that you « sleep cold. » But this common frustration rarely stems from the quality of your bag’s loft. The real culprit is an invisible, relentless force of physics happening right beneath you: conductive heat loss. Your body is a furnace, and the cold, dense ground is a massive heat sink, actively pulling warmth from you.
Most campers focus on the air temperature, buying bags with impressive down fill or synthetic insulation to create a pocket of warm air. This is a battle against convection and radiation, and modern bags fight it well. However, they are almost completely defenseless against the primary enemy of a warm night’s sleep. When you lie down, your body weight compresses the bag’s insulation to a negligible thickness, creating a direct thermal highway for your body heat to escape into the earth. The ground is a far more effective heat thief than the air.
This is where the fundamental misunderstanding lies. The solution isn’t a thicker sleeping bag; it’s a smarter defense against the ground. This guide reframes the problem from the perspective of thermal dynamics. We will deconstruct the science of heat transfer in a camping environment and demonstrate why your sleeping pad’s R-value is not just a feature, but the single most critical variable in your sleep system’s equation. Forget what you think you know about staying warm; it’s time to understand the physics that dictate whether you sleep soundly or shiver until dawn.
To master your sleep system, it’s essential to understand each component’s role in this thermal battle. This article will break down the science, the gear, and the skills you need. Here is a look at the critical points we will cover.
Summary: Sleeping Mats: Why Your Expensive Bag Fails without the Right R-Value?
- Why the ground sucks heat 3x faster than the air?
- How to repair a valve leak in the field?
- The R-value misunderstanding that leads to freezing nights
- Closed-cell foam vs Inflatable: Which is indestructible?
- When to inflate: Adjusting pressure before sleep vs during the day
- Why temperature ratings are survival limits, not comfort guarantees?
- How to keep your butt warm without a slipping pad?
- Sleeping Bags: How to Stay Warm When the Temp Drops Below Rating?
Why the ground sucks heat 3x faster than the air?
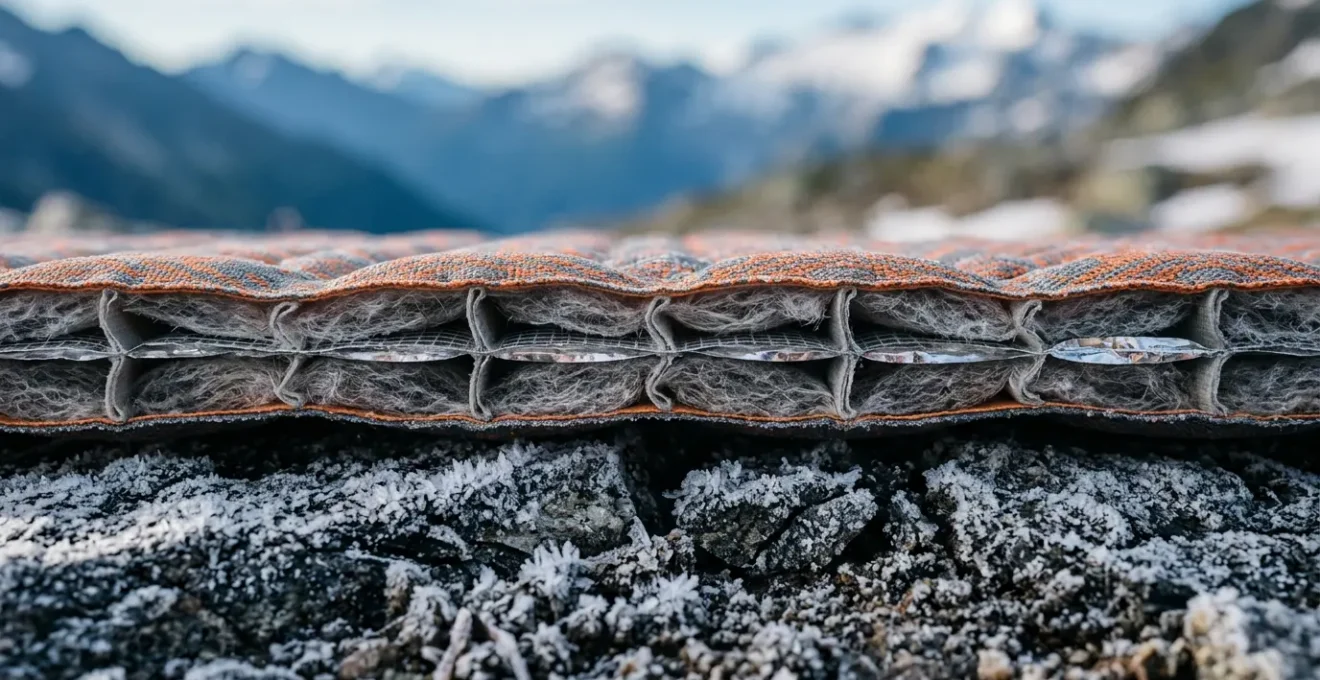
To understand why you get cold, we must first confront the primary antagonist: conduction. Heat transfers in three ways: convection (through fluid movement, like air), radiation (through electromagnetic waves), and conduction (through direct contact). While you might feel the chill of the air, it is a poor conductor of heat. The ground, however, is a master of it. The dense, solid earth acts as a massive and relentless heat sink, and any object in direct contact with it will have its thermal energy drained away with incredible efficiency. In fact, while the prompt’s title suggests a 3x rate, the reality is even more stark; research shows that the ground conducts heat away up to 25 times faster than still air.
This is where your sleeping bag, for all its fluffy loft, fails you. A sleeping bag’s primary function is to trap a layer of air around your body and prevent convective heat loss. It works because air is a great insulator. But this principle is rendered moot where your body meets the ground. As Peak Gear Guide outdoor equipment analysts explain in their « Sleeping Pad R-Value Guide 2026 »:
Your sleeping bag insulates the air around you, but the insulation beneath you gets compressed to almost nothing by your body weight.
– Peak Gear Guide outdoor equipment analysts, Sleeping Pad R-Value Guide 2026
This compression creates a thermal bridge—a direct path of high conductivity from your warm body to the cold ground. It doesn’t matter if you have an 800-fill-power down bag; compressed down has virtually no insulating value. You might as well be lying on a thin nylon sheet. The only thing that can break this thermal bridge and fight conduction is your sleeping pad. Its job is not primarily comfort, but thermal resistance.
How to repair a valve leak in the field?
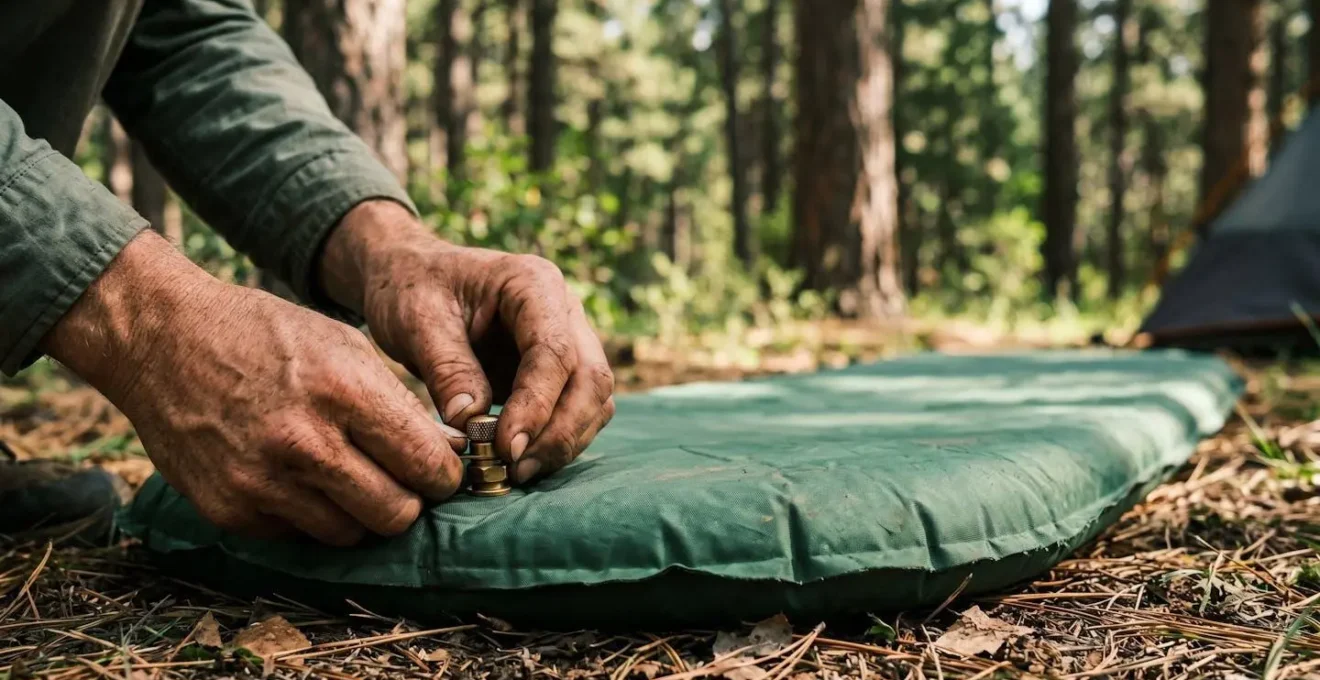
An inflatable sleeping pad is your primary shield against conductive heat loss, but its effectiveness plummets to zero if it cannot hold air. A valve leak is a critical failure that can turn a comfortable night into a dangerous one. Unlike a puncture in the main body, a valve leak can be subtle and harder to diagnose. Being able to perform a field repair is not just a useful skill; it’s an essential part of relying on inflatable gear in the backcountry. The process requires patience and a methodical approach, but it can salvage a trip.
The first step is diagnosis. If you suspect a leak but can’t find an obvious puncture, the valve is a prime suspect. Inflate the pad fully and use a spray bottle with soapy water (or submerge it in a lake if conditions permit) to cover the valve area. Look for tiny bubbles forming, which indicates escaping air. Once you’ve confirmed the leak’s location around the valve, you can begin the repair. It is crucial to work on a clean, dry surface for any adhesive to bond properly.
For minor leaks or as a temporary field fix, a durable adhesive patch like Tenacious Tape can be applied over the faulty area after a thorough cleaning. For a more permanent solution or a complete valve failure, you may need to replace the valve entirely, a process that involves carefully removing the old flange and inserting a new one. The key to success with any repair is allowing the adhesive to cure, which can be the most challenging part in the field.
Action plan: Emergency valve repair in the field
- Isolate the leak: Inflate the pad and apply soapy water around the valve. Press on the pad and watch for bubbles to pinpoint the exact source of escaping air.
- Prepare the surface: Mark the leak’s location. Thoroughly dry and clean the area around the valve with an alcohol wipe if available. The surface must be free of dirt and oils.
- Apply a field patch: For a quick fix, cut a piece of Tenacious Tape large enough to cover the leak with a generous overlap. Press it firmly onto the clean, dry surface, smoothing out any air bubbles.
- Test the seal: Wait at least 30 minutes if possible before re-inflating the pad. Gently apply pressure and listen for any hissing to ensure the patch is holding.
- Plan for a permanent fix: Understand that field repairs are often temporary. When you return home, use a dedicated adhesive like Seam Grip for a durable, long-term solution, allowing it to cure overnight.
The R-value misunderstanding that leads to freezing nights
For years, comparing the insulation of sleeping pads between brands was guesswork. Manufacturers used proprietary testing methods, resulting in ratings that were inconsistent and often misleading. A « warm » pad from one company might be colder than a « 3-season » pad from another. This chaos led directly to the freezing nights campers experience when their gear doesn’t perform as expected. The solution was standardization. The industry needed a single, unified test to measure a pad’s resistance to heat flow, allowing for a true apples-to-apples comparison.
This led to a major breakthrough in gear testing. According to the industry standardization timeline, a group of leading manufacturers, including Therm-a-Rest, began developing what would become the ASTM F3340-18 standard. Finalized and published in 2019, this procedure dictates that every pad is tested the same way: placed between a hot plate (simulating your body) and a cold plate (simulating the ground), with sensors measuring the energy required to keep the hot plate at a consistent temperature. The more energy required, the lower the pad’s insulating power.
The result of this test is the R-value. It is a simple, linear number representing thermal resistance. An R-value of 4 is twice as insulating as an R-value of 2. This standardization is the single most important tool a consumer has. However, a common misunderstanding is treating R-value as a direct correlation to a specific temperature. It’s not. It is purely a measure of insulation. A higher R-value means better insulation, which allows your sleep system to perform better in colder temperatures. Generally, an R-value of 1-2 is for summer use, 3-4 for 3-season use, and 5+ for winter camping. But remember, this is a measure of the pad’s potential, which can be affected by real-world use.
Closed-cell foam vs Inflatable: Which is indestructible?
When selecting a sleeping pad, the two dominant technologies are closed-cell foam and inflatable air pads. The choice between them represents a fundamental trade-off between durability, comfort, and packability. From a pure physics perspective, both aim to achieve the same goal—trapping air to slow conductive heat transfer—but they do so in vastly different ways, leading to a significant divergence in their indestructibility.
The undisputed champion of durability is the closed-cell foam pad. These pads are essentially solid sheets of foam filled with tiny, sealed air bubbles. Their construction is their greatest strength. There is nothing to inflate or deflate, and therefore, nothing to puncture or leak. They can be torn, gouged, or abraded without any loss of insulating performance. As Elizabeth Nguyen, a sales lead at REI, notes, this makes them exceptionally reliable:
Closed-cell sleeping pads are versatile, lightweight and very durable. They don’t get damaged easily. It’s a solid piece of foam, so you don’t have to worry about it deflating or needing a major repair if it punctures.
– Elizabeth Nguyen, REI sales lead, Closed-Cell vs. Self-Inflating Sleeping Pads: Which Is Right for You?
In contrast, inflatable pads offer superior comfort and packability at the cost of durability. By using air as their primary structure, they can be much thicker, conforming better to the body, and can be packed down to a fraction of the size of a foam pad. However, their reliance on an airtight membrane makes them inherently vulnerable to punctures from sharp rocks, thorns, or even embers. While field repairs are possible, a catastrophic failure can leave you with no insulation at all. Therefore, while no pad is truly « indestructible, » the closed-cell foam pad comes as close as possible, offering absolute peace of mind at the expense of comfort and bulk.
When to inflate: Adjusting pressure before sleep vs during the day
The performance of an inflatable sleeping pad is not a static property; it’s a dynamic variable that is directly influenced by user behavior, particularly the inflation level. A common mistake is to inflate a pad to maximum firmness during the day and leave it. However, the ideal pressure for thermal performance is often at odds with the ideal pressure for comfort, and both are affected by changes in ambient temperature. Mastering pad pressure is an advanced skill that unlocks your gear’s full potential.
The physics at play are governed by the Ideal Gas Law (PV=nRT). As the temperature drops in the evening, the air inside your pad cools and contracts, causing the pressure to decrease. A pad that felt firm in the warm afternoon sun will become softer and less supportive after sunset. Therefore, the best practice is to perform the final inflation or « top-off » right before you get into your sleeping bag, when the air inside the pad is closer to the nighttime ambient temperature. This ensures you start the night with the correct volume of air for proper support and insulation.

Furthermore, there is a direct trade-off between comfort and warmth. Many campers let some air out for a softer, more comfortable sleep surface. While this may feel better on hips and shoulders, it can have a disastrous effect on insulation. As an analysis from the Backpacking Light community highlights, this can lower the effective R-value. By allowing your body to sink deeper into the pad, you compress the internal baffles and reduce the distance between your body and the cold ground, creating a colder sleep. The rated R-value is achieved at full inflation; any reduction in pressure compromises that rating.
Why temperature ratings are survival limits, not comfort guarantees?
The temperature rating on a sleeping bag is perhaps the most misunderstood number in outdoor gear. Campers often see a « 30°F » rating and assume it guarantees a comfortable night’s sleep at that temperature. This is a dangerous misconception. The standardized test for sleeping bags (ISO 23537, formerly EN 13537) defines ratings based on what an « average » person can endure without dangerous levels of heat loss. The « Lower Limit » rating is the temperature at which a standard man can sleep for eight hours without waking due to cold, but it is not a promise of comfort. It is closer to a survival metric.
More importantly, this test is not conducted in a vacuum. It is a system test, and the sleeping pad is a non-negotiable part of that system. As ATEPA Outdoors’ technical documentation explains, the industry testing reveals that all sleeping bag temperature ratings are determined using a standardized sleeping pad with an R-value of approximately 4.8. This is a crucial piece of information. It means the bag’s advertised performance is entirely dependent on you using a pad with a similar level of insulation.
If you pair your expensive 30°F bag with a cheap, uninsulated pad with an R-value of 1.3, you have fundamentally broken the test protocol. The system’s integrity is compromised. Your body will lose an immense amount of heat to the ground via conduction, and the sleeping bag will be unable to compensate. The warmth it was designed to trap will be continuously drained away from beneath you. The consequences are significant; the same ATEPA paper claims that using a low R-value pad could effectively slash 10°F (6°C) or more from your sleeping bag’s performance. Your 30°F bag now performs like a 40°F bag, all because of an inadequate foundation.
How to keep your butt warm without a slipping pad?
You’ve selected the right R-value and paired it perfectly with your sleeping bag. Yet, you wake up in the middle of the night cold, only to find you’ve slid halfway off your pad. This frustratingly common problem, often caused by the slick nylon-on-nylon interface between your bag and pad, completely undermines your entire sleep system. When any part of your body, particularly the high-pressure areas of your hips and shoulders, comes off the pad, you create an uninsulated thermal bridge directly to the cold tent floor. All your careful gear selection is rendered useless.
Preventing this « midnight slide » is crucial for maintaining the thermal barrier you’ve built. The first line of defense is site selection. Always try to pitch your tent on the flattest ground possible. Even a slight, imperceptible slope can be enough to cause you to migrate downhill over several hours. If you must camp on a slope, orient your body so your head is on the uphill side. This is not only more comfortable but also uses gravity to keep you pressed against the head of your tent rather than sliding down.
If flat ground isn’t an option, you can turn to gear-based solutions. Many modern sleeping pads and bags are designed with « pad straps » or « sleeves » to integrate the two pieces of gear into a single unit. If your gear lacks these features, you can create your own friction. A few lines or dots of silicone seam sealer applied to the top of your sleeping pad can create a surprisingly effective non-slip surface once cured. This adds negligible weight and can dramatically increase the friction between your pad and bag, anchoring you in place. Finally, placing spare clothing or your empty backpack under your knees can create a physical barrier that helps prevent your lower body from sliding down.
Key takeaways
- Conductive heat loss to the ground is the primary reason you feel cold, not air temperature.
- Your sleeping bag’s temperature rating is only valid when used with a sleeping pad of a sufficiently high R-value (around R-4.8 for the test standard).
- The ASTM R-value standard is the only reliable way to compare pad insulation across brands; a higher number is always more insulating.
Sleeping Bags: How to Stay Warm When the Temp Drops Below Rating?
Even with a perfectly matched pad and bag, you may encounter conditions that push your sleep system to its absolute limit. When the temperature unexpectedly plummets below your bag’s comfort rating, staying warm is no longer about a single piece of gear, but about system-wide optimization. Rather than simply accepting a cold night, you can actively « boost » your system’s performance by applying a few key thermal principles. This is where you move from being a passive user of gear to an active manager of your thermal environment.
The most effective strategy is to increase your total R-value. Since R-values are additive, you can significantly boost your insulation by layering pads. Placing a cheap, indestructible closed-cell foam pad underneath your primary inflatable pad can add an R-value of 1 to 2.5 to your system. This not only provides a massive thermal boost but also adds redundancy in case your inflatable pad fails. This simple combination is a go-to strategy for experienced winter campers and mountaineers.
Beyond the pad, focus on what’s inside the bag with you. Ensure you are wearing a dry set of base layers and socks to bed; any moisture in your clothing will suck heat from your body as it evaporates. Wearing a warm beanie is also critical, as you can lose a significant amount of heat through your head. A classic trick is to fill a hard-sided water bottle with hot (not boiling) water, ensure it’s sealed tightly, and place it in your sleeping bag near your core or feet. This acts as a personal radiator, providing active heating for several hours as it slowly cools. By thinking of your pad, bag, clothing, and accessories as one integrated system, you can effectively and safely push its performance far beyond its nominal ratings.
Stop blaming your sleeping bag for cold nights. The first step to a warmer camping experience is to re-evaluate your entire sleep system, starting with its foundation. Apply these thermal principles, prioritize your pad’s R-value, and take control of the physics that dictate your comfort in the wild.