In summary:
- Effective packing is less about total weight and more about strategic placement; keeping mass low and central is critical to preserving your MTB’s handling.
- Mastering tubeless tire plug repair is a non-negotiable trailside skill that transforms a trip-ending puncture into a minor delay.
- A single, high-quality multi-tool with a chain breaker and a spare quick-link provides more real-world value than a heavy, redundant toolkit.
- Intelligent route planning involves using topographic maps and satellite imagery to identify unrideable terrain and reliable water sources before you’re committed.
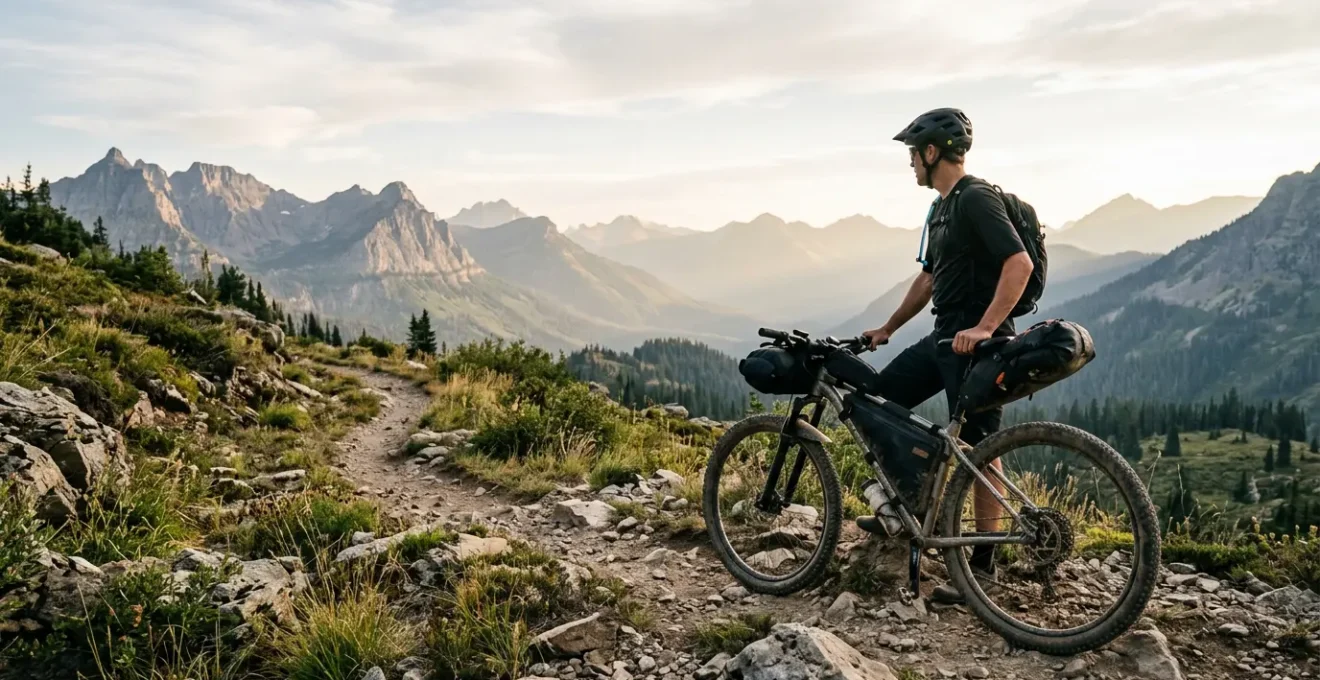
The allure of bikepacking is the promise of freedom: your mountain bike, loaded with everything you need, disappearing over the horizon. But for many riders making the leap from day trips to multi-day epics, that promise is overshadowed by a nagging fear. The fear of an overloaded, unwieldy bike that handles like a shopping cart on descents, and the cold dread of a mechanical failure miles from the nearest road. The common advice is often generic: « pack light » and « distribute weight evenly. » While true, this misses the fundamental point.
True self-sufficiency on the trail isn’t born from a packing list, but from a mechanic’s mindset. It’s about developing a sense of mechanical empathy—understanding how every item you strap to your bike impacts its performance, its balance, and its potential failure points. It’s about shifting the focus from simply carrying gear to creating an integrated, reliable system where your bike, your bags, and your repair kit work in harmony. This isn’t just about avoiding a bad time; it’s about preserving the very reason you ride an MTB in the first place: its agility, responsiveness, and fun factor.
Forget the vague platitudes. This guide is built on the practical, engineering principles that govern your bike. We will dissect the physics of weight distribution, provide a masterclass in critical trailside repairs, and apply a minimalist’s logic to tool selection. By the end, you won’t just know what to pack; you’ll understand *why* each choice matters, giving you the confidence to build a setup that is light, capable, and resilient.
To navigate this deep dive into bikepacking mastery, we’ve structured this guide to address the most critical mechanical and logistical challenges you’ll face. The following sections provide a clear roadmap from fundamental principles to advanced trailside problem-solving.
Summary: The Mechanic’s Guide to Packing, Balance, and Trailside Repairs
- Why weight distribution affects your handling on descents?
- How to fix a tubeless puncture in the middle of nowhere?
- The route planning mistake that leads to unrideable cliffs
- Handlebar bag vs Seat pack: Which impacts balance less?
- When to lube your chain: The daily maintenance ritual
- Why soft steel blades dull after cutting one rope?
- How to read a topographical map to find water sources?
- The One-Tool Rule: Why a 15-Function Multi-Tool Beats a Heavy Toolbox?
Why weight distribution affects your handling on descents?
Weight distribution directly impacts your bike’s center of gravity, and on a descent, that becomes the single most important factor in your bike’s handling. A high center of gravity, created by stacking gear high on a rear rack or in a tall seat pack, acts like a pendulum. It wants to keep moving in a straight line, fighting your attempts to lean the bike into a corner. This creates a top-heavy, « tippy » sensation and requires significantly more energy to initiate turns, making the bike feel sluggish and unpredictable when you need it to be most agile.
Conversely, keeping weight low and centered—primarily within the frame triangle and in low-slung fork bags—maintains a center of gravity that is closer to the bike’s own. This is the essence of dynamic load management. The bike and its load move as a single, cohesive unit, allowing you to lean it, flick it through corners, and maintain control over technical terrain without fighting against a delayed, swinging mass. The goal is to make the loaded bike feel like a slightly heavier version of your unloaded bike, not like a completely different machine. This principle is not just theory; bikepacking equipment research confirms that mounting gear lower and closer to the axles results in a more confidence-inspiring and performant ride quality compared to traditional high-mounted bag setups.
Think of it from a leverage perspective. Weight placed high and far from the bike’s pivot points (the wheel axles) exerts more force on your steering and balance inputs. By minimizing this leverage, you minimize the effort required to control the bike, saving energy and boosting confidence on challenging descents where precision is paramount.
How to fix a tubeless puncture in the middle of nowhere?
The hiss of escaping air and the sight of sealant spraying from your tire is a heart-sinking moment for any rider, but in a remote setting, it can feel like a trip-ending disaster. The key to turning this crisis into a minor inconvenience is mastering the tubeless plug. This is the first line of defense and the most common major trailside repair you’ll face. The process is a form of trailside triage: quickly assess the damage and apply the fastest, most effective fix to get rolling again.
The basic procedure involves finding the hole, using the plug tool’s reamer to clean and slightly enlarge it, then forcefully inserting a sticky, rubberized plug (often called a « bacon strip ») into the opening, leaving a portion sticking out on both the inside and outside of the tire. The sealant inside the tire then interacts with the plug to create an airtight seal. The image below shows this critical moment of insertion.
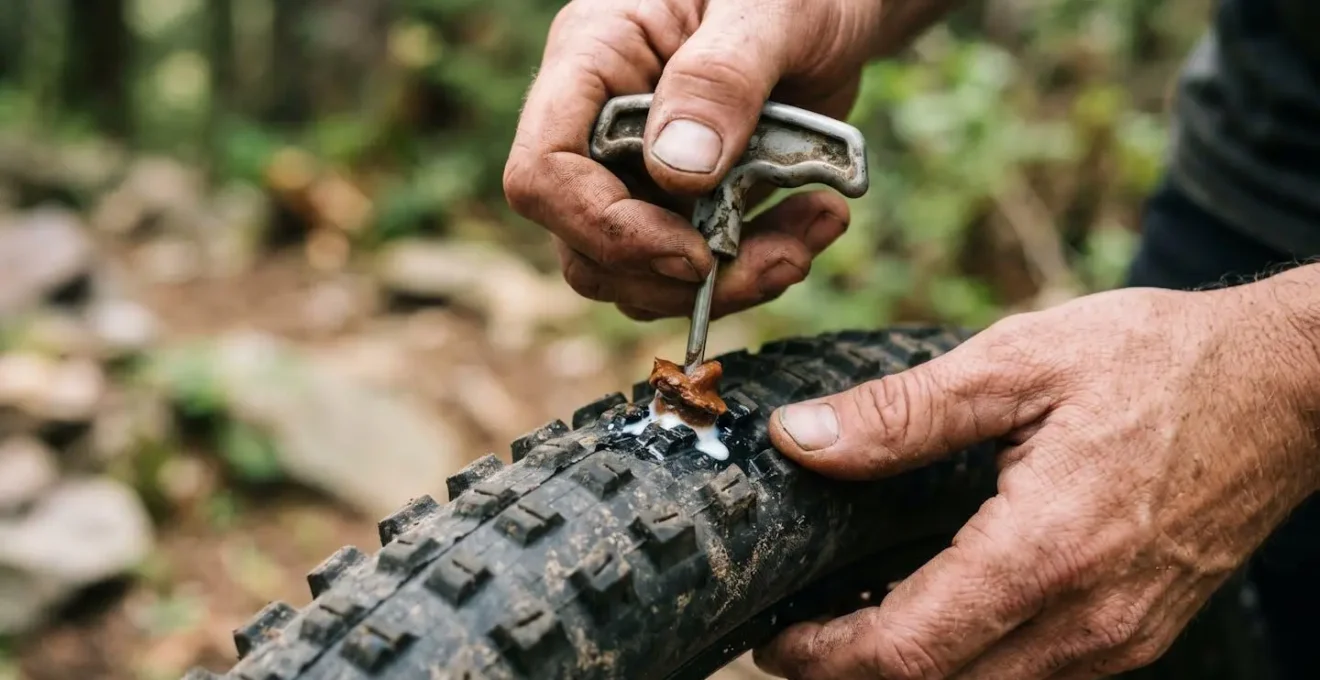
However, not all punctures—or plugs—are created equal. The type of hole (a clean puncture versus a jagged tear) and your specific plug system will dictate the best approach. A mechanic’s knowledge lies in understanding the options before you even hit the trail, as shown in the table below.
This comparative data, based on a comprehensive guide to tubeless repair, highlights that different technologies are optimized for different failure scenarios. Having the right tool for the job is half the battle.
| Plug Type | Best For | Puncture Size | Installation Method | Price Range |
|---|---|---|---|---|
| Bacon Strips (Standard) | Small round holes and linear cuts | Up to 5mm | Fork-style applicator, twist to ream hole, insert plug halfway | $6-$10 |
| Dynaplug System | Quick repairs, small punctures | Up to 4mm | Hollow insertion tube with preloaded plug, brass-tipped plug with rubber-impregnated cord | $30-$50 |
| Oversized Plugs (Lezyne) | Larger holes and tears | Up to 10mm | Oversized fork and double-size plugs for bigger damage | $20-$25 |
| Stan’s DART | Permanent repair with sealant | Up to 6mm | Hackle material creates chemical reaction with sealant for airtight bond | $15-$20 |
Ultimately, the best tool is the one you’ve practiced with. Spend an afternoon in your workshop sacrificing an old tire. Practice inserting different plugs until the motion is second nature. When you’re cold, tired, and being eaten by mosquitos, muscle memory is your most reliable asset.
The route planning mistake that leads to unrideable cliffs
The single most dangerous route-planning mistake is blindly trusting a single digital map layer without cross-referencing it with topographic data. A line on a map that looks like a trail can, in reality, be a « hike-a-bike » scramble up a 45-degree scree field or, worse, lead you directly to the edge of an unrideable cliff. The error lies in ignoring the language of the landscape: topographic contour lines. These lines are your most reliable guide to the steepness of the terrain.
Widely spaced contour lines indicate a gentle, rideable slope. As they get closer together, the gradient increases. When contour lines merge into a single, thick band, you are looking at a vertical or near-vertical drop—a cliff. Relying solely on a satellite view or a standard trail map can be deceptive, as tree cover can obscure the true nature of the terrain. Proper failure point analysis during planning means identifying these potential hazards from the comfort of your home, not when you’re precariously balanced on a precipice with a loaded bike.
To avoid this catastrophic error, you must adopt a multi-layered reconnaissance protocol. This isn’t just about finding a path; it’s about verifying its viability and planning for contingencies. A robust planning process is your first and most important piece of safety equipment.
Your Digital Reconnaissance Checklist for Route Planning
- Study Contour Lines: Identify sections where topographic contour lines are tightly packed or merge. These are your primary red flags for unrideable terrain that require further investigation.
- Cross-Reference Map Layers: Toggle between satellite imagery, OpenStreetMap (OSM), and official topographic maps (like USGS Topo). A « trail » on one may be an overgrown path or non-existent on another.
- Employ 3D Visualization: Use the 3D view in tools like Google Earth to visually inspect any questionable sections identified on 2D maps. This gives you a real-world sense of the gradient.
- Mark Bail-Out Points: Before you finalize the route, identify and mark potential escape routes—major road crossings, towns, or other points where you can safely exit the trail if conditions are worse than expected.
- Plan Resources Around Exits: Your water and food strategy should be based on the distance between reliable resupply points and your marked bail-out options, ensuring you always have enough to reach safety.
This meticulous approach transforms route planning from a simple exercise in connecting dots to a strategic process of risk mitigation. It’s the difference between a successful adventure and a potential survival situation.
Handlebar bag vs Seat pack: Which impacts balance less?
Both handlebar bags and seat packs impact balance, but they do so in fundamentally different ways. A handlebar bag directly affects steering dynamics, while a large seat pack alters the bike’s overall weight bias and can interfere with critical components. From a pure physics standpoint, weight on the handlebars has a more pronounced effect on handling feel, as it adds inertia directly to the steering axis. Even a small amount of weight makes the front end feel « floppy » at low speeds and resistant to quick directional changes.
For this reason, most guidelines recommend a strict limit on front-loaded weight. For example, some mountain bike bikepacking guidelines suggest a maximum of 5 lbs (2.3 kg) on the handlebars to maintain predictable steering, though modern slack head angles can tolerate a little more. A seat pack, on the other hand, places weight high and to the rear, which primarily affects fore-aft balance during steep climbs and descents. However, for a mountain biker, the seat pack presents a far more significant mechanical challenge: dropper post compatibility.
Case Study: The Dropper Post Compatibility Challenge
For modern trail riding, a dropper seatpost is non-negotiable. It’s essential for maintaining a low center of gravity on descents. A traditional, large bikepacking seat pack that straps to the seatpost and saddle rails renders a dropper post useless. This forces a difficult compromise between carrying capacity and bike performance. The solution has come from innovative, dropper-compatible seat packs (typically under 10 liters). These designs use specialized clamps or harnesses that attach to the fixed lower portion of the dropper stanchion, preserving crucial travel. An alternative strategy that emerged is to bypass the seat pack entirely. By combining fork-mounted cages and a larger frame bag, riders can distribute weight away from both the handlebars and the seatpost. This « third way » preserves the bike’s intended handling and full dropper functionality, offering superior control on technical terrain compared to conventional setups.
In summary, while a handlebar bag has a more direct impact on steering feel, the mechanical interference of a large seat pack with a dropper post often poses a greater threat to the performance of a modern mountain bike. The ideal solution is often a hybrid approach: a small, light handlebar bag for essentials, a dropper-compatible seat pack, and maximizing the use of the frame triangle and fork mounts to keep the center of gravity low and bike functions unimpeded.
When to lube your chain: The daily maintenance ritual
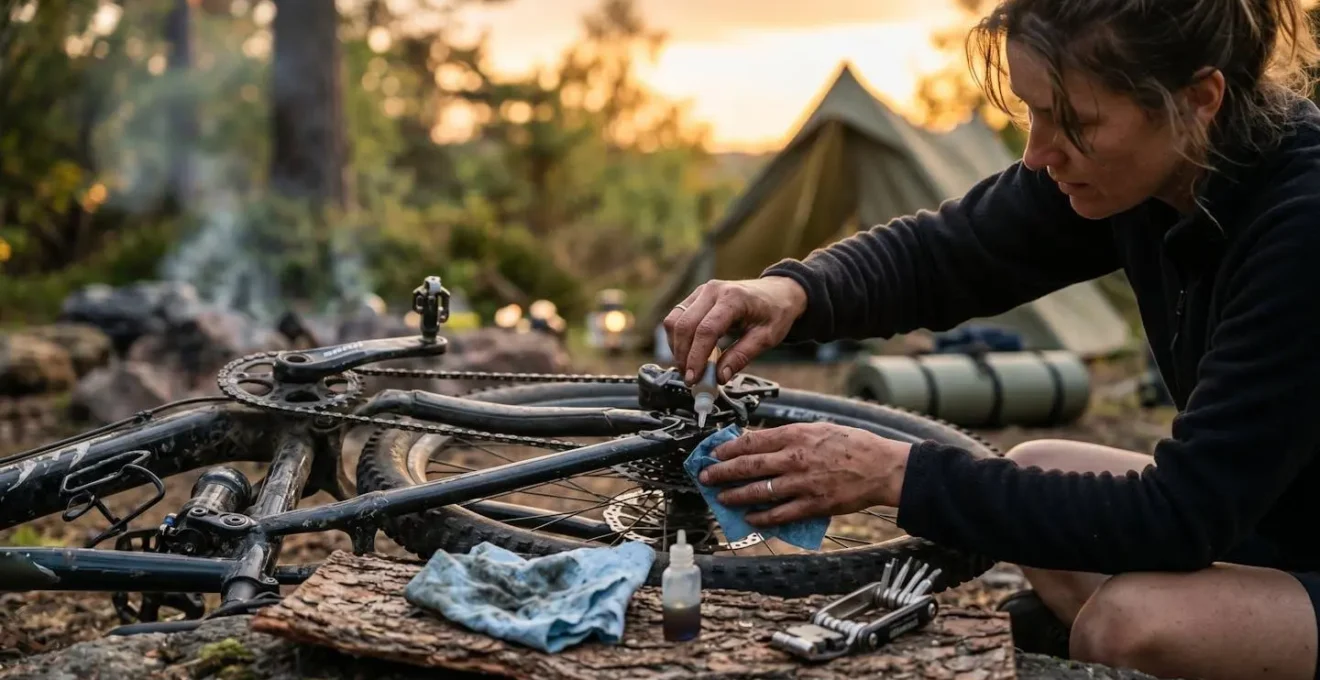
The correct time to lube your chain is at the end of a long day’s ride, not at the beginning of the next one. This might seem counter-intuitive, but it’s based on sound mechanical principles. Applying fresh lubricant to a chain caked in the day’s dirt, dust, and grime does not help; it creates a highly effective grinding paste. This abrasive slurry dramatically accelerates wear on your entire drivetrain—chainrings, cassette, and pulley wheels—which are expensive and difficult to replace in the field.
The proper ritual is simple: at the end of the day, before you settle into your camp chair, take two minutes for your bike. First, use a dry rag to thoroughly wipe down the chain, removing as much surface grit as possible. Only then should you apply a single drop of the appropriate lube to each roller. Let it sit overnight. This allows the lubricant’s carrier to evaporate, leaving the protective lubricating film to penetrate deep into the rollers and pins where it’s needed most. In the morning, a final quick wipe of the chain’s outer plates removes any excess lube that would otherwise attract new dirt.
This end-of-day check-in is about more than just the chain. It’s an opportunity to ensure the systemic reliability of your bike for the following day. It’s a moment to connect with your machine, inspect it for potential issues, and build the confidence that it’s ready for another hard day on the trail. This simple, meditative process can be the difference between a smooth ride and a long walk.
To formalize this process, adopt a quick 5-minute health check as part of your daily camping routine:
- Wipe and Lube Chain: Clean off grit with a rag *before* applying fresh, condition-appropriate lube (wet for wet, dry for dry).
- Check Key Bolts: Give a quick check to suspension pivot bolts, stem bolts, and cockpit controls. Vibration can loosen critical fasteners.
- Inspect Brakes: Visually check your brake pads for wear and glance down the rotor to ensure it’s still running true.
- Check Tire Pressure: Verify your tire pressure is appropriate for the next day’s terrain. A quick squeeze is better than nothing.
- Listen for Creaks: As you perform these checks, listen for any new noises. A creak is your bike’s way of telling you something is wrong before it fails completely.
Why soft steel blades dull after cutting one rope?
A soft steel blade dulling after cutting a single rope is a classic example of mismatched materials and a misunderstanding of what « sharp » means at a microscopic level. The ability of a blade to hold an edge, known as edge retention, is almost entirely dependent on the steel’s hardness and composition. Soft steel, typically low-carbon steel that hasn’t been properly heat-treated, lacks the internal structure to resist deformation and abrasion.
Think of the cutting edge not as a perfect line, but as a microscopic saw-tooth profile. In high-quality, hard steel, this edge is supported by microscopic crystals called carbides, which are incredibly hard and wear-resistant. Soft steel lacks these hard carbides. When you force this soft edge against a material like rope, you’re not just slicing; you’re creating immense friction and pressure on that tiny, unsupported edge. The fibers of the rope, especially if they contain any embedded dirt or dust, act like a fine-grit abrasive.
The result is that the microscopic edge of the soft blade literally rolls over, deforms, or is abraded away in a single pass. It’s like trying to cut sandpaper with a blade made of hard wax. It might work for one cut, but the blade’s geometry is destroyed in the process. A quality multi-tool knife blade is made from hardened steel specifically so its microscopic edge can withstand this abuse over hundreds of cuts. This is why investing in a tool with quality steel isn’t a luxury; it’s a fundamental requirement for a tool to be reliable when you need it most.
How to read a topographical map to find water sources?
Finding water in the backcountry requires reading the land, not just the map. While solid blue lines are a great starting point, they only indicate perennial (year-round) streams or rivers. Relying on them alone is a gamble, as they can be seasonal or run dry. The real skill is using the map’s contour lines to identify landforms where water is likely to collect, even without a marked stream. This is a critical part of your pre-trip failure point analysis, ensuring you have a primary and secondary water plan.
Your first clue is in the V-shape of the contour lines. Contour lines form a « V » shape when they cross a gully, drainage, or valley. The point of the « V » always points uphill, toward the higher elevation. These gullies, also called re-entrants, are natural channels for water. Even if a stream isn’t marked, these are the most likely places to find springs or pooled water, especially after recent rain. By combining this topographic knowledge with satellite imagery, you can dramatically increase your chances of finding a viable source.
However, a source on a map is not a guarantee of water in your bottle. Seasonality plays a huge role. In fact, research from the Adventure Cycling Association shows that many creeks, lakes, and reservoirs shown on maps can run completely dry in the late summer and fall. You must build redundancy into your water strategy.
- Look for Converging Contours: Identify « V » shaped re-entrants and gullies where contour lines bunch together. These are natural water channels.
- Check Satellite for Vegetation: On satellite imagery, look for unusually dense or green patches of vegetation in these gullies or in otherwise arid terrain. Greenery requires water.
- Distinguish Stream Types: Understand the map’s legend. A solid blue line (perennial) is more reliable than a dashed or dotted blue line (intermittent/seasonal).
- Consider Seasonal Factors: Be extra cautious when planning trips in late summer or fall. Assume that smaller, intermittent sources will be dry and plan accordingly.
- Carry Extra Capacity: Always plan for a source to be dry. Carry enough water capacity to push to your next *reliable* source, or carry a high-quality filter you trust to treat water from more questionable pools.
Reading a map for water is less about finding blue lines and more about predicting where water *should be* based on the shape of the earth. It’s a skill that combines map-reading with an understanding of the local environment.
Key takeaways
- Weight distribution is about control, not just capacity. Keeping weight low and central within the frame is non-negotiable for preserving your MTB’s handling.
- A trailside failure is only a catastrophe if you are unprepared. Mastering tubeless plug repair and carrying a chain tool are essential, learnable skills.
- Your most powerful tool is foresight. Analyze your route for unrideable cliffs and unreliable water sources before you even touch your bike.
The One-Tool Rule: Why a 15-Function Multi-Tool Beats a Heavy Toolbox?
The « One-Tool Rule » is a philosophy, not a literal limit. It’s the principle that a single, high-quality, well-chosen multi-tool that solves 80% of potential mechanicals is infinitely more valuable than a heavy, disorganized toolbox full of redundant or useless items. From a mechanic’s perspective, bikepacking is an exercise in efficiency. You aren’t carrying tools for every possibility; you are carrying tools for the most *probable* failures. This is the 80/20 rule of trailside mechanics.
Experience and data show that the vast majority of trip-ending mechanicals fall into two categories: punctures and broken chains. After that come loose fasteners and bent derailleur hangers. Therefore, your primary tool must be built around solving these core problems. A multi-tool without a robust chain breaker is a toy. A repair kit without a tubeless plug tool is a liability. Your entire toolkit should be an ecosystem built around your main multi-tool, supplementing it with items it can’t possibly include, like a pump, tire levers, and consumables like zip ties and quick-links.
Building your minimalist-but-effective kit requires prioritizing failures by probability:
- Priority 1: Puncture Repair: This is the most common issue. Your kit must include a tubeless plug tool, spare plugs, a spare tube (for catastrophic tire failure), tire levers, and a reliable pump or CO2 inflator.
- Priority 2: Chain Repair: The second most common show-stopper. Your multi-tool must have a chain breaker, and you must carry at least one spare quick-link compatible with your chain.
- Priority 3: Fastener Adjustment: Your multi-tool needs to have the correct size hex (Allen) and Torx keys for your bike’s specific components (stem, pivots, axles, etc.).
- Priority 4: Derailleur Hanger: A bent or broken derailleur hanger is a common end to a trip. A spare, specific to your bike frame, weighs almost nothing and can save your ride.
- Priority 5: Consumables & Specialized Items: This category includes items the multi-tool cannot replicate: zip ties (for everything), a valve core remover, a small bottle of chain lube, and perhaps a spoke wrench.
By building your kit with this logic, you move away from a « what if » mentality to a calculated, probability-based approach. You carry exactly what you need for the most likely problems, saving weight and complexity while increasing your actual on-trail capability.
Stop worrying about ‘what ifs’ and start building a reliable system. Pack with mechanical empathy, plan with foresight, and hit the trail with the confidence that you can handle what it throws at you. Your next adventure is waiting.